This post contains affiliate links. Please see our disclosure policy.

In order to bake sourdough bread successfully, you need to create your own sourdough starter, a bubbly best friend if you will. Here you’ll find easy step by step instructions for making a sourdough starter from scratch. You’ll find notes on what to do each day, as well as the type of flour to use and a handy troubleshooting guide – all essential for making a sourdough starter.
You can find my step by step instructions for how to make a sourdough starter (including a video) in the recipe card at the end of this post.
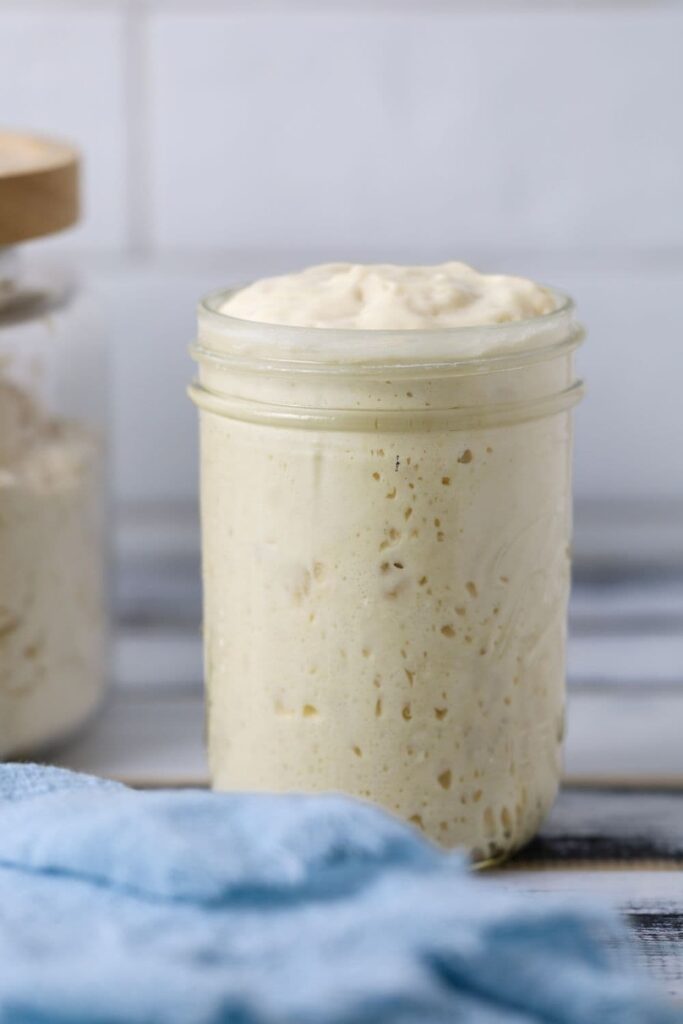
Table of Contents
- What Is A Sourdough Starter?
- What Equipment Will You Need?
- How Long Does It Actually Take?
- What Flour Should I Use to Make Sourdough Starter?
- How To Make a Sourdough Starter
- Tips For Success
- Troubleshooting Your Sourdough Starter
- What To Do If Your Sourdough Starter Isn’t Ready to Bake With:
- Why Does Hydration Matter?
- Maintaining A Sourdough Starter
- How To Make Sure You Never Have to Start from Scratch
- Using A Digital Kitchen Scale
- What to Bake with Your Sourdough Starter
- Frequently Asked Questions
- Sourdough Starter Recipe
What Is A Sourdough Starter?
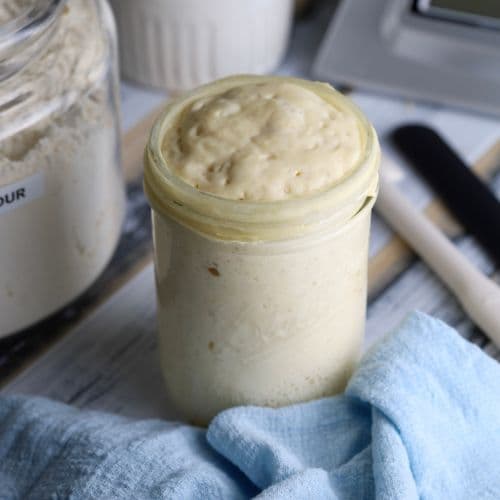
A sourdough starter is a mixture of flour and water which is colonised with wild yeast and bacteria over a period of time. The mixture is maintained at room temperature while it’s being established. Then it can be kept in the refrigerator once it’s considered mature. Active sourdough starter is used to bake sourdough bread.
The most amazing part is that every single sourdough starter will be unique in its own way because it is dependent on many environmental factors unique to your home and environment (in fact many baker’s have fun naming sourdough starter). Want to understand the science behind a sourdough starter, take a look at how a sourdough starter works. You might also find the history of a sourdough interesting.
What Equipment Will You Need?
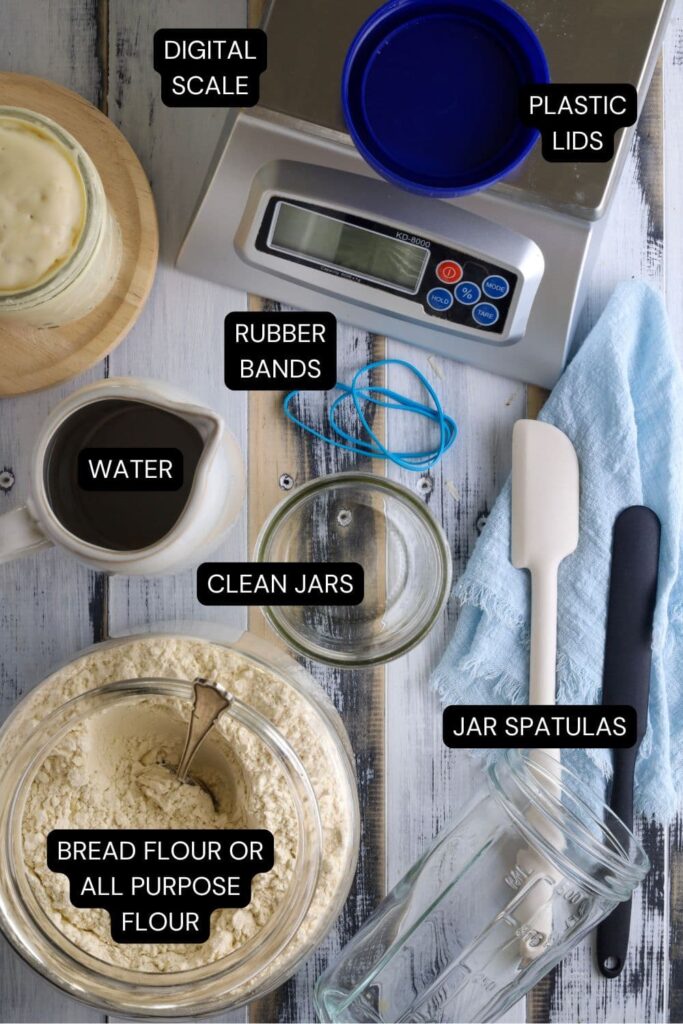
You don’t need any fancy equipment to make a sourdough starter, but you will need:
- Clean Glass Jars – I recommend having at least 2 jars on hand (I prefer 16oz mason jars). Check out the sourdough starter jars I recommend.
- Rubber Band – is really handy to place on your jar so you can check when and if your sourdough starter is doubling.
- Spatula or something to stir your sourdough starter with (a butter knife is a good stirring tool too)
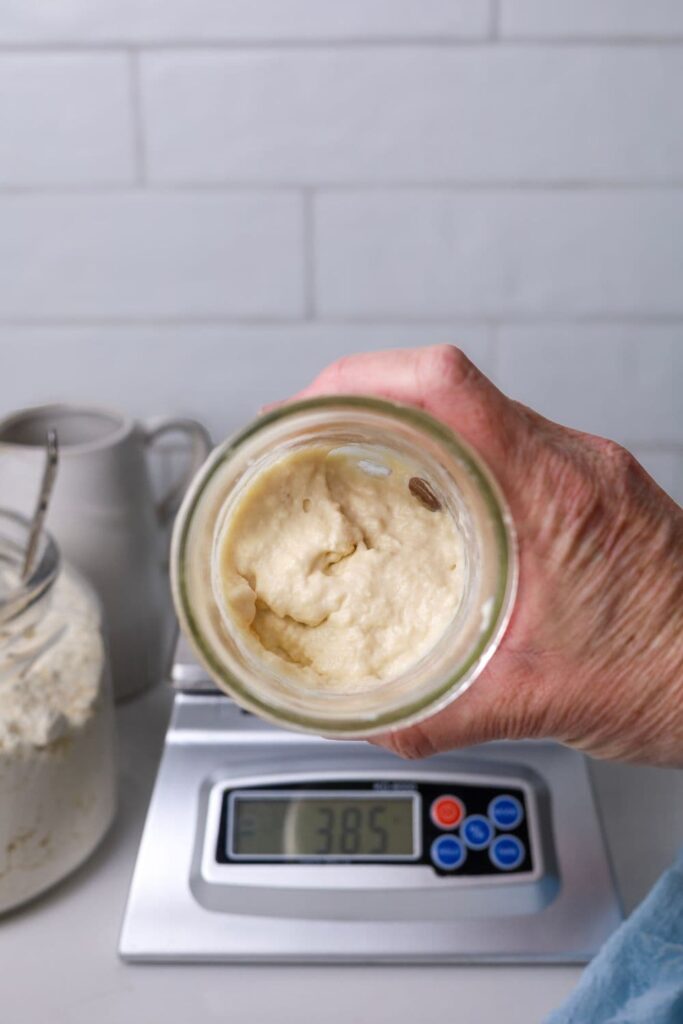
- Digital scale – this is essential for accurately measuring the flour and water for your sourdough starter.
- Flour – all purpose flour or bread flour is fine to use. Having some rye flour or whole wheat flour on hand to strengthen your sourdough starter is also a good idea.
- Water – good quality, clean water is essential to making a sourdough starter. Do not use distilled water or tap water full of chlorine (although filtered tap water is perfectly fine). If you’re not sure of the quality of your water, use bottled water.
How Long Does It Actually Take?
There’s no doubt, making a sourdough starter takes time and a lot of patience! While it generally only takes about 7 days to create a viable sourdough starter, it will usually need more time before it’s truly ready for baking. You can check out my guide to understand when your sourdough starter is ready to bake with. The float test isn’t always a reliable method to check your sourdough starter’s readiness for baking. Just because it floats, doesn’t mean it’s ready to bake sourdough bread with.
The exact timing depends on your home environment, particularly temperature and conditions. Don’t be discouraged, your starter can still be used, but you’ll notice your sourdough loaves improve as it continues to mature. Many bakers find their starter becomes reliably “active” after around 14 days, though for some it can take several months. This is totally ok.
In the meantime, you don’t have to let your discard go to waste. Try making sourdough pancakes, sourdough waffles or even a quick sourdough discard sandwich bread. Just keep in mind that your starter should be at least 7 days old before you begin using the discard to bake with.
What Flour Should I Use to Make Sourdough Starter?
You can really use any type of plain, non raising flour made from a grain that you like for this sourdough starter recipe. Do not use self raising flour or bleached flour of any kind.
I have successfully created sourdough starters with plain flour (all purpose flour), bread flour and wholemeal spelt flour. I’ve also milled my own whole wheat berries and started a super active starter from this freshly milled whole-grain flour
Your starter will gather yeast not only from the environment, but also from the bacteria on the flour. Whole flours will have more of the “good stuff” on them, so will generally take off sooner. Read more about where the yeast in sourdough starter comes from.
A little rye flour added to your plain or bread flour will often help to get your starter bubbling sooner. It’s like superfood for your sourdough starter!

How To Make a Sourdough Starter
Days 1-3
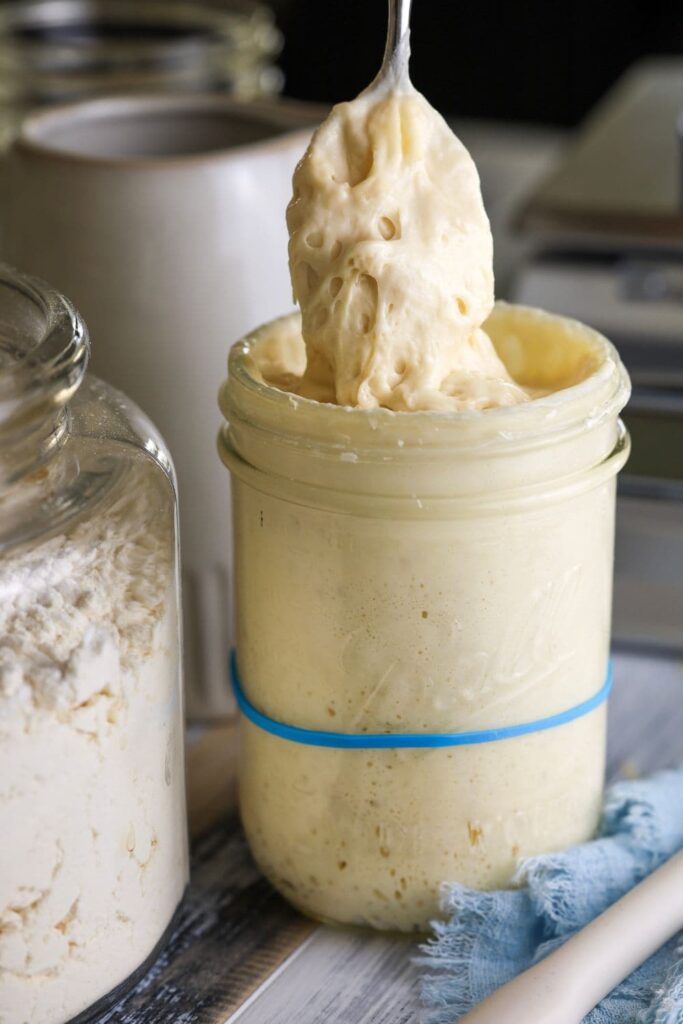
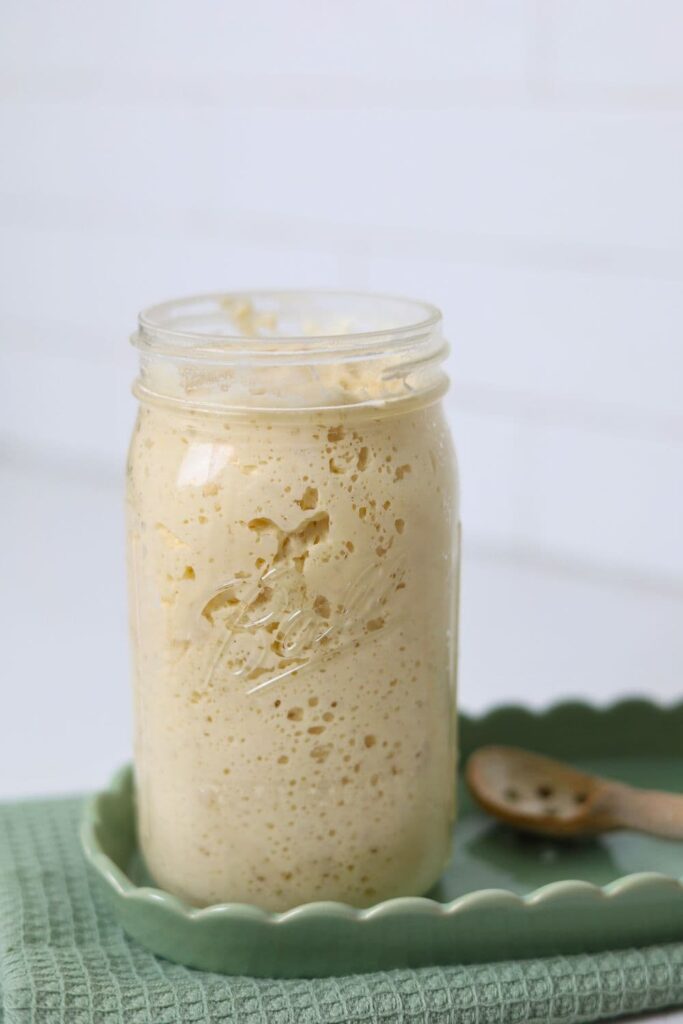
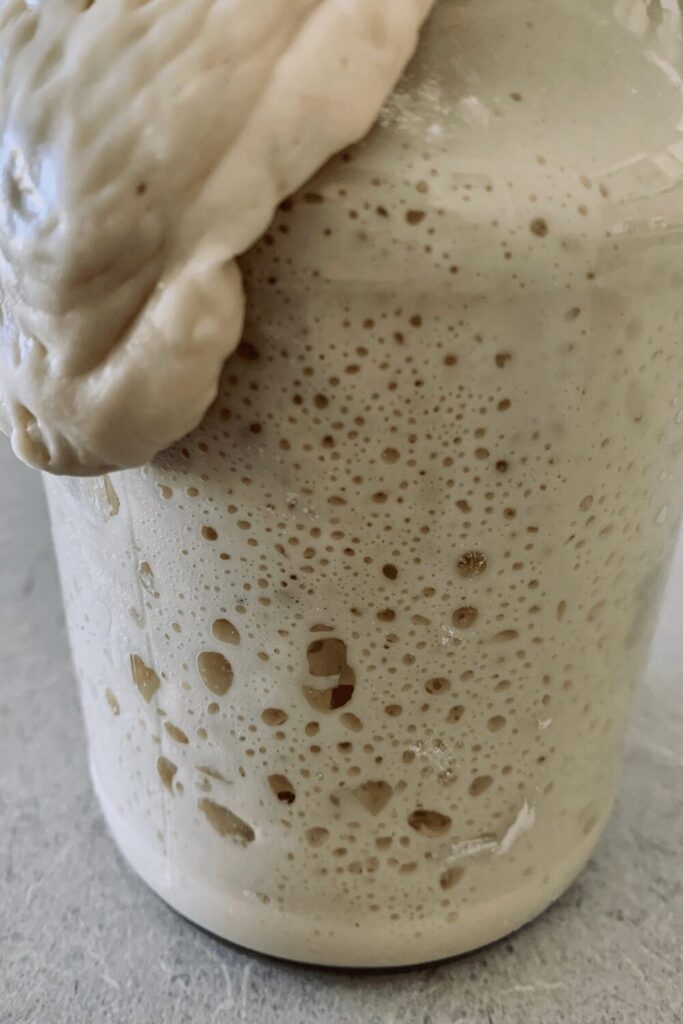
To create your sourdough starter, begin with 50g of flour and 50g of water in a clean jar on Day 1. Mix well, cover loosely, and leave it somewhere warm for 24 hours. On Day 2, simply stir the mixture to add oxygen, no extra flour or water needed. By Day 3, you’ll start a routine of discarding some of the starter and feeding the remainder with equal parts flour and water (50g each). This daily feeding encourages growth, bubbles, and even some interesting smells – completely normal signs that your starter is alive. If you notice a layer of liquid on top, called “hooch,” stir it back in when you feed.
Days 4-7
From Day 4 onward, your starter will need to be fed twice a day, around 12 hours apart. Continue discarding before each feed and watch as your starter becomes stronger, rising higher each time. By Day 5, you may want to mark your jar with an elastic band to track its growth. Keep this up through Day 6 and beyond. On Day 7, your starter will officially be a week old! While it may not be fully mature just yet, the key is consistency.
Keep feeding twice daily until it reliably doubles within 2–6 hours of a feeding. At that point, your starter will be strong enough to bake with. It will continue to improve as it matures over the coming weeks.
You will find a very detailed set of instructions for making a sourdough starter in the recipe card at the bottom of this post.
Kate’s Pro Tip
Tips For Success
Be patient! You won’t create magic overnight, but with time and patience, you will make a thriving sourdough starter.
Temperature is important. Try to keep your starter between 24-28C (75.2-82.4F) to encourage fermentation.
Use a scale. Skip the cups and spoons and measure your flour and water accurately to give your starter the best chance.
Troubleshooting Your Sourdough Starter
While you are growing or developing your sourdough starter, you may have some issues or questions that arise.
Here are the most common questions that I get asked about sourdough starters. You might also like this comprehensive list of the most common sourdough starter questions I get asked.
- Liquid forming in or on top of your starter – sometimes you may get some dark liquid forming on top of or in the middle of your starter. It’s called hooch and is perfectly normal (it’s actually a mixture of alcohol, water and byproducts of the fermentation process). Just pour it off if you can and feed as per normal (if you stir the hooch back in, you’ll make your sourdough starter hav ea much stronger flavor). You’ll find that your starter develops hooch when it is hungry. You can read about how to prevent hooch on sourdough starter.
- My starter smells like nail polish remover – again it’s perfectly normal, it’s just hungry, so feed, feed, feed.
- My starter isn’t bubbling like the first few days – sometimes starters start out strong and then taper off a little between days 3-7. It’s ok and may just be that the good bacteria is taking a little longer to win. Just keep feeding it consistently and you should see some action. Even if it’s not really doing anything, the yeast will still need to be fed.
- How do I keep my starter warm – it’s not totally essential to keep to keep your sourdough starter warm, it will still work. It will just take a lot longer in a colder environment. Some ideas to keep your starter warm are inside the oven with the light on, next to the kettle, inside an Eziyo yoghurt maker or in a cupboard next to your oven. Check out this guide to keeping your sourdough starter warm.
- Fruit Flies in my starter – your sourdough starter may attract fruit flies. They might have already been in your kitchen or they’ve heard there’s new food! You can eliminate fruit flies in your sourdough starter using this guide.
- Why is my sourdough starter forming a skin? – sometimes you’ll find that your sourdough starter develops a crust or skin. It’s totally ok and just means that it’s getting a bit too dry on top. Try covering your sourdough starter with a jar lid that’s not screwed on. Just scrape the skin off and feed as per normal.
- My starter has grown mold – if your starter develops anything pink or orange or furry, it’s definitely time to ditch it and start again. Make sure that your jar is clean, especially the sides of the jar. If the mold happens a few times, consider using a different flour as sometimes the mold spores come from the flour and not the environment. Believe it or not, my very first sourdough starter actually grew mold (I was heartbroken), but the experience made me stronger and allowed me to get a better understanding of how sourdough starter works.
- Can I feed my starter with different flour? – If you run out of the type of flour you started with, it’s ok to feed it with a different flour. If you just feed it once and then go back to the type you started with you shouldn’t have any issues. If you are swapping the type of flour for all subsequent feeds then your starter may go through an adjustment stage as the levels of bacteria and yeast get used to their new food.
- Can I cook with my discard straight way – no, you need to wait at least 7 days before you use your sourdough discard. It’s not recommended to keep your sourdough discard before this time. When you’re ready to start using your discard, you can use some of these sourdough discard recipes.
- What water to feed my sourdough starter with? – water quality is extremely important to a sourdough starter. You should avoid many types of water including distilled and reverse osmosis. You can read this full guide to the water you should use for your starter.
What To Do If Your Sourdough Starter Isn’t Ready to Bake With:
- Continue to feed your starter with fresh flour and water twice a day for a few days until its consistently rising and falling. Remember that every starter will be different. It could take 14 days, it could take 28 days, but a consistent feeding schedule is key.
- If you need a break pop it in the fridge for a few days. When you’re ready, take it out and start feeding it twice a day again for a few days. I generally don’t recommend keeping an immature starter in the fridge, however if you need a break or you’re going away, this is an option.
- Try feeding your starter a different type of flour for a few feeds. Unbleached is best. Rye flour is always a good one – it’s like superfood to your sourdough starter.
- If you live in a cooler climate you might only need to feed once a day. Check to see when your starter is actually hungry (it will fall and be smelly).
Why Does Hydration Matter?
The instructions for this sourdough starter use equal amounts of flour and water to achieve a 100% hydration level for your starter. Majority of recipes (and all of my recipes) use a 100% hydration starter. If you need guidance on understanding hydration more, take a look at my guide to sourdough hydration for beginners.
As long as you always feed your starter equal amounts of flour and water, it will be at 100%. Even if you only have 20g of starter, and you feed it 50g of water and 50g of flour, you’ll still have a 100% hydration starter.
When you are feeding your starter, you just need to make sure you always feed it more than it weighs itself. For example if you have 50g of starter in your jar, you’d want to feed it at least 50g of water and 50g of flour (a total of 100g) to make sure it has enough food.
Generally, the rule is 1:1:1 so 1 part starter, 1 part flour, 1 part water. But as long as you feed the starter more than it weighs, it will thrive. This is called a sourdough starter ratio. A lot of the time when a sourdough starter isn’t doubling consistently, it’s because it’s not being fed enough. Always remember the 1:1:1 ratio.
A pasta madre is a good option if you want to build a lower hydration sourdough starter.
Maintaining A Sourdough Starter
Once you have a thriving sourdough starter established, you’ll need to continue to feed your sourdough starter regularly to ensure it remains healthy and active.
There are lots of ways to feed a sourdough starter and I always get asked what the best way to do it is (especially when using a clean jar every time).
If you’d like to put your starter into a clean jar each time, then the easiest way to do it is to take 50g of your sourdough starter and place this into a clean jar. Feed the 50g of starter in the clean jar as normal (ie 50g of flour and 50g of water or whatever sourdough starter ratio you prefer). Creating less mess with your sourdough starter is always a good thing.
You could also use a bowl to pour the 50g of starter into and feed it and mix it in the bowl while cleaning your jar so you can pour it back in. This is a good method if you only have one jar to use.
You can either use the discard in the old jar or just wash out and have a clean jar ready for next time. It’s a good idea to transfer to a clean jar when the rim of your old jar gets really built up but you don’t have to clean your sourdough starter jar as much as you think. If you’re feeding everyday, change your jar at least once a week.
How To Make Sure You Never Have to Start from Scratch
Once your starter is viable, it’s a great idea to dry some of it out to ensure you never have to start again. These instructions on how to dehydrate your sourdough starter are your insurance policy to never having to start from scratch again. You’ll simply be able to reactivate your dried sourdough starter if something happens to the starter on your kitchen counter.
Other alternatives to drying your sourdough starter include:

Using A Digital Kitchen Scale
I have provided the measurements for this starter in grams because it is easier to ensure accuracy (although sourdough starters are very forgiving and can tolerate eyeball measurements – as long as you’re feeding your starter more than it weighs).
Many people come to my Facebook Group asking for help with their sourdough starter – and often the problem is that they are measuring using volume rather than weight (remembering a cup of flour does not weigh the same as a cup of water). Once they start weighing their ingredients accurately, their sourdough starters develop quickly and rarely have issues.
The benefits of weighing your sourdough ingredients vs using volume measurements cannot be ignored.

What to Bake with Your Sourdough Starter
When you are in the process of creating your starter (from 7 days onwards) you can start using your sourdough starter to make sourdough discard recipes like sourdough discard banana bread, sourdough blueberry buckle and sourdough discard lemon muffins.
Once you have a mature, active sourdough starter, you’ll be able to use it to bake this simple sourdough bread recipe, as well as lots of other sourdough recipes like these sourdough dinner rolls, sourdough bagels and sourdough pizza dough.
Frequently Asked Questions
Yes, you can use gluten free flour to make a sourdough starter. Brown rice flour is a great one to start with, or a store bought blend of gluten free flour can be helpful too.
When your sourdough starter is considered mature, it should peak in around 4 to 6 hours when fed a 1:1:1 ratio, but the time it takes to peak will be dependent on the ratio you use and the temperature you keep it at.
Yes there are lots of different types. Read about 10 different types of sourdough starter.
Sourdough Starter Recipe
Equipment
- Clean Jar
- Digital Scales
- Silicone Spatula
Ingredients
- 50 g Flour , Bread, All Purpose, Rye, Whole Wheat – whatever you'd prefer
- 50 g Water, Filtered
Instructions
- DAY 1:All you need for today is 50g of water and 50g of flour plus a clean jar. Mix the water & flour together in the jar, pop the lid on loosely (or a piece of paper towel & elastic band). Place the starter somewhere warm for the next 24 hrs. If your house is cold, pop it near the kettle or oven to keep it warm.
- DAY 2:Once your starter is 24 hours old, you need to check on it and give it a good stir. You do not need to add anything today – just get some oxygen into your mixture and then recover and pop aside for another 24 hours.Your starter may already have some bubbles forming – this is a great sign. But it's also totally fine if it's not doing anything. Time is everything! Make sure it’s in a warm spot – you can find some ideas here.
- DAY 3:On day 3 remove half of your starter and then add 50g of flour and 50g of water to the remaining 50g of starter in your jar. Mix it together with the end of a wooden spoon, being sure to get lots of oxygen into your mixture. Replace the cover and pop it away until tomorrow.See notes below for more info on using a clean jar vs same jar.Don’t worry if you keep checking it – it’s completely normal It’s good to notice how it changes in shape, size and smell over the 24 hours.At this stage it's completely normal for it to smell really bad and to have developed a layer of liquid on top (this is called hooch). It might look like the water has separated from the flour but it's just telling you that it's hungry. Stir the hooch in when you feed your starter. It's also quite normal for it to double in size. Keep going – it will be fine
- DAY 4:Step 4 is to feed your starter in the same way as you did yesterday. Remove 100g of your starter and then add 50g of flour and 50g of water to the remaining 50g of starter in your jar. Mix it all together with the end of a wooden spoon. Replace the cover. You’ll need to do this twice today, around 12 hours apart. While your starter will be fairly forgiving, set a reminder on your phone if you think you’ll forget it’s just like having a pet.
- DAY 5:Step 5 is to feed your starter in the same way as you did yesterday. Remove 100g of your starter and then add 50g of flour and 50g of water to the remaining 50g of starter in your jar. Mix it all together with the end of a wooden spoon. Replace the cover. You’ll need to do this twice today, around 12 hours apart. It's a good idea at this stage to pop an elastic band around the jar you are using. Put the elastic band at the level of your starter when you feed it. This helps you to be able to see how far your starter is rising when it peaks.
- DAY 6:Step 6 is to feed your starter in the same way as you did yesterday. Remove 100g of your starter and then add 50g of flour and 50g of water to the remaining 50g of starter in your jar. Mix it all together with the end of a wooden spoon. Replace the cover. You’ll need to do this twice today, around 12 hours apart.
- DAY 7:YAY! Your sourdough starter is a whole week old. Keep feeding twice a day as you have been for at least 14 days.Now I know you want to get to baking bread … but just remember that the most important thing about this whole process is time. Your starter might be ready, but chances are it will need a bit longer to mature – generally 14 days. You need to keep feeding your starter the same way as you have been, twice a day (discarding before you feed) until it's consistently doubling within around 2-6 hours after you've fed it. Once it's consistently doubling after every feed you can try and bake with it. Your starter will keep maturing as you use it.For more information on how to know when your starter is ready, go here.
Notes
Nutrition
Nutrition information is automatically calculated, so should only be used as an approximation.
Like this? Rate and comment below!


I’m having so much fun making bubbles! How you Doughin’ is working on day 4. Hungry and popping when I peek! He’s getting ready for his morning feeding now!
To stir or not to stir that is my question. Do you stir before removing “discard”, or do you stir before feeding starter after “discard” , or both ? I am on day 3, have tried to read all relevant pages but cannot find reference to this.
At what point can we store in fridge?
You don’t want to put your sourdough starter in the fridge until it’s mature. You can read more about understanding when your sourdough starter is ready to use.
I have seen starter made from beer, is this possible?
You don’t need to make a starter from beer, flour and water is all you need. You might like to add beer to sourdough bread though 🙂
Took me a little time to get my head round the recipe but have now cracked it. That said, my house is usually on the cool side 17 to 17.5c and my starter (Raising D’ etre) took the huff until I upped the temp to 18.5c(energy is expensive in the UK), moved her in front of a radiator and swaddled her is a throw blanket. Now she is off and running and I have kept some discard who will eventually live in the fridge as my back up. Due to the slow slow start I’ll wait around 10 days before I give her a debut. I have used British Wholemeal Flour.
PS: Keep up the good work.
Hello new to making a sourdough starter. I do have a question about Day 4 feeding in the evening. Am I suppose to discard anything when I feed the starter that evening? Thank you!
Yes, you need to discard before every feed 🙂
I have taken a stab at a first attempt (today on Day 3) but I have a question –
Once my sourdough is ready, and I use it in a recipe, do I need to start a new sourdough from scratch, or can I keep part of the dough as my new starter? and if so, at what point of the recipe, and how much do I take?
So, if you have 150g of starter in your jar and you take 100g out for a recipe, you’d feed the remaining 50g of starter in your jar and allow it to peak ready for your next bake 🙂
Hi ours is doing great and we are almost 3 weeks in, can we drop down to once a day feeding? Thank you as well
I recommend feeding twice a day, but you can feed once a day if you prefer 🙂
Should I make a double batch if I plan to share with a friend? Or just 1x and split it, refeeding it to gain more volume?
No need to make a double batch, the best thing to do is to just make a viable starter (so wait until your starter is mature). Then take 50g and pop it in a jar for your friend! This is also a great post on how to share sourdough starter.
I’m not sure what I’m not doing. My starter is 2 weeks old today. It more than doubles when it’s doing it’s thing, but I don’t have those big bubbles in it, just many, many small bubbles. Right after feeding, within 30 mins., I get just a few bigger bubbles, but that’s it. I’m using organic unbleached bread flour, and feeding every 12 hours. When it’s feeding time, the starter has visibly fallen and it is loose, but it still has a small bit of stretch in it. Maybe I’m feeding too often. I can’t find any information on my specific problem, so maybe you could help. Thank you!
It doesn’t necessarily matter whether your bubbles are large or small, the most important thing is that your starter is doubling, which it sounds like it’s doing. If you do want those larger bubbles, it’s generally a case of lowering the hydration of your starter. I’ve put together a post on how to get bigger bubbles in your sourdough starter which will help. But as long as your starter is doubling, it’s doing what it’s meant to.
Hi I just started making a new starter. I’m up to my 3rd day. I was wondering if I can feed every 24 hours instead of every 12 hours? Thanks so much for all your helpful information, I love your site.
I don’t recommend only feeding once a day, but if it works better for you then you definitely can. I would feed a 1:2:2 ratio if you’re feeding once a day 🙂
Struggling!! I’m on day 5 and in the post it’s been saying to REMOVE 100g of the starter than add in 50g water and flour but that leaves me basically nothing left in the jar once I’ve removed 100g. But then further down in the post when talking about clean jar or reusing the jar you say only removing 50g…
Have I just waisted 5 days of a starter that won’t work now? Is it 50g removal or 100?
No you definitely haven’t wasted 5 days. So It’s not saying different things … you either remove 100g from the jar and feed the 50g (or whatever is left in your jar) with 50g of flour and 50g of water OR you take 50g and put it into a clean jar and feed 50g of flour and 50g of water. They are both the same method of feeding, but one is into a clean jar and one is into the same jar – it just depends on what works better for you 🙂
I understand that if you do not have filtered water.. you must leave the water out for several days to remove chlorine. Is this so?
Leaving it sit overnight should be sufficient. This post talks a bit more about which water to use for sourdough.
Hi! I’ve been following your directions. I am on day 6. I started seeing bubbles throughout around day 4. I haven’t really been seeing it rise and fall and have been having a lot of hooch. Any suggestions? Should I try a higher ratio, if so which one (in grams?)
It’s normal for your starter to get bubbles but not really rise and fall yet. I would just keep going, although if you are getting hooch then it would indicate the your starter wants a bit more food. Try a 1:2:2 ratio and see how that goes 🙂
Thank you for all the great detail!
Question about starter lids: my started kit came with tin, screw on lids, as well as those cotton hats that you can place over the jars. When/why choose one or the other when managing your starter?
I actually prefer to use a plastic lid, you can see the plastic lids I use here. It’s really up to you – the cons are that the metal lid will more than likely go rusty, but the cloth cover can cause your starter to dry out. If you have one of those ring lids, where you can take the flat part of the lid out, this can just sit on top of the jar which is a good compromise 🙂
What do you do with the discard during the days that you are starting the starter
You need to toss the discard from the first 7 days, it’s not able to be used 🙂
If I miss my 2 feedings on day 4, is that a problem?
It’s not ideal, however just keep going, your starter will be fine 🙂
like all the info…will help me alot.. question though can we store discard for a couple days to have enough to use to bake ..thanks..been forty years since I have keep a sourdough starter
Yes you can do this 🙂
I doubled the amount of started twice by accident. I corrected the next time I fed but is it worth trying to continue to feed or should I start over?
This website is so helpful though!
So glad you’re finding the website helpful 🙂 Just keep going, it will be fine xx
might you suggest any helps for very sluggish starter (just making it, tried and ‘failed’ and trying again – seems to go well for first three days then for the next two weeks does nothing) at high altitude – about 6000′ please?
When you say it does nothing, are there bubbles in the liquid? I would reduce the water just a little bit and see if that helps. Unless it’s moldy, it’s still viable and things will be happening under the surface that you can’t see!
Is it possible to freeze dry your starter?
I haven’t tried it, only freezing it and drying it 🙂
What do you do with the daily discard? Toss it, save it or use it right away? TIA
I save it and bake with it 🙂 Sometimes I use it straight away, other times I’ll just keep it in the fridge til I need it 🙂 Just make sure your starter is at least 7 to 10 days before you start saving and using the discard 🙂 xo
I am on day 6 and have been following this to a tee. When removing the 100g I am pretty much emptying the entire jar and there is no rise. Is this normal? This is my 3rd attempt at getting an active starter.
You won’t be emptying the entire jar, there should always be 50g left (based on the math). But honestly, it doesn’t really matter how much is left in the jar, it’s just important that you are discarding some, otherwise you’ll end up with a huge starter (which is unnecessary). So once you’re feeding what’s left in the jar with 50g of flour and 50g of water, there’s no rise, even after 12 hours?
Hi there- so I’ve been leaving 50g in the jar of starter and adding 50g bread flour and 50g water. Still hasn’t doubled and it’s day 15. I have bubbles and it maybe rises only a little. Feeding every 12 hours
It sounds like your starter is on the right track! Try increasing your ratio, so do a 1:2:2 feed – so use 25g of starter and 50g of flour and 50g of water – and make sure you’re keeping your starter really warm 🙂
Is it possible to use the brod and Tayler to put starter in while making it.
Absolutely! You can see how I use mine here.
Thanks for these straightforward instructions! So many sourdough sites/videos, but some are too obscure, and others are too “scientific”. Your technique and explanations are great for me. One question I have is about the starter doubling after a feeding. Mine (at about a week) is definitely rising 4-6 hours after feeding, though not quite to doubling in size yet. But it doesn’t persist at that size – it shrinks down again before the next feeding. Is it supposed to at least double in size and stay there until the next feed? Or is the rise-then-fall normal and okay? Thanks very much!
Thanks so much for your kind words 🙂 I’m so happy to help you on your sourdough journey! Your starter should definitely “fall” or shrink back down once it’s peaked, so that’s totally normal. A good thing to do is to put a rubber band around the jar so you know where it started and you can gage if it is actually doubling. But it’s definitely not meant to stay double, the starter will deflate as the yeast have used up all their food and the carbon dioxide they are producing has escaped from the jar 🙂 Hope that helps 🙂
Is it okay to use reverse osmosis water for this recipe?
No, you can’t use RO water for sourdough. You’ll need to use a different water source. This is a good resource on best water for sourdough.