
Baking sourdough bread at high altitude can cause a few issues with your bread. Depending on how far above sea level you live, you may have issues with wet, sticky dough or lack of oven spring. These problems are mainly caused by lower air pressure and drier air (caused by a lack of humidity). If you are living in areas like Utah, Colorado or Wyoming, you might have found that your sourdough baking is affected by high altitude.

This post contains affiliate links. Please see our disclosure policy.
Most Common Sourdough Problems at High Altitude
When baking sourdough bread at high altitude, the most common problems you’ll run into are:
- Wet, sticky dough that cannot be easily shaped (after bulk fermentation)
- Dough that spreads out when tipped out of banneton (after proofing)
- Dough that is difficult to score and collapses after scoring
- Lack of oven spring (loaves are flat and wide with a dense crumb)
Many of these problems point to a single cause – over fermentation. Over fermentation happens more easily at higher altitudes because of the lower air pressure and lower moisture levels. While it may seem insurmountable, these issues are very easy to fix. You will be able to bake amazing sourdough at higher altitudes.
The loaf below is an example of what can happen when baking bread at higher altitudes. The bread has no oven spring and is wide and flat. The crumb is dense and gummy.

How Does Elevation Affect Sourdough?
Living at higher altitude means that you are living further above sea level than most people. The higher above sea level you go, the less humidity there is. This means that the air will be drier. Drier air will dry your ingredients out.
Higher elevations also mean lower air pressure.
Drier Air Means Drier Ingredients
The higher you travel above sea level, the less humidity there is. This will make the air drier. On average, most higher altitude locations can experience humidity levels as low as 10 – 20%, in comparison to sea level locations, which can be as high as 80% humidity.
Drier air will mean drier ingredients. This is very important when using flour to bake sourdough. Flour at higher altitudes will be much drier and will absorb water differently.
This may mean you need to add more water to compensate for the drier flour. The trick is to not add it all at once because you may add too much!
When baking sourdough at higher altitude it’s important to do an autolyse to make sure that the flour absorbs the water before you move on to the stretch and folds. This will give you an opportunity to add more water if necessary.
You may need to add up to 50g more water.
Lower Air Pressure Means Faster Fermentation
Higher altitude locations will have lower air pressure than locations at sea level. Lower air pressure causes gasses to expand much faster than they would at sea level. This is pertinent to sourdough because the wild yeast in your dough are releasing gasses as they feed on the starches in the flour. Bulk fermentation will happen much more quickly at high altitude because of these fast expanding gasses.
Now that we understand the effect of low air pressure on sourdough, you can see how easily sourdough bread can be over fermented at higher altitudes. Temperature will play a part of course, as it does for bulk fermentation at any altitude. But even in cooler temperatures, the air pressure will make a difference to your dough. To combat this problem, you can decrease the amount of starter you use in your dough.

Best Tips for Baking Sourdough Bread At High Altitude
As you can see there are definitely some easy fixes for baking sourdough bread at high altitude. It’s really just a matter of understanding what is causing the over fermentation of your bread and putting solutions in place to overcome them.
Here’s an easy to follow table for how to overcome sourdough bread problems at high altitude:
| ELEMENTS AFFECTED BY HIGHER ALTITUDES | HOW TO ADJUST SOURDOUGH RECIPE FOR HIGH ALTITUDE |
|---|---|
| Hydration | Increase hydration (after autolyse if necessary) |
| Amount of starter | Decrease amount of starter (to stop over fermentation) |
| Stretches & Folds | Increase to strengthen gluten network |
| Bulk Fermentation | Decrease bulk fermentation time (or amount of starter) |
| Covered Dough | Use plastic cover for resting dough on counter and in fridge to stop it drying out. |
| Baking Temperature | Increase baking temp (or baking time) |
| Baking Time | Increase baking time (or baking temp) |
Like all sourdough baking, you will find that a little experimentation is necessary to get a better bake. For example, you might prefer to increase the baking time rather than the baking temperature. In any case, there are definitely solutions for the causes of over fermentation of sourdough at higher altitudes.
Increase Hydration for High Altitude
You will find that you’ll need to increase the hydration of your sourdough to accomodate for the lack of moisture in the air at higher elevations. This will be particularly important if you are using whole wheat and whole grain flours, as they typically require more water anyway.
The best tip I can give you here is to not increase the hydration straight off the bat. Conduct the autolyse or fermentolyse period and then assess the dough after that. If the flour does not feel hydrated enough after the autolyse period, add up to 50g more water.
My easy sourdough recipe sits at 71% hydration. Adding an extra 50g of water would bring it up to 81%. This is quite high hydration bread, but may be an essential addition to the success of your bread at higher altitudes. You can read a guide to sourdough hydration here.
Amount of Sourdough Starter At High Altitude
The amount of sourdough starter can be important when baking at higher elevations because of the speed in which fermentation can happen. Reducing the amount of starter in your dough can help to slow the fermentation down.
You could reduce the amount of starter in the dough down to 25g to help with this. You can read more about the amount of starter to use and why it matters here.
Stretches & Folds
Stretching and folding is a common technique used to develop a strong gluten network in sourdough bread. The gluten also strengthens during the bulk fermentation period.
Because you need to shorten the bulk fermentation period when baking sourdough at high altitude, it can be helpful to perform extra stretch and folds to ensure the gluten network is strong enough.
This will also help with the structure of your sourdough, making for easy shaping. It will also help your dough not spread out when you tip it out of the banneton.
Shorter Bulk Fermentation Time
Given the lower air pressure at higher altitudes, you’ll need to decrease the bulk fermentation time you give your sourdough. In short, fermentation time decreases as altitude increases.
The only way to get around this, is to reduce the amount of sourdough starter, as discussed above. It’s best to keep a close eye on your dough during bulk fermentation, at least until you are confident with timing.
Covering Your Sourdough
We know that the air is drier above sea level due to the reduced humidity. This will not only dry out your flour before you mix your dough, it can also dry out the dough while it’s fermenting and proving.
You should cover your dough with a plastic cover while it’s in bulk fermentation and especially during proofing.
Elasticised plastic food covers are great for this purpose. They will ensure that your dough does not develop a dry and tough skin, which is is detrimental to good sourdough oven spring.
A plastic bag, like the type you get your fruit and vege in at the supermarket, is also a good option.

Baking Time and Temperature at Altitude
You will need to increase the temperature at which you bake at altitude. This can be difficult for sourdough though, because it’s already baked at high temperatures.
The general advice is to increase the baking temperature by about 25C. The alternative is to increase the baking time to ensure your sourdough is baked through.

Does Altitude Affect Sourdough Starter?
Altitude does not have a profound affect on your sourdough starter. While there are many adjustments you’ll need to make for a successful loaf of sourdough bread, your sourdough starter is more forgiving.
If anything, you’ll need to add slightly more water to compensate for the lower humidity levels and drier flour. If you are using whole wheat or whole grain flours, you may notice this more. In that case, a little more water will be necessary.
You many notice that your starter peaks quite quickly – this will be due to the lower air pressure. It’s not a problem, however, if you want to extend the rise, you can feed the starter at a higher ration (1:2:2 for example).
If you don’t already have a sourdough starter, you can use this easy guide to create your own sourdough starter from scratch.

Frequently Asked Questions
No – you can use the sourdough recipe you prefer. You will just need to make the adjustments listed above to ensure you have success at higher altitudes.
You will need to increase the baking temperature by about 25ºC from what is instructed in the recipe. The alternative to this is increasing baking time. You may need to experiment to find what works for you.
It’s not essential to add more water to your sourdough starter if you live at higher altitude, however the lower humidity will cause the flour you use to be drier. If you feel that it’s too dry, adding a little extra water will not hurt it.
You’ll need to make sure you cover your shaped dough with a plastic cover once it’s shaped. The drier air at higher altitudes will mean that your dough can develop a dry skin which can be detrimental to good oven spring. You need moist dough to create the steam necessary for your sourdough to bloom in the oven.

Want More Info?
If you found this article on Baking Sourdough At High Altitude helpful, you might enjoy these:
- Why is my dough so wet and sticky?
- How to Know When Bulk Fermentation has finished
- How To Make Sourdough Taste More Sour
- How To Reduce The Amount of Starter You Use
- Weirdest Sourdough Questions Answered

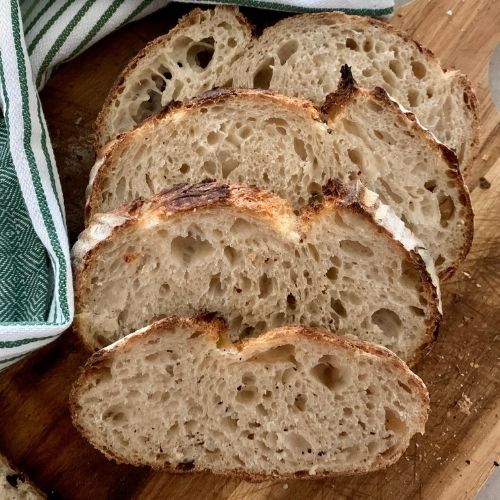
High Altitude Sourdough Bread Recipe
Equipment
- Mixing Bowl
- Digital Scales
- Banneton
- Dutch Oven
Ingredients
- 500 g Bread Flour
- 400 g Water, (only add 350 g to start with)
- 25 g Sourdough Starter
- 10 g Salt
Instructions
- Premix & FermentolyseWeigh out your sourdough starter and 350 g of water into a large bowl. Then add your flour and salt and mix whole lot together to form a shaggy dough. Cover your bowl with cling film or a damp tea towel and let it sit for around 30 minutes (up to one hour is ok).Remember to only use 350 g for the first part, you can add more after autolyse has finished if the dough is too dry.
- High Elevation Tip – Increase the Hydration if NecessaryCheck the feel of your dough. If the flour was absorbed all the water and is still dry, add half the extra water and see how it feels. You can add up to 50g extra water if necessary.
- Forming Up The DoughWork your way around the bowl, grabbing the dough from the outside, stretching it up and over itself, into the centre, until a smooth ball is formed. You shouldn't need more than about 20-25 stretches to form the ball. Once the dough has formed into a smooth ball, pop the cling film back on and let it rest for 30 minutes. It's really important to keep the dough covered at high altitude to ensure that you don't lose any moisture.
- Stretch & Fold – Strengthening GlutenOver the next few hours you need to create some structure for your dough by "stretching and folding". Aim to do around 6 sets of stretches and folds. For each set, stretch the dough up and over itself 4 times. Leave around 15 minutes in between each set. Again you do not have to be exact with time, but you need to do at least 6 sets over 2 hours.
- Bulk FermentOnce you've finished your stretch and folds, place the cling film back over your dough and let it rest and ferment (a plastic cover is a better option for this stage).Remember that you need to watch the bulk ferment carefully at high altitude as it will happen faster. You're looking for the dough to double, but this will happen faster than you think.
- Shaping The DoughOnce your dough has finished it's first ferment, it's time to shape it into either a boule or a batard. It's better if you don't use any flour for shaping as this will dry the dough out – and you want to avoid this at high altitudes.Use a silicone dough scraper to gently ease the dough out of the bowl. You want it to land upside down on your counter so that the smooth top of the dough is on the countertop and the sticky underside is facing up. This will make it easier to shape.Place your shaped dough into a banneton or other proofing container. Make sure you place a plastic cover over the banneton to stop the dough from forming a dry skin.
- Cold FermentPlace the shaped dough into the fridge to cold ferment. Try to leave it in the fridge for a minimum 5 hours up to a maximum of around 12 hours. A shorter cold ferment is better in higher altitudes as it has less chance of over proofing.
- Preparing To BakeOnce you're ready to bake your sourdough, you'll need to preheat your oven to 250ºC/480ºF. Place your Dutch Oven into the oven when you turn it on so it gets hot. This oven temperature is higher than I would normally bake sourdough – it has been adjusted for higher altitudes. If you don't want to bake this high, you could reduce to 230ºC (450ºF) and increase the baking time.
- Bake Time!When your oven is at temperature, take your sourdough out of the fridge. Gently place it onto a piece of baking paper. Make sure that you make the baking paper big enough to use the edges as a handle to lower to dough into your Dutch Oven.Gently score your bread with a lame, clean razor blade or knife. Carefully take your dutch oven out of the oven. Place the sourdough into the pot using the baking paper as a handle. Put the lid on and place into the hot oven. BAKE TIME:30 Minutes with the lid on at 250ºC/480ºF plus10-15 Minutes with the lid off at 230ºC/450ºFRemember that longer baking times may be needed at higher altitude, so if your bread does not look or feel done, you can leave it in the oven for up to 15 minutes longer. When you remove your dough from the oven, carefully remove it from the dutch oven as soon as possible and place on a wire rack to cool.
Notes
Nutrition
Nutrition information is automatically calculated, so should only be used as an approximation.
Like this? Rate and comment below!











Thank you so much for this recipe! I’ve been struggling with consistent loafs for almost a year, and never thought of the altitude issue. Just pulled the second perfect loaf out of the oven!! Thank you!
Thank you for these tips. At 2,000 feet (610m) hydration is my biggest adjustment to make with the flours that I use. My flours work best at 70%. If everything went without a hitch, what fun would that be and what would be learned? Now I know why my long cold proofing, at times, yield flat tops and less than stellar spring. I’ll be studying this article in depth because I’ve only just begun sourdough baking this past winter but getting great results from the information obtained from sites like this one. However, I’m expecting a whole new set of challenges when it hits 40.5C and 15% humidity this summer.
I love your very informative site and in all fairness, I should buy your book. 😉
Thank you.
What a revelation! I’m baking in the Utah mountains – dry and high and you have helped solve some mysteries. Other recipes have instructed to feed the starter the night before you want to start a loaf but by the morning my starter was already deflated and smelled of acetone no matter how early I got up. I now understand what has happened (over ferment). With this knowledge I will tweak things until I get it right. Many thanks!
Thank you. At 7000 feet and was having all of the issues you discussed. Any recommendations on using 100% einkorn flour?
Thank you!
Mark
Hi, thanks for all the info for baking at altitude (7,000′ here)! I am somewhat of a Newbie to sourdough…. I want to mix up two loaves at one time, instead of just one (because it seems more time-efficient than going thru the full recipe twice). My question is on the starter/water for the autolyse… with double the ingredients, can I assume that the both the water/starter in this step would double from 25g starter/350g water to 50g starter /700g water? Or do those proportions stay the same as for one loaf? The scale changes ingredients to double, not not the notes 🙂
About how long should the first ferment take? And should my mixture be in the fridge during this first ferment?
It really depends on your starter, the temperature of your kitchen and your dough. It should sit on the counter for the first ferment 🙂
Could you please give a time range? Is this an overnight (8+ hours) ferment or do I need to watch it (i.e., check it every… 15 minutes? Every hour?) until it has doubled? Please explain it like this is my first loaf ever attempted (because it is!) 😆 and I expected to leave it overnight for a “rise,” according to a friend. Thank you for all the info!
Why no approxinatetime time frame given for first bulk fermentation
Giving a time frame for bulk fermentation is not something I like to do because what works for me in my kitchen might not work for you in your kitchen. It all depends on temperature, strength of starter, water quality, hydration – so many factors! So the best thing to do is get stuck in and experiment and make notes on how long it takes for you and what changes those time frames. Honestly, my bulk fermentation varies from day to day too, it’s not a static process with a set timeframe 🙂 My best advice is learn to read your dough and not the clock 🙂
I love this recipe but I found it burned the bottom of my bread. Im at 7500 feet in Colorado, so wasnt sure why? I followed the recipe exactly. Maybe my oven is too hot?
Do you recommend a bench rest after bulk fermentation and before placing into banneton? Thank you!
How would I adjust baking if I was just using a bread tin? Without the Dutch oven? I’d like the uniform shape…
I live in Alberta Canada and I am trying your instructions.
I am not sure about the fermentation length after the 6 stretch and folds.
You say double. Is there a rough time frame?
I am in a high-altitude, low-humidity location (5000 ft & < 30%) and my sourdough dough is too sticky. It sticks to the camber, my hands, the countertop, everything. It won't hold it's shape. So your article seems to be exactly what I'm looking for and seems to address my issue, but I'm curious to understand why would increasing the water would make the dough less sticky. That seems counter-intuitive. There is so much I don't understand about this process so I'm not disagreeing with you, rather I'm trying to understand.
Quick question, is there a way I can incorporate spelt into this wonderful recipe?
Can you use spelt flour in this recipe?
I’m a sourdough beginner in New Mexico at 5,500 ft elevation and have been frustrated as to why my dough is so sticky after the first fermentation and my loaves coming out thin and flat and disappointing.
Then last night I found your article on high altitude adjustments and over fermentation. What a revelation. I’m going to try them for the next round. Fingers crossed
I’m going to try this we live at 7000 feet, dry and high in az and my sourdough has many of the issue listed
This recipe turned out perfect. I’m at 7000 ft elevation. I used 375g water and cold fermented for 6 hours. I’ve also done 2 hours counter ferment and 2 hours cold ferment due to time restrictions and bread turned out amazing. Thank you for the recipe, my previous recipe gave me less chewy and more dense breads.
Is it safe to sub out a small amount of the bread flour with say 50g of rye or whole wheat flour?
Yes you can do this 🙂
Thank you! I live in Northern Utah, and I have had every single thing you talk about happen. Last week I did something different and finally had a good loaf.
Thank you for making this recipe!! I live at 5500 ft elevation. Excited to try it.
Question: how can I incorporate oil in this recipe?
You can add oil into the recipe during the initial mixing of the flour, water, starter and salt. You would need to experiment with what effect this has on your dough. You can read this too which might be helpful.
I have a question regarding your notes for autolyse. When making 2 loaves, the notes only say to add 350g of water to start to the ingredients, even though the ingredients doubled. This created a very very dry dough even after an hour of autolyse. For someone new to making 2 loaves at a time (been making single loaves at 5600′ for 7 months) this seems misleading. Should I have added 700g to start? Someone else asked this question, yet there was no reply. Would be nice if you fixed your instructions or provided some direction when making multiple loaves. Hoping I can recover my dough now that I added more water and letting it rest a bit longer. I love your recipes however this one has me flummoxed.
I have been struggling to get sourdough right for months now and this is the closest I’ve gotten to a successful loaf. I live at 3600 feet and only recently did I realize that might be a contributing factor. I’m currently working on my second batch with this recipe and will report back. The reason my previous loaf did not come out right is my own fault, I fell asleep during the bulk fermentation lol.
Haha! Happens to the best of us. 🙂 We’d love to hear how your second batch turned out!
Love this recipe at 7,200′! I’m wondering how I can do it in a sandwich loaf format? Could I put it in my glass loaf pan to cold proof and then bake straight from there? Thanks!
Fantastic! So glad I could help! You can definitely take some advice from this post on baking sourdough in a loaf pan to adapt for a sandwich loaf format 🙂
This has made a huge difference in my sourdough loaf game! If I wanted to add inclusions, when would be a good time in this process to do so? Any adjustments?
Typically half way through the stretch and fold stage (so around the 3 to 4th fold if you’re doing 6 sets). This post goes into further detail about inclusions in sourdough.
I live in Colorado at an elevation of about 6,000 feet.
Besides decreasing the amount of starter to 25GR, I increase water to 450GR. I don’t do the Banneton step.
12 hours on countertop, then 6 hours in refrigerator.
Bake @ 425F (non convection) for 1 hour and 20 minutes, lid on the entire time.
Thank you so much for your tips, Jim!
Unfortunately where I live they don’t carry rice flour, can I use gluten free baking flour?
Semolina is a great alternative to rice flour for dusting bannetons 🙂
This recipe has never failed me. I’m in Colorado Springs and it’s the only one I’ve ever used. My very first loaf and every loaf after turned out perfectly. If you’re a new baker looking for a reliable recipe or having bad luck with your loaves, this one is worth trying!
This recipe is fantastic! I moved to Denver last February and struggled all year to figure out how to adjust for altitude! Thank you so much!!!
Will this make a less sour tasting loaf? I’m at 3600 and keep getting sticky, flat loaves. The recipe I use calls for 100g starter, and tastes amazing, I just get flatter loaves.
Do you allow the dough to double and still get a flatter loaf?
this was my first time making any kind of sourdough anything my starter was only 3 weeks old kept at 60° in my kitchen and this recipe came out perfect as is I followed everything temperature time everything I live in Denver if at 5,280 elevation