Thermomix Sourdough
No matter which Thermomix model you own, this guide to making real sourdough bread in your Thermomix will see you baking a successful loaf every single time! Thermomix sourdough could not be easier!
Servings 1 Loaf
Calories 1896kcal
Equipment
- Thermomix
- Banneton
- Dutch Oven
Ingredients
- 100 g Sourdough Starter fed and bubbly
- 380 g Water you can reduce the water to 350g if you want a lower hydration dough
- 500 g Bread Flour Baker's Flour
- 10 g Salt
Instructions
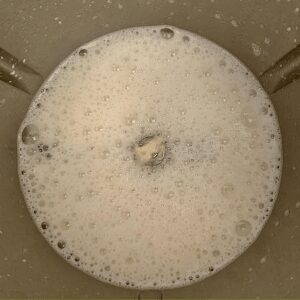
- Add your sourdough starter and water to the TM bowl. Mix speed 3 for 15 seconds.
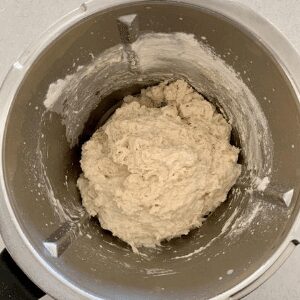
- Add your flour and salt to the sourdough starter and water in the TM bowl. Mix for 20 seconds on Dough mode. Leave the dough in the TM bowl for 30 minutes to 1 hour.
- Mix the dough for 3 minutes on Dough mode. Leave dough to rest in the bowl for at least 10 minutes (you can leave it up to around 30 minutes if you want to). You don't want the dough to get too warm from mixing.
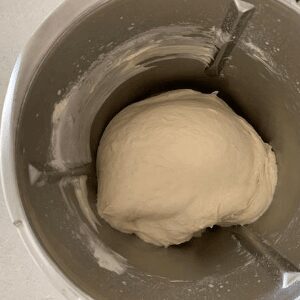
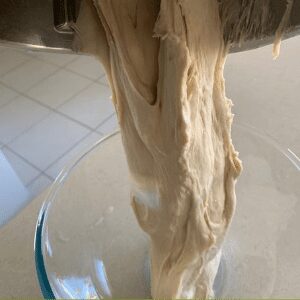
- Mix the dough for another 3 minutes on Dough mode. The gluten in your dough will be well formed by now and the dough should be slapping the sides of the bowl. When you look into the bowl, you should see that there is a gap between the dough and the side of the bowl because the dough has formed a "ball". The dough will be elastic when you pull it up and have quite a bit of stretch.

- Pour the dough into a glass bowl. It should "bounce" out in one big blob if you jiggle the TM bowl upside down. Most if it will come away from the blades in this way. You can use a silicone spatula to get the remaining dough if you need to.If there is still a little sticky dough left on the blades, just cover with water and blitz on speed 10 to easily clean the blades. The quicker you do it, the easier they are to clean. A quick zip around with a Thermo brush and you should be good to go!
- Cover the dough in your bowl with plastic wrap and leave it to bulk ferment. See Notes below for information on this step.
- Use a silicon spatula to gently ease the dough out of the glass bowl. You want it to land "upside down" with the smooth top of the dough at the bottom and the sticky underneath on the top. This will make it very easy to shape.Using your hands, pull the of the dough into the centre so that it starts to form a ball. Once all the edges are in the centre, turn the dough over so that the smooth dough is at the top. Using the sticky underside, gently tension the dough so that it forms a ball.
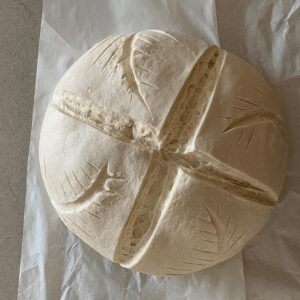
- You will need a banneton to put your dough into. If you do not have a banneton, then a bowl or basket lined with a floured tea towel is perfectly fine. Make sure your bowl isn't too big though, you want your dough to retain some shape.Whatever you're using needs to be liberally floured with your rice flour. If you're using a banneton - liberally sprinkle it with rice flour. If you're using a cloth or tea towel, rub the flour into it to ensure it becomes non stick.Once the dough is shaped into a tight ball, place it into your banneton smooth side down, so your seam is on the top - this way the top of your dough will get the pretty lines from the banneton. If you're using a cloth or tea towel in a bowl it's ok to put your dough with the smooth side up. Just make sure the dough is tight.Lift your dough around the edges to pop a little more rice flour if you feel it needs it. Just try to handle the dough as little as possible and be really gentle as you really want to preserve all the gases and air bubbles that have formed during your bulk ferment.
- Now your dough is in it's "shaping container" cover it loosely with a plastic bag or damp tea towel and place into the fridge. I use a large plastic bag to cover it - I just reuse it each time. It's not totally essential to cover it - you can place it in the fridge uncovered if you'd prefer.Try to leave it in the fridge for a minimum 5 hours up to a maximum of around 36 hours. The longer you leave it the better your bread will be! A longer cold ferment creates beautiful blisters on your crust and a deeper sourdough flavour. It will also ensure your dough forms a skin which makes it easier to score.
- Once you're ready to bake your sourdough, you'll need to preheat your oven to 230C/450F. Place your Dutch Oven into the oven when you turn it on so it gets hot. Try to preheat for around 1 hour to ensure your oven is super hot - but you know your oven so just adjust this time if you need to.Leave your dough in the fridge until the very last minute - placing a cold dough into a hot oven will give you a great "spring".
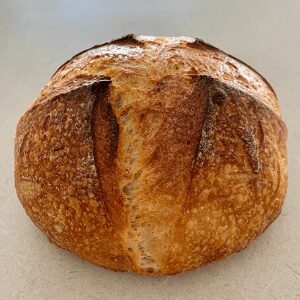
- Now it's time to bake!When your oven is at temperature. Take your sourdough out of the fridge. Gently place it onto a piece of baking paper. Make sure that you make the baking paper big enough to use the edges as a handle to lower to dough into your Dutch Oven.Gently score your bread with a lame, clean razor blade or knife. At minimum a large cross is sufficient, but you can get as artistic as you like. Try to score it fairly deep to ensure the dough opens up.
- Carefully take your dutch oven out of the oven. Place the sourdough into the pot using the baking paper as a handle. Put the lid on and place into the hot oven. If you want to you can spritz your dough with extra water before you put the lid on.If you're worried about the base of your bread burning, place a baking sheet on shelf underneath your Dutch Oven - it works!BAKE TIME:Bake your sourdough for 30 minutes with the lid on at 230C/450F plus10 minutes with the lid off at 210C/
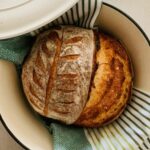
- When you remove your dough from the oven, carefully remove it from the dutch oven as soon as possible and place on a wire rack to cool.
Notes
Notes on Bulk Fermentation -
The time you need to bulk ferment will depend on the temperature in your home. This recipe has 100g of starter so will ferment at a good rate. You can leave it overnight, but you'd need to have a cool home, so under 18 degrees. You don't want it to go over while you're sleeping. You can read more about how the amount of starter affects your sourdough here.
Your dough is ready to move onto the next stage when it's doubled in size, slightly domed on top and is full of bubbles. It will be soft and pillowy and NOT sticky on top! You can read more about bulk fermentation here.
Nutrition
Calories: 1896kcal | Carbohydrates: 382g | Protein: 63g | Fat: 9g | Saturated Fat: 1g | Sodium: 3906mg | Potassium: 501mg | Fiber: 13g | Sugar: 2g | Vitamin A: 10IU | Calcium: 89mg | Iron: 5mg
