This post contains affiliate links. Please see our disclosure policy.

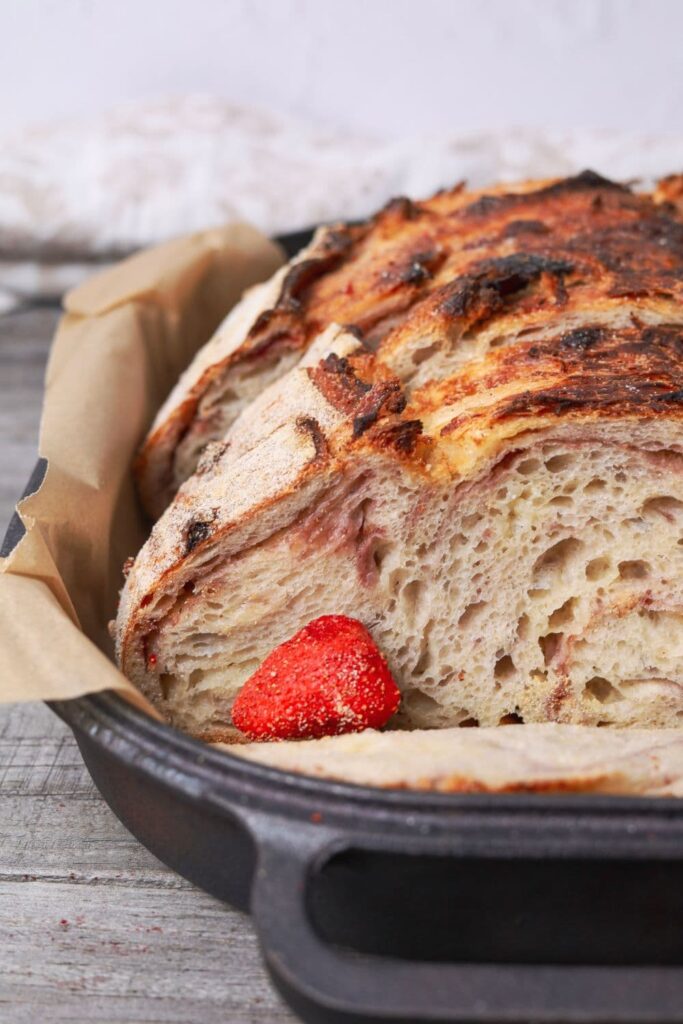
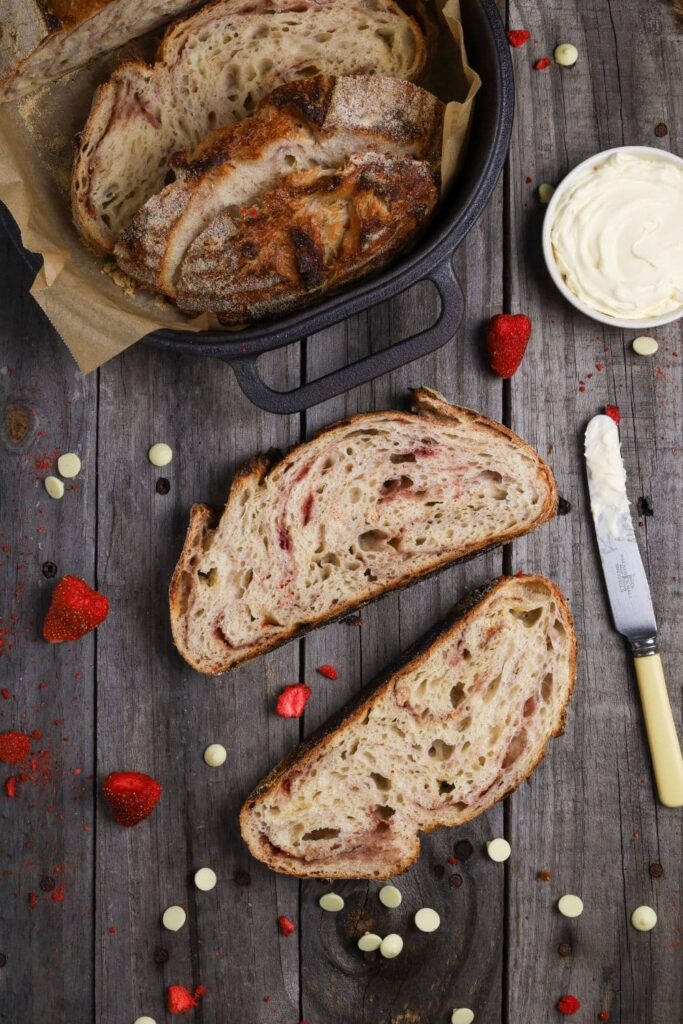
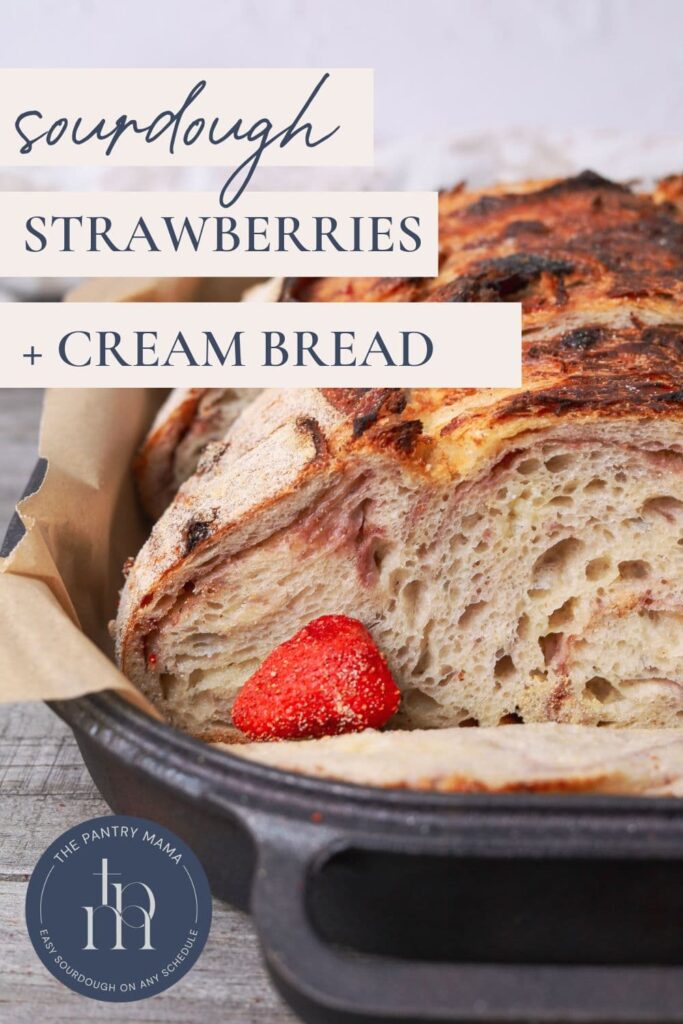
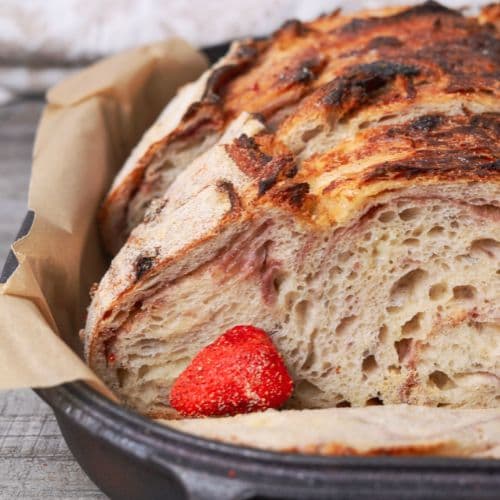
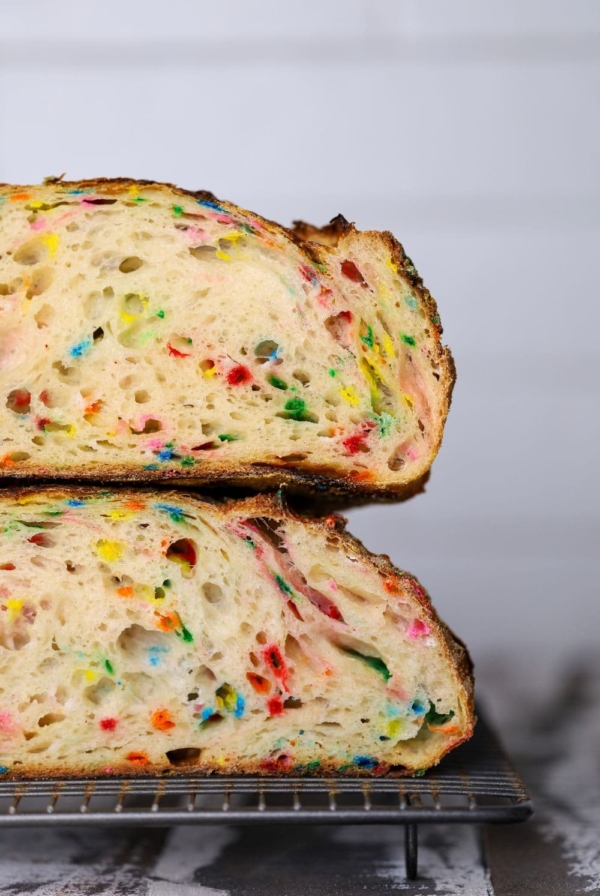
This sourdough strawberries and cream loaf is a dreamy twist on your favorite sourdough bread, bringing together the sweetness of strawberries with a creamy, tender crumb. Made with freeze-dried strawberries for intense berry flavor and a swirl of creamy white chocolate, this loaf is as beautiful as it is delicious. It’s perfect for spring and summer baking, offering a fruity, slightly tangy treat that feels both comforting and special.
If you love using strawberries in your sourdough baking, then make sure you also check out these sourdough strawberry bars, sourdough strawberry rolls, sourdough strawberries and cream cookies and sourdough strawberry cake.
Why You’ll Love This Recipe!
Bright berry flavor without the mess – Freeze-dried strawberries add concentrated sweetness and vibrant color without adding extra moisture to the dough. Fresh strawberries are not recommended due to their moisture.
Soft crumb – A swirl of creamy white chocolate pairs perfectly with the subtle tang of sourdough, and creates a super soft cumb.
Perfect for any season – Since it uses pantry-friendly freeze-dried strawberries, you can enjoy this cheerful, strawberries-and-cream loaf year-round.
Ingredients
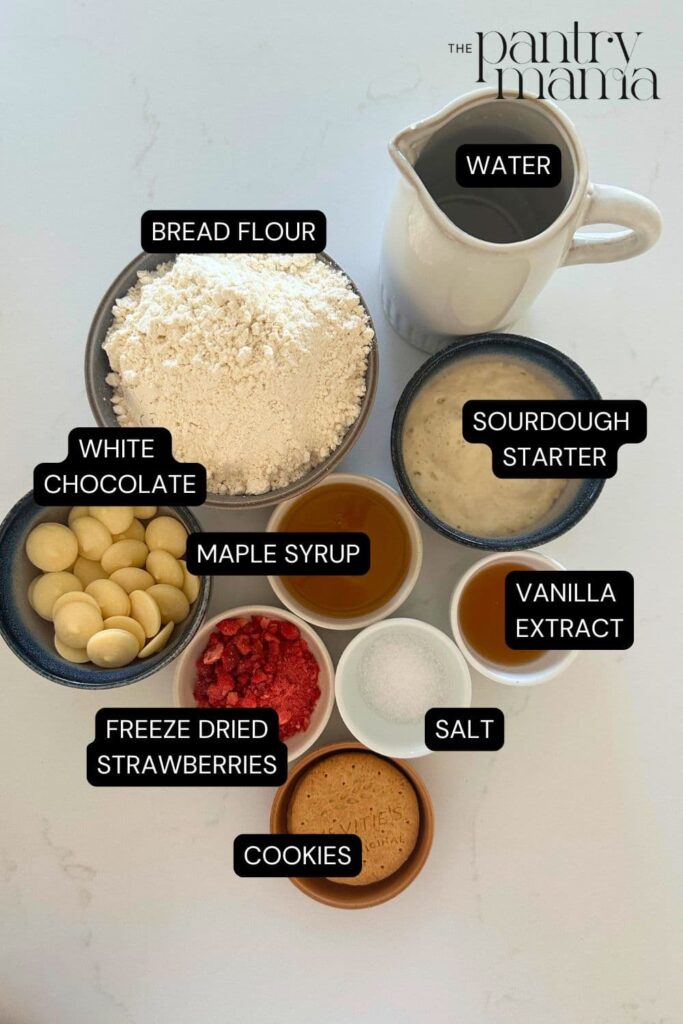
- Sourdough Starter – you’ll need an active sourdough starter to create this gorgeous loaf. You want it to be bubbly and at it’s peak when you mix the dough.
- Water
- Bread Flour – a high protein bread flour is recommended to make this loaf, like with all sourdough bread.
- Salt
- Vanilla Extract – you can use vanilla extract or vanilla paste for this recipe. Either works to impart a delicate vanilla flavor to this sourdough bread.
- Maple Syrup – I’ve used maple syrup to gently layer some sweetness through this dough. You could also use honey if you want to.
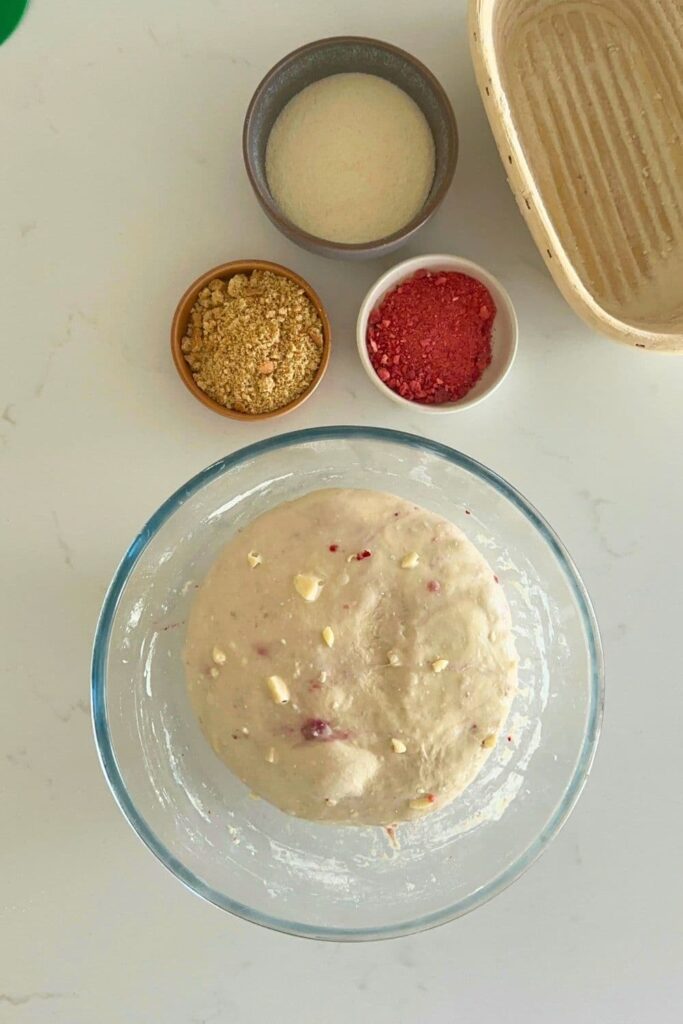
- Freeze Dried Strawberries – you’ll need crushed freeze dried strawberries. I find it’s easiest to smash them inside a small zip loc bag using a rolling pin. Just be sure to keep them dry so that they don’t become sticky.
- White Chocolate Chunks – you can use white chocolate chips or chop up your favorite block of white chocolate.
- Cookie Crumbs – I’ve used crushed Digestive cookies but you could also use Graham crackers or anything similar.
How to Make Strawberries & Cream Sourdough Loaf
This loaf is fairly easy to put together. The maple syrup and vanilla do make the bulk fermentation a little faster, so you’ll need to keep an eye on your dough. It can make the dough a little sticky too, but nothing too crazy.
Pre Mix & Autolyse
Weigh out your sourdough starter, water, vanilla and maple syrup in a glass or ceramic bowl. Mix them together so that the maple syrup, vanilla and sourdough starter are dissolved in the water (or at least really well distributed).
Then add your flour and salt and mix altogether with a spatula. The dough will be fairly dry and only just brought together.
Cover your bowl with cling film or a damp tea towel and let it sit for around 1 hour.
Forming Up Your Dough
Work your way around the bowl, grabbing the dough from the outside, stretching it up and over itself until a smooth ball is formed. You shouldn’t need more than about 20-25 folds to form the ball.
Once the dough has formed into a smooth ball, pop the cling film back on and let it rest for 30 minutes.
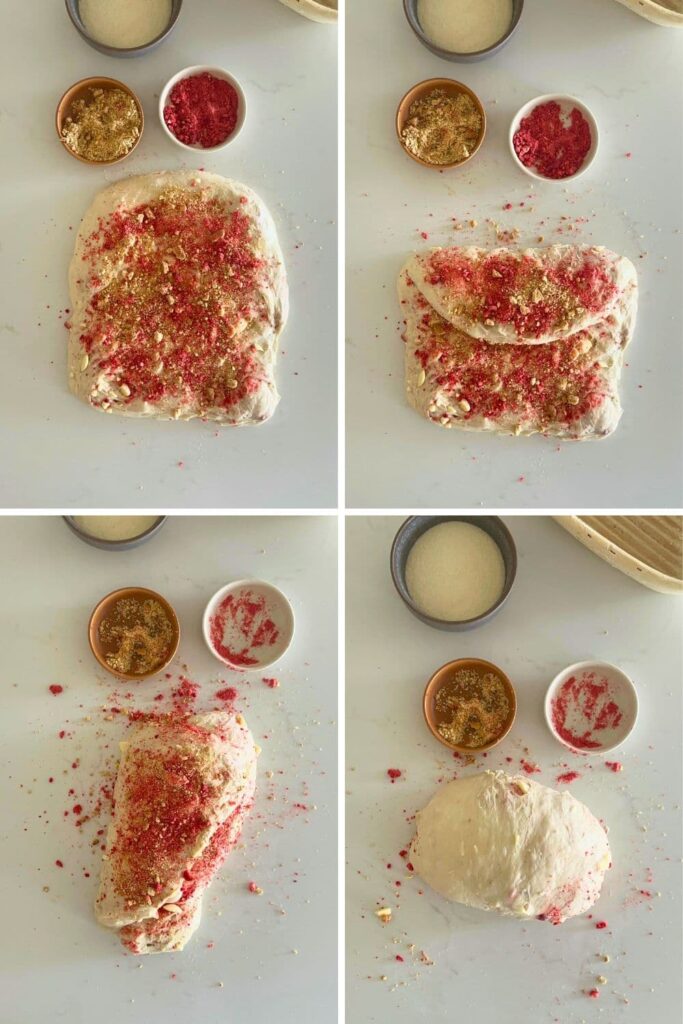
Stretch & Fold – Creating Structure
You need to add the white chocolate chunks and freeze dried strawberries to your dough during the stretch and fold phase. It’s very easy to do!
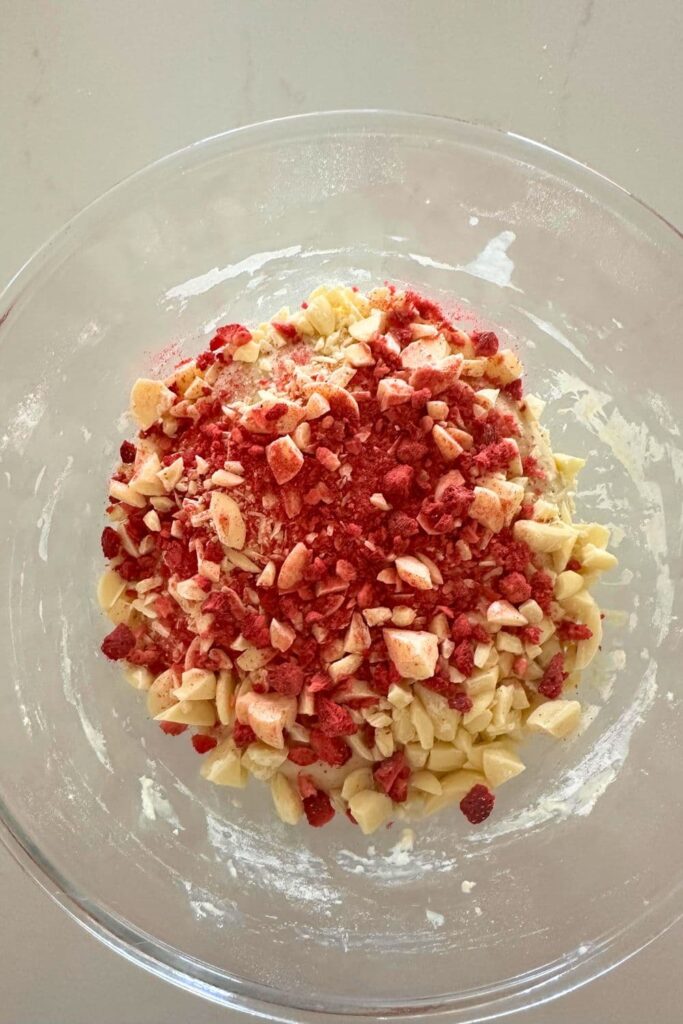
Try to add them around the second or third set of stretch and folds. So do your first set of stretch and folds with the dough as is and then add the inclusions on the second (or third) set depending on how your dough is behaving.
Try to do around 4 sets of stretch and folds with around 15 to 30 minutes between each set.
Bulk Ferment
Once you’ve finished your stretch and folds, place the cling film or damp tea towel back over your dough and let it rest and bulk ferment at room temperature. This can happen quite quickly with the maple syrup in the dough and all the inclusions, so keep an eye on that dough.
Shaping Your Dough
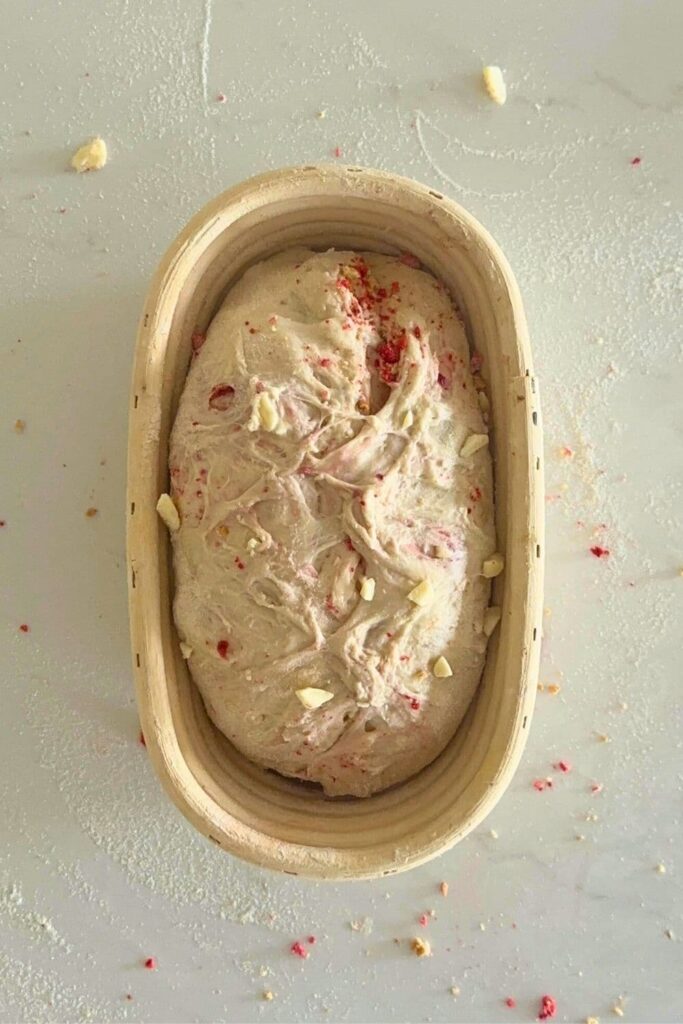
Once your dough has finished its first ferment, it’s time to give it some shape and surface tension and add the extra freeze dried strawberries and cookie crumbs inside. I think this recipe lends itself to a batard however it’s completely up to you what shape you would like.
Stretch your dough out into a rough rectangle and sprinkle over a generous amount of the spice mixture. Fold the top down and sprinkle on some more. Fold the sides in, sprinkle some more. It’s really up to you as to how much of the mixture you want to use.
Roll up the dough like a burrito and pull it towards you to create some surface tension and ensure all of those gorgeous freeze dried strawberries and cookie crumbs are tucked up inside.
Place the shaped dough into your banneton with the seam side up. Stitch the base together if you need to.
Cold Ferment
Now your dough is in it’s “shaping container” cover it loosely with a plastic bag or damp tea towel and place into the fridge to cold ferment.
Try to leave it in the fridge for a minimum of 5 hours. You can leave this in the fridge for up to 24 hours. I don’t like to leave this one in the fridge for longer than this because of the added ingredients.
Preparing to Bake Your Sourdough
Once you’re ready to bake your sourdough, you’ll need to preheat your oven to 230C/450F.Place your Dutch Oven into the oven when you turn it on so it gets hot. Try to preheat for around 1 hour to ensure your oven is super hot – but you know your oven so just adjust this time if you need to.
Baking Your Sourdough
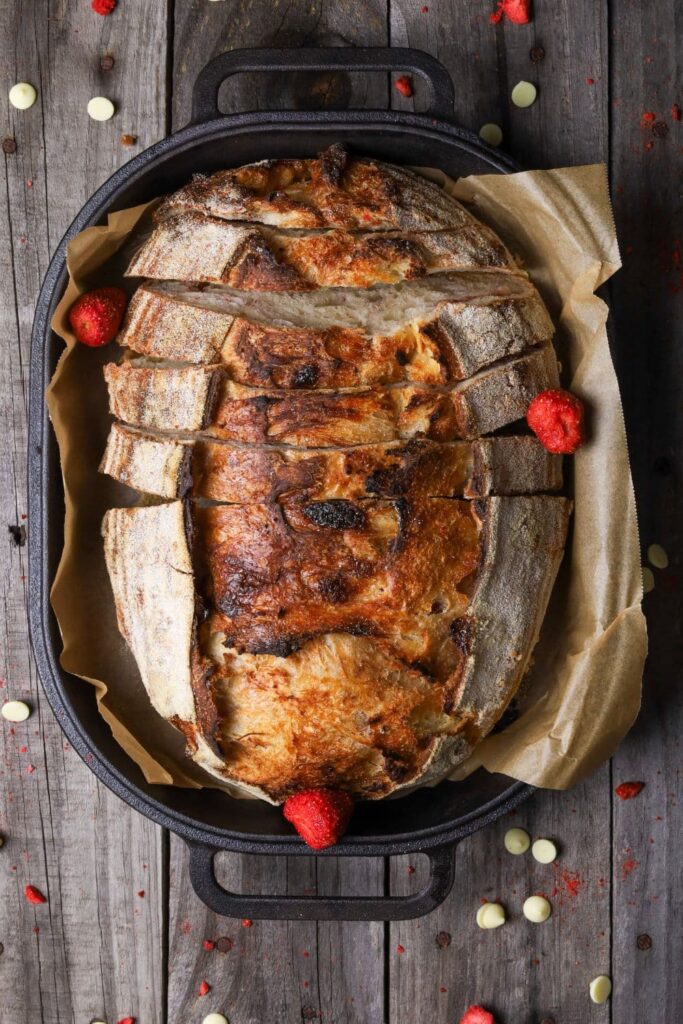
Now it’s time to bake!When your oven is at temperature. Take your sourdough out of the fridge. Gently place it onto a piece of baking paper.Gently score your bread with a lame, clean razor blade or knife.
Carefully take your dutch oven out of the oven. Place the sourdough into the pot using the baking paper as a handle. Put the lid on and place into the hot oven.
BAKE TIME:
30 minutes with the lid on at 230C/450F
plus 10-15 minutes with the lid off at 210C/410F
If you’re worried about the base of your bread burning, place a baking sheet on shelf underneath your Dutch Oven – it works! When you remove your dough from the oven, carefully remove it from the dutch oven as soon as possible and place on a wire rack to cool.
Baking Timeline
| TIME | PROCESS |
|---|---|
| 9 am | Premix and autolyse for around an hour, forming up the dough and leaving to rest for another 30 minutes before stretch and folds. |
| 11 am | 1st stretch and fold |
| 11.30 am | 2nd stretch and fold – add half the freeze dried strawberries and white chocolate chunks. |
| 12 pm | 3rd stretch and fold – add other half of the freeze dried strawberries and white chocolate chunks. |
| 12.30 pm | 4th stretch and fold. |
| 1 pm | Bulk fermentation at room temperature remembering that the maple syrup will speed up fermentation. |
| 5 pm | Shape dough into a batard, adding the crushed cookies and extra freeze dried strawberries, place into banneton and then into fridge for cold fermentation. |
| 7 am | Wake and bake! The next morning, you can get up, make a coffee and bake your sourdough strawberries and cream sourdough loaf! |
Frequently Asked Questions
I don’t recommend using fresh strawberries to make this loaf. Strawberries are mostly water and they will add too much hydration to your loaf. In testing this recipe, I tested it so many times with fresh strawberries and it was always too wet and always baked up dense and gummy.
When testing this recipe, I experimented with using cream cheese during the shaping process (instead of white chocolate) and I found that the cream cheese generally absorbed into the loaf during baking and didn’t add a lot to the flavor of the baked bread. It also made the loaf really gummy, so I recommend using white chocolate chunks to achieve the creaminess in this loaf.
You can leave the maple syrup out if you prefer. I love the sweetness it brings to the loaf, but if you don’t want to add it, you can just leave it out.
Strawberries and Cream Sourdough Loaf
Equipment
- Mixing Bowl
- Digital Scale
- Banneton
- Dutch Oven
Ingredients
Bread Dough
- 100 g Sourdough Starter
- 350 g Water
- 500 g Bread Flour
- 10 g Salt
- 5 g Vanilla Paste
- 20 g Maple Syrup
Added During Stretch and Folds
- 15 g Freeze Dried Strawberries, (crushed)
- 100 g White Chocolate Chunks
Added During Shaping
- 15 g Freeze Dried Strawberries, (crushed)
- 30 g Cookie Crumbs, (crushed – I've used Digestive cookies)
Strawberry Cream Cheesecake Spread
Instructions
- Pre Mix & Autolyse:Weigh out your sourdough starter, water, vanilla and maple syrup in a glass or ceramic bowl. Mix them together so that the maple syrup, vanilla and sourdough starter are dissolved in the water (or at least really well distributed).Then add your flour and salt and mix altogether with a spatula. The dough will be fairly dry and only just brought together.Cover your bowl with cling film or a damp tea towel and let it sit for around 1 hour.
- Forming Up Your Dough:Work your way around the bowl, grabbing the dough from the outside, stretching it up and over itself until a smooth ball is formed. You shouldn't need more than about 20-25 folds to form the ball.Once the dough has formed into a smooth ball, pop the cling film back on and let it rest for 30 minutes.
- Stretch & Fold – Creating Structure:You need to add the white chocolate chunks and freeze dried strawberries to your dough during the stretch and fold phase. It's very easy to do! Try to add them around the second or third set of stretch and folds. So do your first set of stretch and folds with the dough as is and then add the inclusions on the second (or third) set depending on how your dough is behaving. Try to do around 4 sets of stretch and folds with around 15 to 30 minutes between each set.
- Bulk Ferment:Once you've finished your stretch and folds, place the cling film or damp tea towel back over your dough and let it rest and bulk ferment at room temperature. This can happen quite quickly with the maple syrup in the dough and all the inclusions, so keep an eye on that dough.
- Shaping Your Dough:Once your dough has finished its first ferment, it's time to give it some shape and surface tension and add the extra freeze dried strawberries and cookie crumbs inside.I think this recipe lends itself to a batard however it's completely up to you what shape you would like. Stretch your dough out into a rough rectangle and sprinkle over a generous amount of the cookie crumbs and crushed freeze dried strawberries. Fold the top of the dough down and sprinkle more of the cookie crumbs and freeze dried strawberries. Fold the sides in and continue to sprinkle all of the ingredients over until you've used them all. Roll up the dough like a burrito and pull it towards you to create some surface tension and ensure all of those gorgeous strawberries and cookie crumbs are tucked up inside.Place the shaped dough into your banneton with the seam side up. Stitch the base together if you need to.
- Cold Ferment:Now your dough is in it's "shaping container" cover it loosely with a plastic bag or damp tea towel and place into the fridge to cold ferment.Try to leave it in the fridge for a minimum of 5 hours. You can leave this in the fridge for up to 24 hours. I don't like to leave this one in the fridge for longer than this because of the added ingredients.
- Preparing to Bake Your Sourdough:Once you're ready to bake your sourdough, you'll need to preheat your oven to 230C/450F. Place your Dutch Oven into the oven when you turn it on so it gets hot. Try to preheat for around 1 hour to ensure your oven is super hot – but you know your oven so just adjust this time if you need to.
- Baking Your Sourdough:Now it's time to bake!When your oven is at temperature. Take your sourdough out of the fridge. Gently place it onto a piece of baking paper.Gently score your bread with a lame, clean razor blade or knife.Carefully take your dutch oven out of the oven. Place the sourdough into the pot using the baking paper as a handle. Put the lid on and place into the hot oven. BAKE TIME:30 Minutes with the lid on at 230C/450F plus10-15 Minutes with the lid off at 210C/410FIf you're worried about the base of your bread burning, place a baking sheet on shelf underneath your Dutch Oven – it works!
- Finishing Your Bake:When you remove your dough from the oven, carefully remove it from the dutch oven as soon as possible and place on a wire rack to cool.
Notes
- Notes on Sourdough Starter – This recipe is based on you having an active starter that you have fed a few hours before starting your bake. For information on whether your starter is ready, go here. I’ve used 100g of starter, but you can use less if you’re baking in warmer temperatures. You can read about how to adjust the amount of starter you use here.
- Notes on Stretch & Folds – This loaf requires you to add a lot of inclusions during stretch and folds so just take it easy. The dough will tear a little but just let it rest and it will recover and absorb all of the inclusions.
- Notes on Baking – If you’re worried about the base of your bread burning, place a baking sheet on shelf underneath your Dutch Oven – it works! If you’re worried about your bread not being cooked all the way through, turn the oven off and place your dough straight onto the oven rack. Leave the door ajar and let your bread rest there for a few hours. Remember not to cut into your loaf too soon – you’ll need to let it cool for at least a few hours (4-6 is best).
Nutrition
Nutrition information is automatically calculated, so should only be used as an approximation.
Like this? Rate and comment below!


I’m blown away….in the best way possible!! I’m sure you know that heart-stopping feeling when a sourdough bread comes together and turns out beautifully!!!! That’s what is happening to me right now!!! I haven’t tasted it yet!! I may just bask in the beauty of it for awhile before I do, but I am sure it will be delicious!!! Thank you for the recipe! I followed it to a T except for leaving out the cookie crumbs…completely forgot to add them in! I wish I could send you pictures!
We love to hear that! Thank you so much, Robbie!
Can I use fresh strawberries?
I don’t think that will work since they will add a lot more moisture.
You call for about 4 hours bulk ferment, but not how much, or what percentage rise to expect. Should it double in size before shaping? I’m in a warm area and it would help to know % rather than time on the bulk ferment.
I always let the dough double 🙂
I made it, with about 75% rise on the first bulk ferment. It still rose more in the fridge before baking. Came out beautiful and delicious. Made a strawberry cream cheese spread to slather on it and it’s as good as cheese danish! Thanks gor this yummy recipe!
What kind of cookie crumbs?
You can use graham crackers, digestive biscuits etc. In the photos you can see on this post I’ve used crushed digestive cookies.
This is an awesome bread with strawberry cream cheese spread over slices. I’m curious if anyone has made individual rolls, maybe 8, with this recipe and how long they’d need to bake?
Hi Deb, thanks so much for your kind words and your question! You can definitely make smaller rolls from this loaf. You could actually use this method for making crusty sourdough bread rolls after the dough has cold fermented. All the baking instructions are there too 🙂 Let me know how it goes 🙂
Can I use dried strawberries instead of freeze dried strawberries?
You can – yes. Just be mindful that they can produce extra moisture. This is the main reason I use freeze dried. I experimented with fresh and dried strawberries, but found that they produced too much moisture and also didn’t hold their color like freeze dried strawberries 🙂