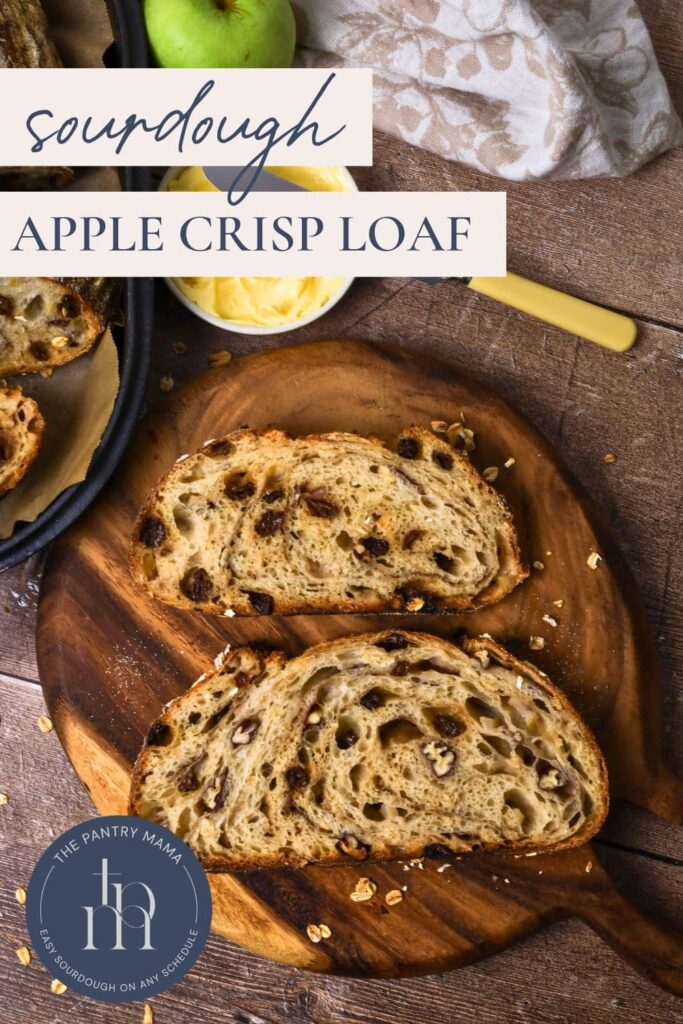
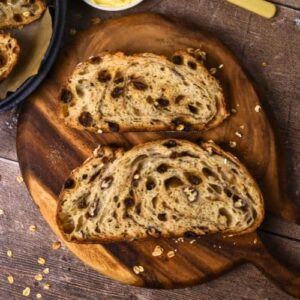
Sourdough Apple Crisp Bread
This post may contain affiliate links.

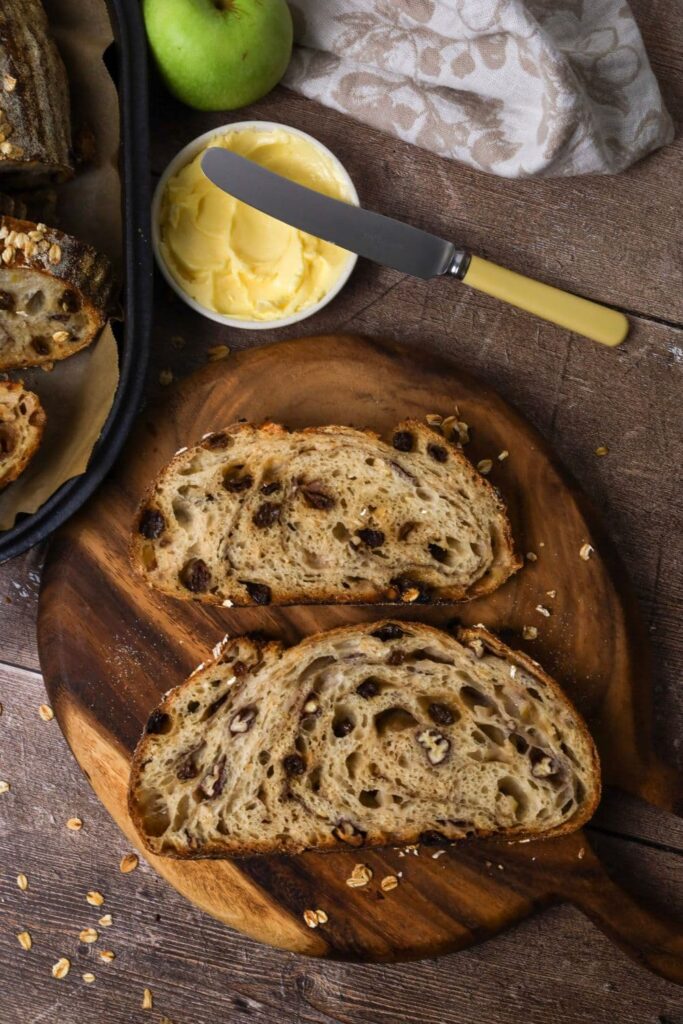
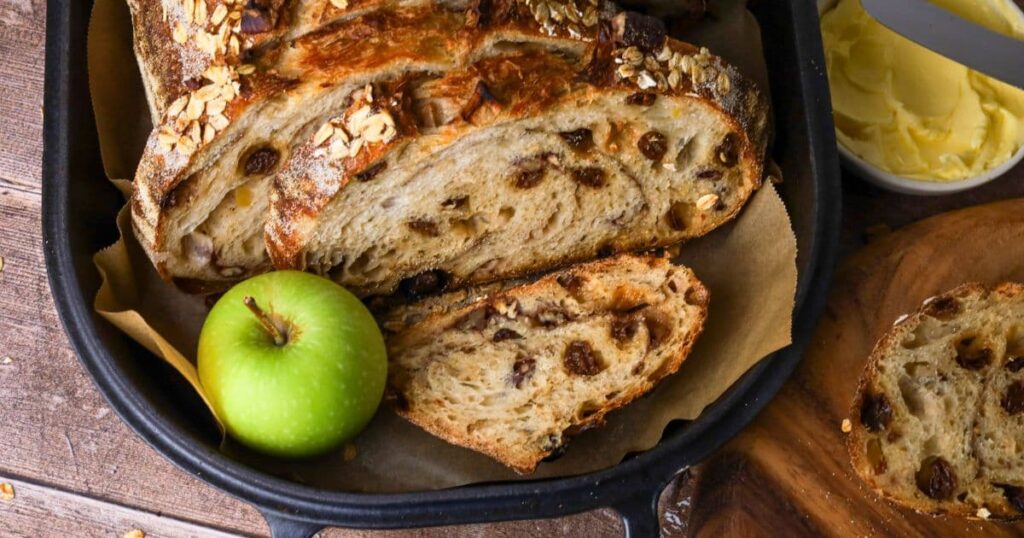
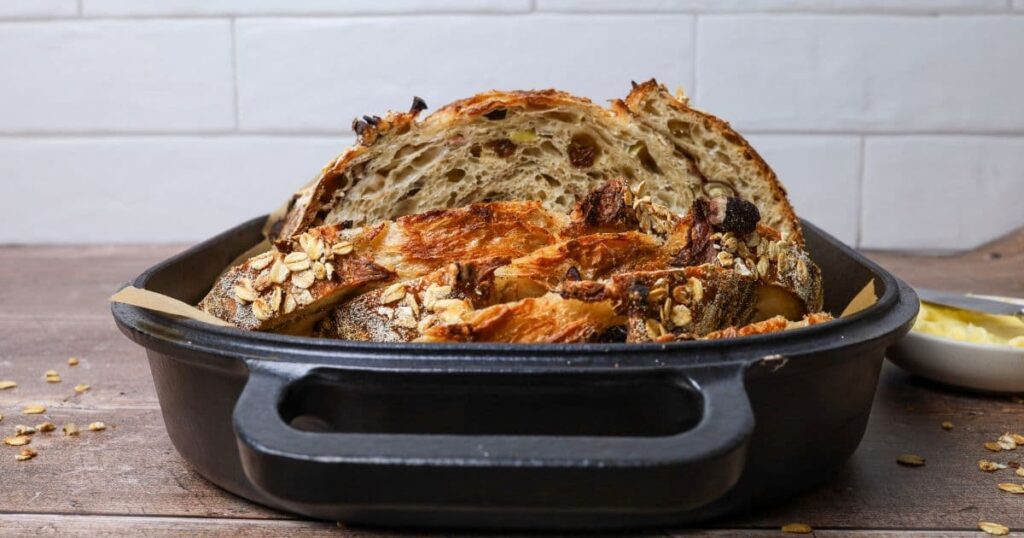
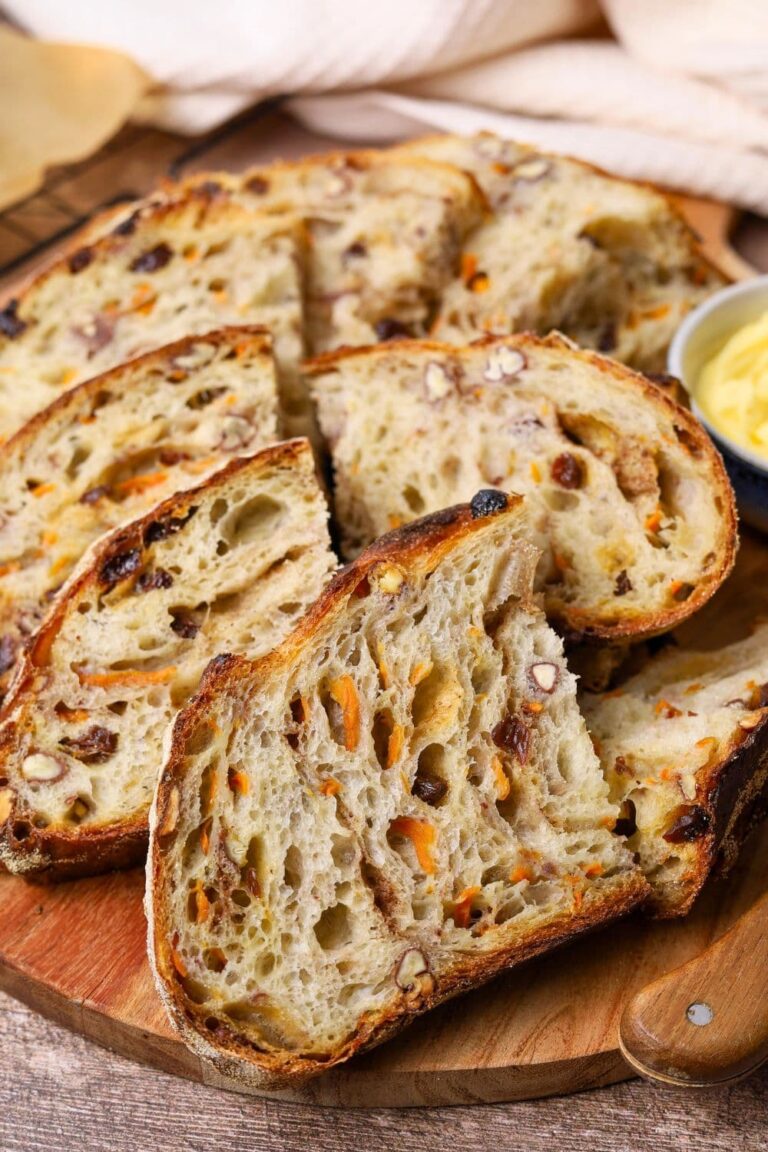
Hands up if you love the comfort of a warm apple crisp for dessert? Well, I've taken everything that's good about an apple crisp and transferred it to a sourdough loaf. It's such a delightfully warm and comforting sourdough loaf, full of diced apple, rolled oats, honey and warming spices - just like a warm sourdough apple crisp on a cold fall evening.
Why You'll Love This Recipe!
Everything You Love About Apple Crisp! - I've taken everything that's good about my sourdough apple crisp recipe and added it to a loaf of sourdough bread! It makes dessert totally acceptable for breakfast! And that's always a good thing, right?
Brunch Centrepiece - Like many flavored sourdough loaves, this sourdough apple crisp loaf makes a beautiful centrepiece for a fall inspired brunch.
Ingredients
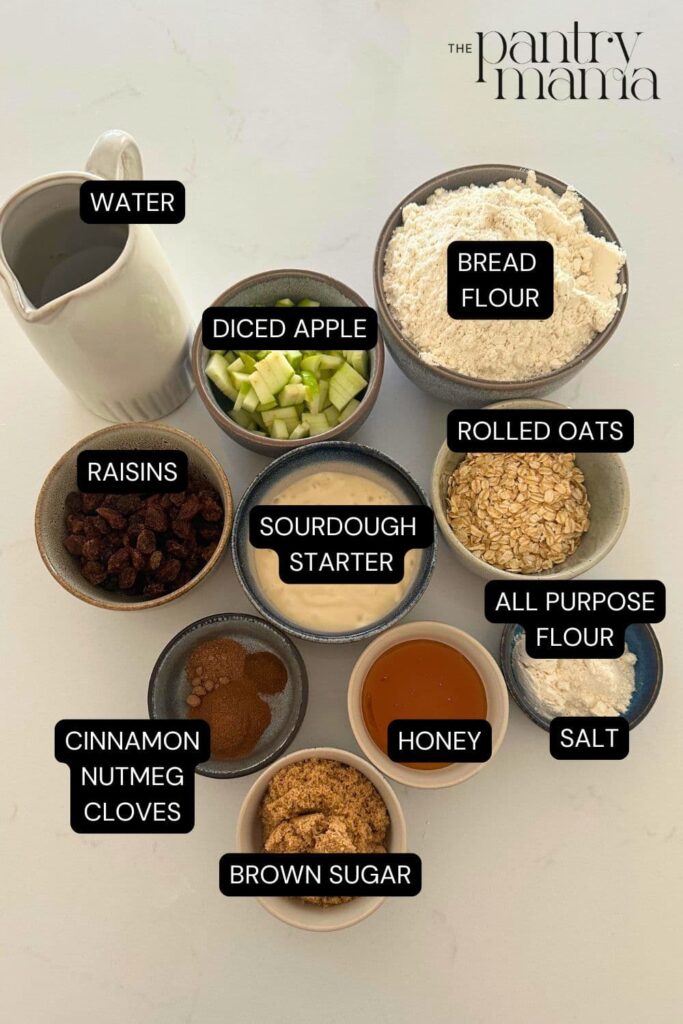
- Sourdough Starter - you'll need an active and bubbly sourdough starter that's been fed in that last few hours so it's ready to raise your dough!
- Water
- Honey - I've used honey to give this bread a little sweetness, but you can choose to use maple syrup instead if you want to.
- Bread Flour - as always, good quality bread flour is a must!
- Rolled Oats - it's important to use traditional rolled oats and not quick oats. Rolled oats bring so much flavor and texture to this loaf. I add some into the banneton before placing the loaf down so that they stick to the crust and toast while baking.
- Salt - you can reduce to suit your own taste, but I recommend at least 10g of salt for this loaf both for flavor and gluten development.
- Raisins - or sultanas, depending on where you live in the world, bring sweet pops of flavor to this loaf. They are not technically an ingredient in an apple crisp but I've added them this loaf for some visual interest and sweetnesss.
- Apple - dice a green apple, skin on (any chance to get extra fibre in). You can use any apple you like really, but I prefer to use green.
- Warming Spices - just like in an apple crisp, I've used warming spices to create the fall flavors you know and love. I've used cinnamon, nutmeg and cloves. You can adjust these to suit your own tastes.
- Brown Sugar - brown sugar brings a gorgeous color and sweetness to this loaf. I've added it in a similar way to this sourdough carrot cake loaf.
- All Purpose Flour - I've used all purpose flour along with the brown sugar in order to stop the brown sugar from leaking out during the cold fermentation.
- Pecans - I use pecans in the topping for my sourdough apple crisp because they increase the crispiness (that is totally a thing) and I just love them. Again you can always leave them out or replace them with walnuts if you prefer.
How To Make A Sourdough Apple Crisp Loaf
One of the things I love about this loaf is how much flavor it packs in. The process of making this loaf was actually inspired by my sourdough carrot cake bread, because just like that loaf, this loaf has some of the flavors added during the mixing stage, some during the stretches and folds and then some during the shaping. It's such a beautiful process and one that I hope you enjoy as much as I do! Honestly there's nothing better than planning this loaf on a quiet Sunday. It's better a day spa in my opinion!
Pre Mix & Autolyse
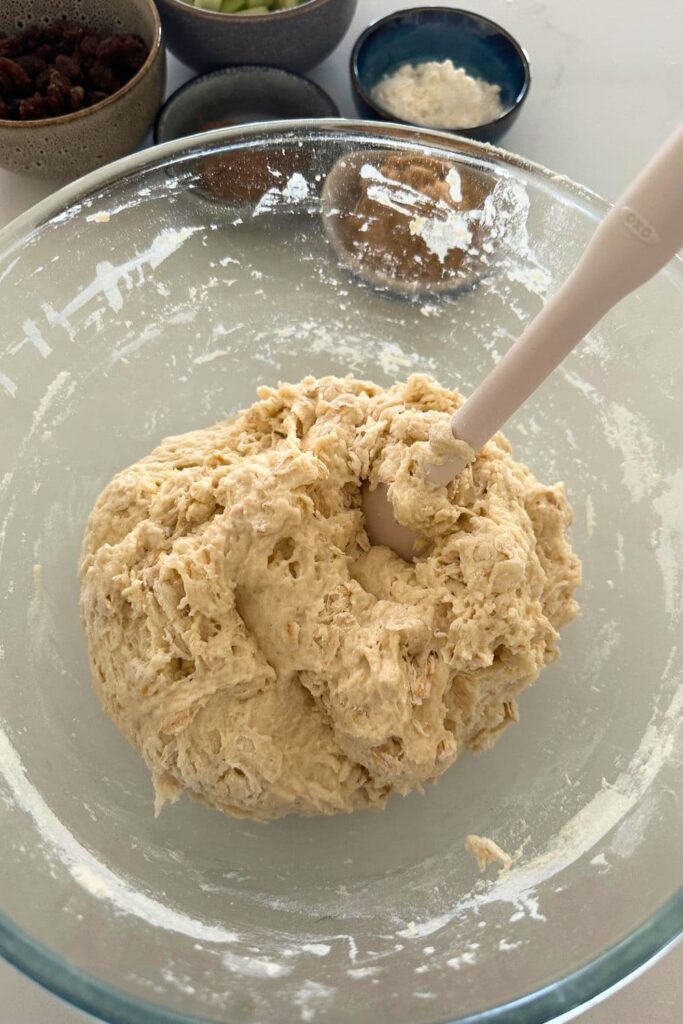
Weigh out your sourdough starter, water and honey in a glass or ceramic bowl. Mix them together so that the honey and sourdough starter is dissolved in the water (or at least really well distributed).
Then add your flour, rolled oats and salt and mix altogether with a spatula. The dough will be fairly dry and only just brought together. Cover your bowl with cling film or a damp tea towel and let it sit for around 1 hour.
Forming Up Your Dough
Work your way around the bowl, grabbing the dough from the outside, stretching it up and over itself until a smooth ball is formed. You shouldn't need more than about 20-25 folds to form the ball.
Once the dough has formed into a smooth ball, pop the cling film back on and let it rest for 30 minutes.
Stretch & Fold - Creating Structure
You need to add the raisins and diced apple to your dough during the stretch and fold phase. It's very easy to do! Try to add them around the second or third set of stretch and folds. So do your first set of stretch and folds with the dough as is and then add the inclusions on the second (or third) set depending on how your dough is behaving.
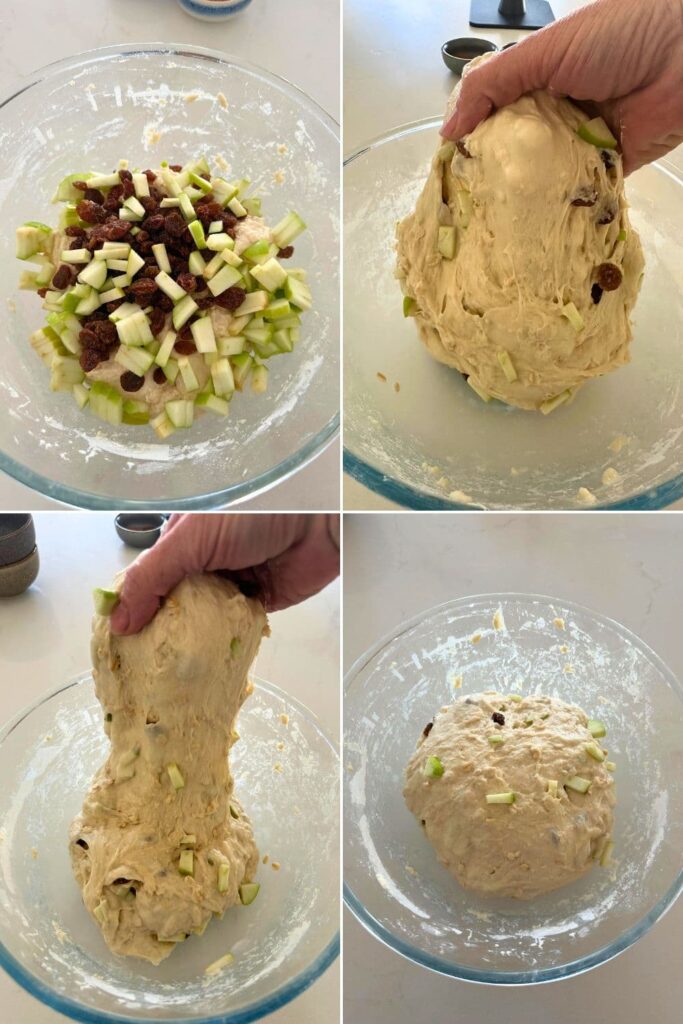
Try to do around 4 sets of stretch and folds with around 15 to 30 minutes between each set.
Bulk Ferment
Once you've finished your stretch and folds, place the cling film or damp tea towel back over your dough and let it rest and bulk ferment at room temperature. This can happen quite quickly with the honey in the dough and all the inclusions, so keep an eye on that dough.
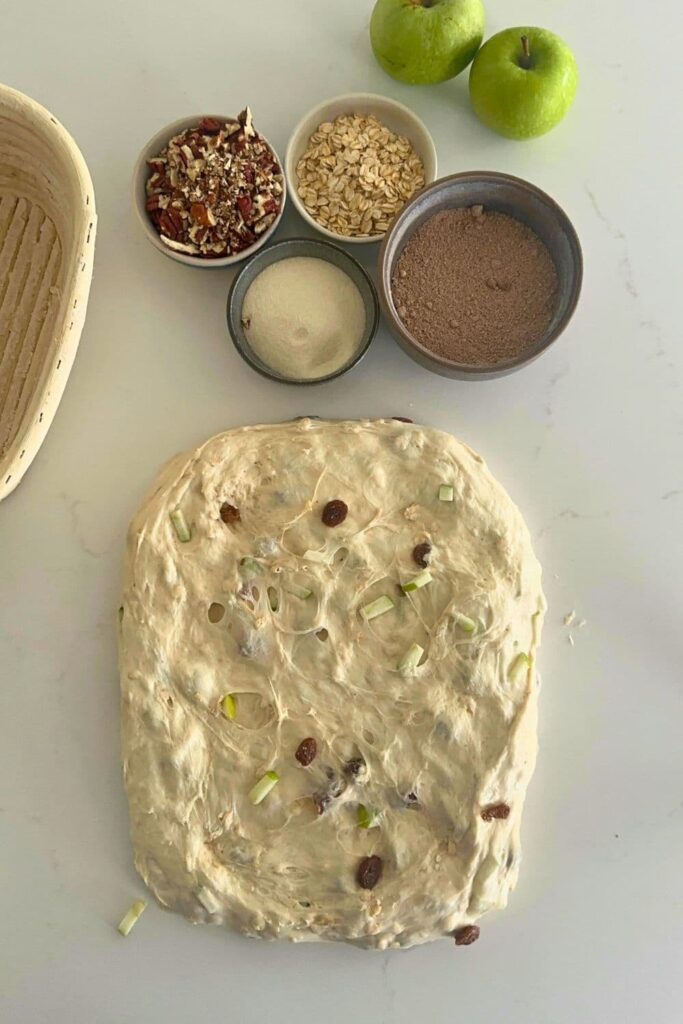
While your dough is fermenting, take a small bowl and mix the cinnamon, nutmeg, cloves, brown sugar and all purpose flour together. Set this aside until you're ready to shape your dough. Chop the pecans if you're going to use them and pop them alongside your spice mixture.
Shaping Your Dough
Once your dough has finished its first ferment, it's time to give it some shape and surface tension and add the spices that you've kept aside.
I think this recipe lends itself to a batard however it's completely up to you what shape you would like.
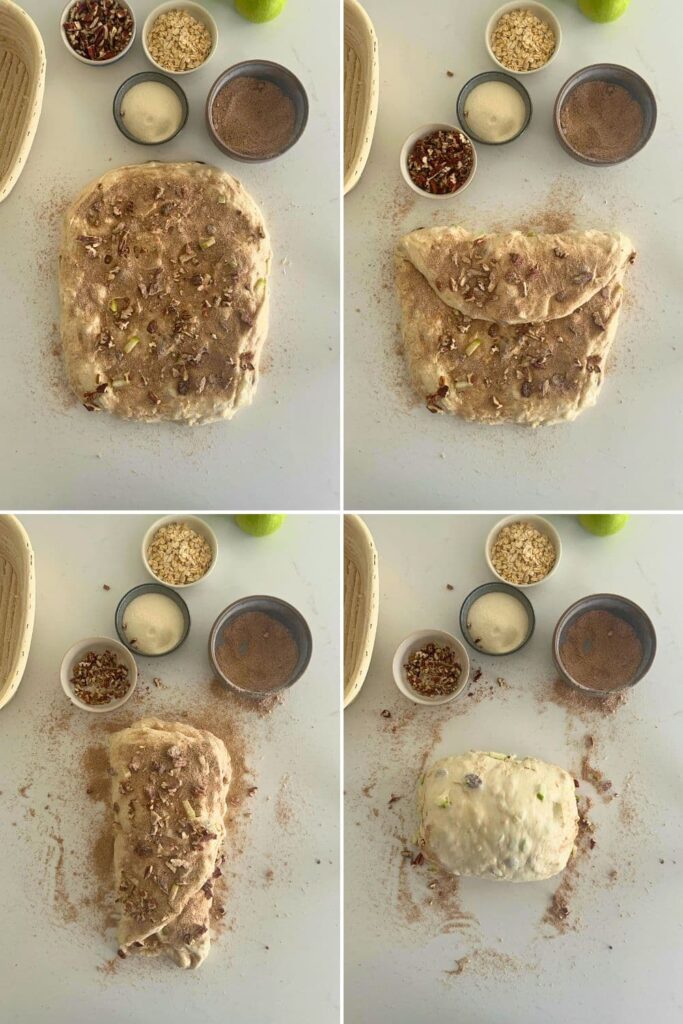
Stretch your dough out into a rough rectangle and sprinkle over a generous amount of the spice mixture.
Fold the top down and sprinkle on some more. Fold the sides in, sprinkle some more. It's really up to you as to how much of the mixture you want to use. If you're using the pecans, add these along with the spice mixture.
Roll up the dough like a burrito and pull it towards you to create some surface tension and ensure all of those beautiful spices are tucked up inside. Place the shaped dough into your banneton with the seam side up. Stitch the base together if you need to.
I like to sprinkle some rolled oats into my banneton before I place the dough on top so that they stick to the top of the dough.
Cold Ferment
Now your dough is in it's "shaping container" cover it loosely with a plastic bag or damp tea towel and place into the fridge to cold ferment.
Try to leave it in the fridge for a minimum of 5 hours. I don't like to leave this loaf in the fridge for too long - generally I don't leave it more than 12 hours because after this the apple can cause moisture issues.
Preparing to Bake Your Sourdough
Once you're ready to bake your sourdough, you'll need to preheat your oven to 230C/450F. Place your Dutch Oven into the oven when you turn it on so it gets hot.
Try to preheat for around 1 hour to ensure your oven is super hot - but you know your oven so just adjust this time if you need to.
Baking Your Sourdough
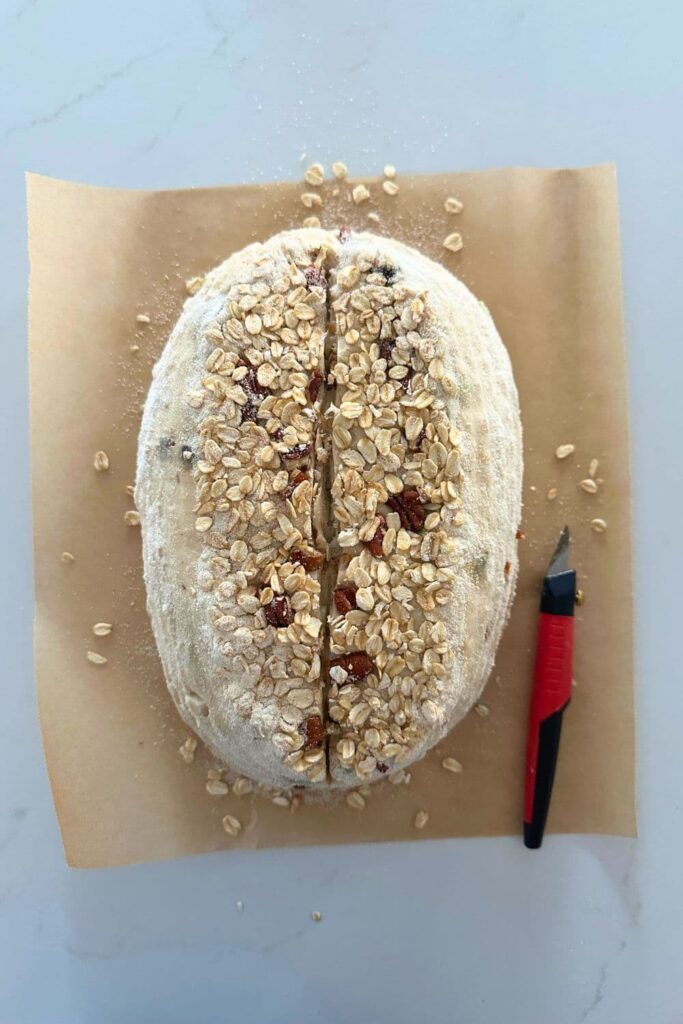
Now it's time to bake! When your oven is at temperature. Take your sourdough out of the fridge. Gently place it onto a piece of baking paper. Gently score your bread with a lame, clean razor blade or knife.
Carefully take your dutch oven out of the oven. Place the sourdough into the pot using the baking paper as a handle. Put the lid on and place into the hot oven.
BAKE TIME:
30 Minutes with the lid on at 230C/450F
plus 10-15 Minutes with the lid off at 210C/410F
If you're worried about the base of your bread burning, place a baking sheet on shelf underneath your Dutch Oven - it works!
When you remove your dough from the oven, carefully remove it from the dutch oven as soon as possible and place on a wire rack to cool.
Baking Timeline
This is just a sample baking timeline, you can adjust it to suit your own needs. I generally feed my starter before bed in order to start the process in the morning like this. I give my sourdough starter a large feed overnight to ensure it peaks in the morning. You can read more about sourdough starter ratios here.
| TIME | PROCESS |
|---|---|
| 9 am | Premix and autolyse for around an hour, forming up the dough and leaving to rest for another 30 minutes before stretch and folds. |
| 11 am | 1st stretch and fold. |
| 11.30 am | 2nd stretch and fold - add half the diced apple and raisins. |
| 12 pm | 3rd stretch and fold - add the other half of the diced apple and raisins. |
| 12.30 pm | 4th stretch and fold. |
| 1 pm | Bulk fermentation at room temperature remembering that the honey will speed up fermentation. |
| 6 pm | Shape dough into a batard, place into banneton and then into fridge for cold fermentation. |
| 9 am | Wake and bake! The next morning, you can get up, make a coffee and bake your sourdough apple crisp bread! |
Sourdough Apple Crisp Loaf
Equipment
- Mixing Bowl
- Digital Scale
- Banneton
- Dutch Oven
Ingredients
Bread Dough
- 100 g Sourdough Starter
- 350 g Water
- 40 g Honey (can use maple syrup if you prefer)
- 500 g Bread Flour
- 50 g Rolled Oats (not quick oats)
- 10 g Salt
Added During Stretch and Folds
- 100 g Raisins (or sultanas)
- 100 g Apple (diced, skin on)
Added During Shaping
- 1 teaspoon Cinnamon (ground)
- ½ teaspoon Nutmeg
- ¼ teaspoon Cloves
- 40 g Brown Sugar
- 20 g All Purpose Flour (see notes)
- 50 g Pecans (chopped, optional)
Instructions
- Pre Mix & Autolyse:Weigh out your sourdough starter, water and honey in a glass or ceramic bowl. Mix them together so that the honey and sourdough starter is dissolved in the water (or at least really well distributed).Then add your flour, rolled oats and salt and mix altogether with a spatula. The dough will be fairly shaggy and only just brought together.Cover your bowl with cling film or a damp tea towel and let it sit for around 1 hour.
- Forming Up Your Dough:Work your way around the bowl, grabbing the dough from the outside, stretching it up and over itself until a smooth ball is formed. You shouldn't need more than about 20-25 folds to form the ball.Once the dough has formed into a smooth ball, pop the cling film back on and let it rest for 30 minutes.
- Stretch & Fold - Creating Structure:You need to add the raisins and diced apple to your dough during the stretch and fold phase. It's very easy to do! Try to add them around the second or third set of stretch and folds. So do your first set of stretch and folds with the dough as is and then add the inclusions on the second (or third) set depending on how your dough is behaving. Try to do around 4 sets of stretch and folds with around 15 to 30 minutes between each set.
- Bulk Ferment:Once you've finished your stretch and folds, place the cling film or damp tea towel back over your dough and let it rest and bulk ferment at room temperature. This can happen quite quickly with the honey in the dough and all the inclusions, so keep an eye on that dough.While your dough is fermenting, take a small bowl and mix the cinnamon, nutmeg, cloves, brown sugar and all purpose flour together. Set this aside until you're ready to shape your dough. Chop the pecans if you're going to use them and pop them alongside your spice mixture.
- Shaping Your Dough:Once your dough has finished its first ferment, it's time to give it some shape and surface tension and add the spices that you've kept aside.I think this recipe lends itself to a batard however it's completely up to you what shape you would like. Stretch your dough out into a rough rectangle and sprinkle over a generous amount of the spice mixture. Fold the top down and sprinkle on some more. Fold the sides in, sprinkle some more. It's really up to you as to how much of the mixture you want to use. If you're using the pecans, add these along with the spice mixture.Roll up the dough like a burrito and pull it towards you to create some surface tension and ensure all of those beautiful spices are tucked up inside.Place the shaped dough into your banneton with the seam side up. Stitch the base together if you need to.
- Cold Ferment:Now your dough is in it's "shaping container" cover it loosely with a plastic bag or damp tea towel and place into the fridge to cold ferment.Try to leave it in the fridge for a minimum of 5 hours. I don't like to leave this loaf in the fridge for too long - generally I don't leave it more than 12 hours because after this the apple can cause moisture issues.
- Preparing to Bake Your Sourdough:Once you're ready to bake your sourdough, you'll need to preheat your oven to 230C/450F. Place your Dutch Oven into the oven when you turn it on so it gets hot. Try to preheat for around 1 hour to ensure your oven is super hot - but you know your oven so just adjust this time if you need to.
- Baking Your Sourdough:Now it's time to bake!When your oven is at temperature. Take your sourdough out of the fridge. Gently place it onto a piece of baking paper.Gently score your bread with a lame, clean razor blade or knife.Carefully take your dutch oven out of the oven. Place the sourdough into the pot using the baking paper as a handle. Put the lid on and place into the hot oven. BAKE TIME:30 Minutes with the lid on at 230C/450F plus10-15 Minutes with the lid off at 210C/410FIf you're worried about the base of your bread burning, place a baking sheet on shelf underneath your Dutch Oven - it works!
- Finishing Your Bake:When you remove your dough from the oven, carefully remove it from the dutch oven as soon as possible and place on a wire rack to cool.
Notes
- Notes on Sourdough Starter - This recipe is based on you having an active starter that you have fed a few hours before starting your bake. For information on whether your starter is ready, go here. I've used 100g of starter, but you can use less if you're baking in warmer temperatures. You can read about how to adjust the amount of starter you use here.
- Notes on Stretch & Folds - This loaf requires you to add a lot of inclusions during stretch and folds so just take it easy. The dough will tear a little but just let it rest and it will recover and absorb all of the inclusions.
- Spice Mixture & All Purpose Flour - I've added all purpose flour to the spice mixture as this can stop the brown sugar from leaking out during cold fermentation. I also recommend not letting this loaf cold fermenting for too long (I generally don't let it cold ferment for more than 12 hours).
- Notes on Baking - If you're worried about the base of your bread burning, place a baking sheet on shelf underneath your Dutch Oven - it works! If you're worried about your bread not being cooked all the way through, turn the oven off and place your dough straight onto the oven rack. Leave the door ajar and let your bread rest there for a few hours. Remember not to cut into your loaf too soon - you'll need to let it cool for at least a few hours (4-6 is best).
Nutrition


Can you use apple cider in place of the water?
You could definitely try it! I've never done this sourdough apple crisp bread with apple cider, but I'm sure it would be a lovely addition 🙂
I cooked this and it was gummy in the middle 🥲 did I do something wrong? I usually cook my loaves at 500 then 450.
Gumminess points to under fermentation, which can be fairly common with inclusion loaves. How old is your starter? Did you allow the dough to double before you shaped it? With the baking temperature, it doesn't really matter how hot you bake the loaf at, if it's under fermented, it won't fully cook through 🙂
This is my favorite go to recipe. If I want to add different inclusions I do but I follow the base. Thank you! If you wanted to make half sized loaves, besides just halving the ingredients, would you do anything different for oven temp? Obviously time would decrease. I am thinking for Christmas presents, doing smaller gift loaves.
So glad you love the recipe! I actually wouldn't decrease the time for these even at half size, they are inclusion heavy, so bake the same time, just watch them once you have the lid off as they possibly won't need as much lid off time xx
The best sourdough bread. All your recipes are perfect.