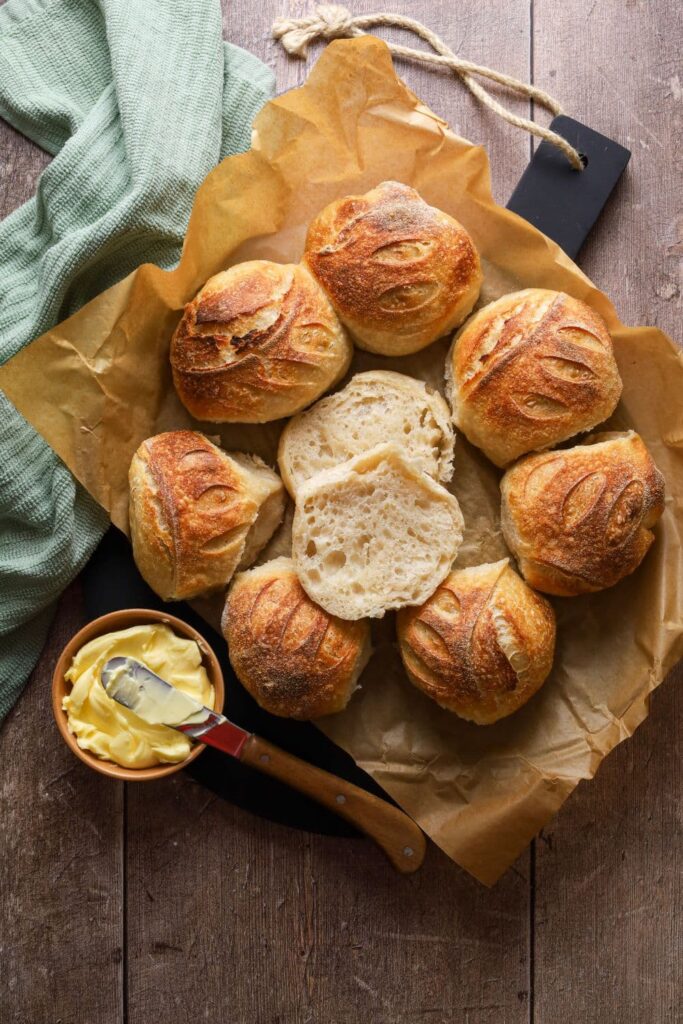
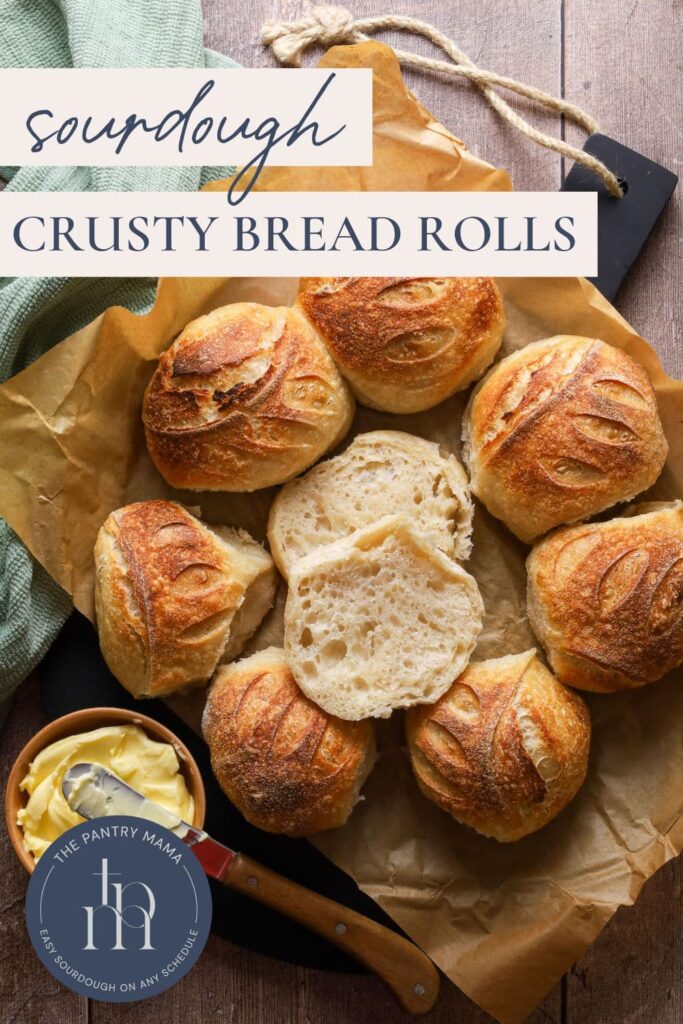
Crusty Sourdough Bread Rolls
This post may contain affiliate links.

I'm so excited to share this recipe for crusty sourdough bread rolls with you! It's one that is so simple and has been working in my kitchen for years and I know you're going to love it to! Now I know that crusty sourdough bread rolls might sound super simple, but this recipe has a little twist in the technique of how I actually form the rolls. It's really fun and saves fridge space during fermentation too!
Why You'll Love This Recipe!
Lean Dough - these crusty sourdough bread rolls are made using a lean dough, which means it's just flour, water and salt - there's no fats, oils or anything to enrich the dough.
Long Fermented - unlike many sourdough rolls, these crusty sourdough rolls are actually long fermented in the fridge, so they are a true sourdough bread with all the benefits, just in individual roll form.
Saves Fridge Storage - this technique for making crusty sourdough bread rolls has you cold ferment the dough in an oval shaped banneton which saves fridge space! You don't need super tiny bannetons, you can cut the dough right before baking. You'll find my instructions for making mini sourdough boules here.
Ingredients
- Water
- Active Sourdough Starter (use between 50g and 100g of sourdough starter depending on the temperature of your home).
- Bread Flour
- Salt
How To Make Crusty Sourdough Bread Rolls
The first part of this process is just like making your favorite sourdough batard (although you can do this with a boule too).
Weigh out your sourdough starter and water into a large ceramic or glass bowl. Mix the water and starter together briefly. Then add your flour and salt and mix whole lot together to form a dry dough.
Cover your bowl and let it sit for around 1 hour (this is called autolyse).
After the dough has been through autolyse you need to bring it together into a ball. Work your way around the bowl, grabbing the dough from the outside, stretching it up and over itself, into the centre, until a smooth ball is formed. You shouldn't need more than about 20-30 stretches to form the ball.
Once the dough has formed into a smooth ball, cover it again and let it rest for 30 minutes.
Stretch and Folds
Over the next few hours you need to create some structure for your dough by "stretching and folding".
Aim to do around 4-6 sets of stretches and folds.
For each set, stretch the dough up and over itself 4 times. Leave around 15 minutes in between each set. You do not have to be exact with time, but you need to do at least 4 sets over 2 hours.
Bulk Ferment
Once you've finished your stretch and folds, place the cling film or damp tea towel back over your dough and let it rest and ferment (a plastic cover is a better option for this stage). You want the dough to double.
Shaping The Dough
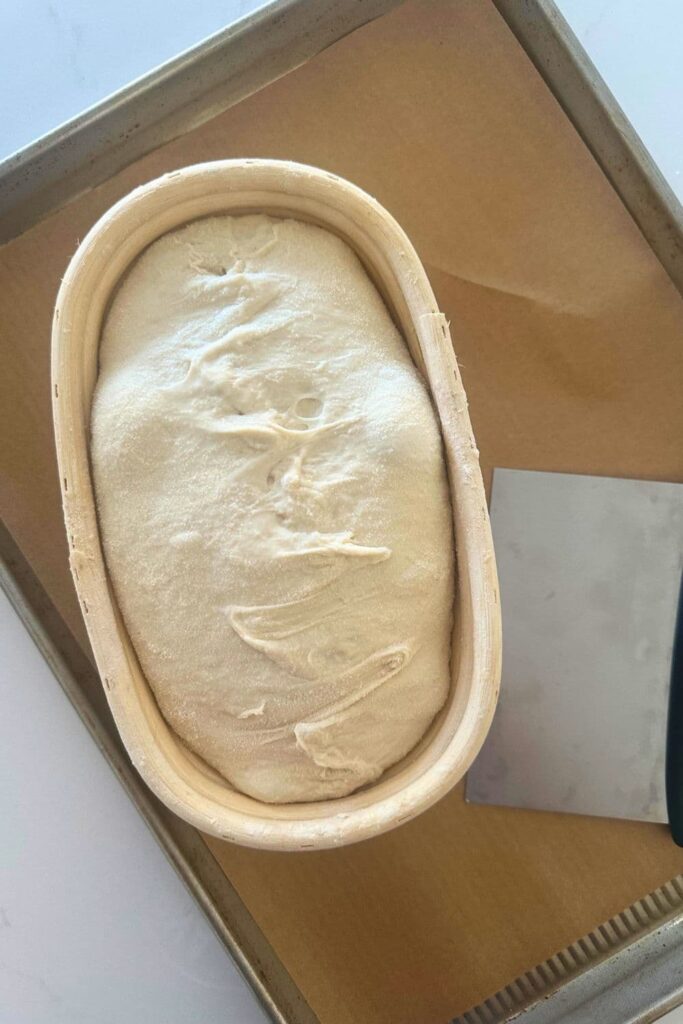
Once your dough has finished it's first ferment, it's time to shape it into a batard.You will need a banneton to put your dough into.
Placing Into A Banneton
Once the dough is shaped, place it into your banneton smooth side down, so your seam is on the top.
Cold Ferment
Now place the dough into the fridge, covered with a plastic cover, for around 24 hours to cold ferment until you're ready to cut it into rolls and bake them.
Preparing To Bake
Once you're ready to bake your crusty sourdough rolls, you'll need to preheat your oven to 230C/450F. If you are going to use a cast iron bread pan, pace this into your oven to preheat.
Cutting the Rolls
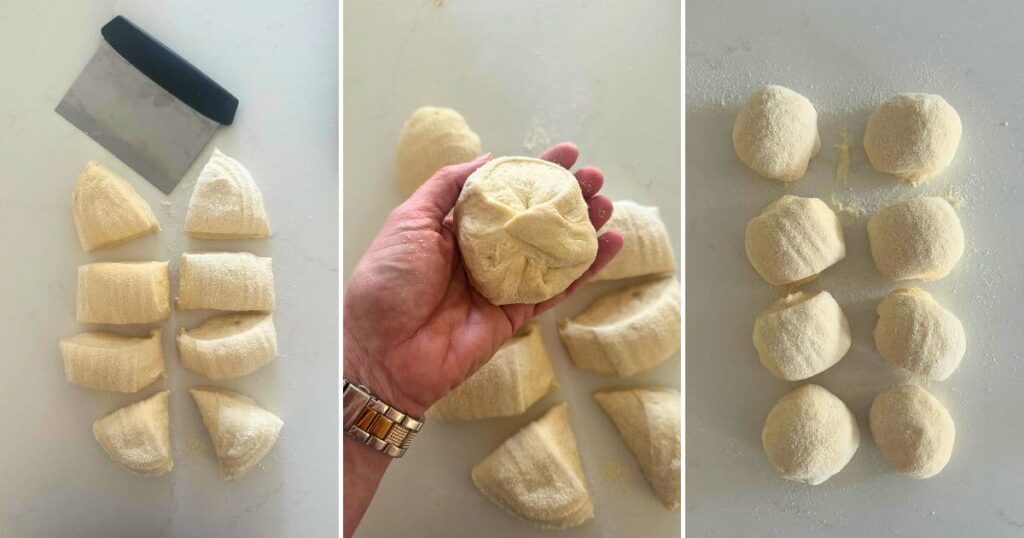
When your oven is at temperature, take your sourdough batard out of the fridge. Tip the dough out of the banneton, straight out onto a clean work surface.
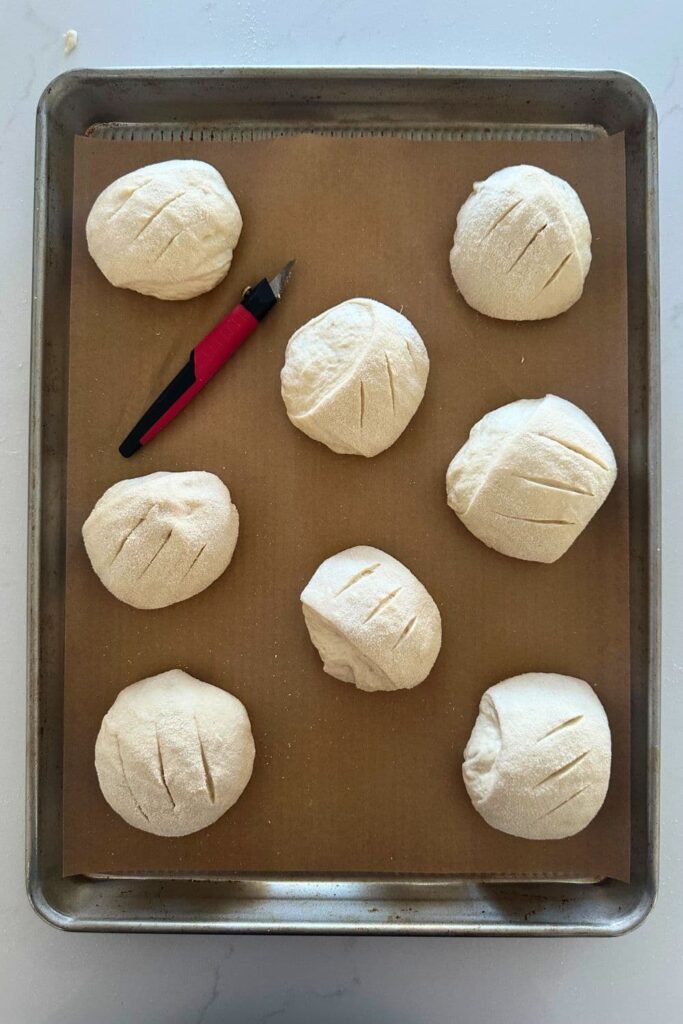
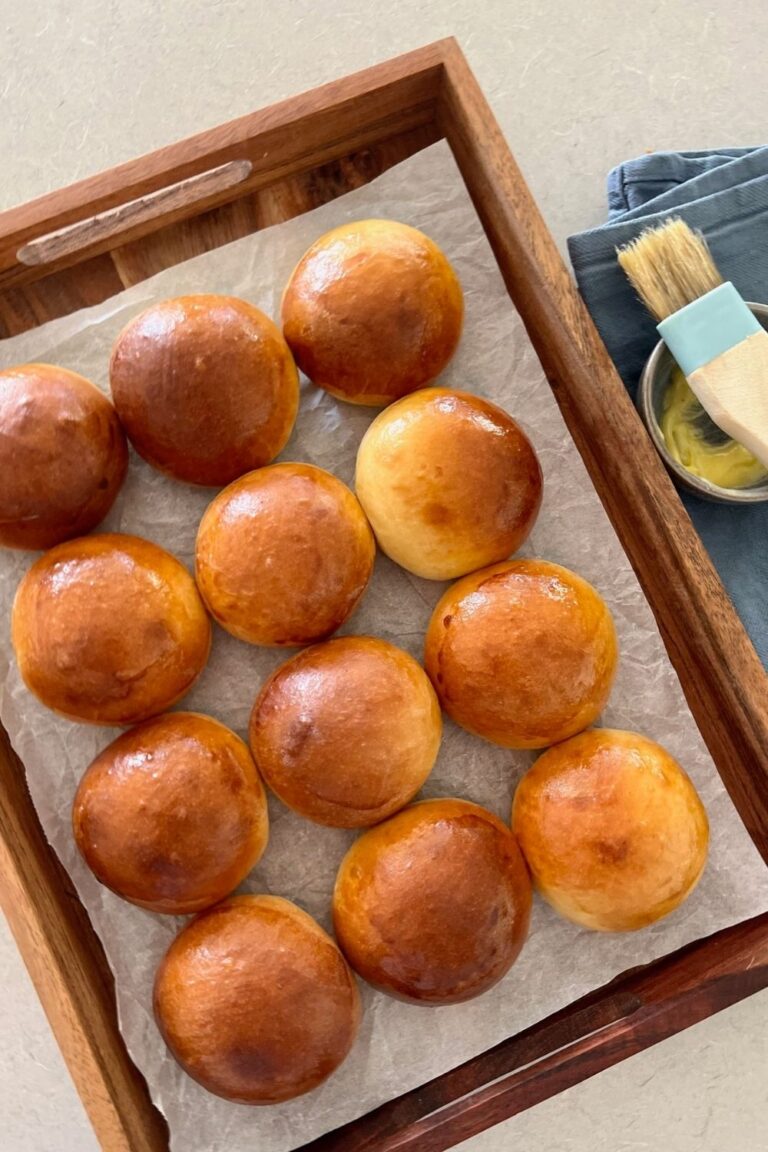
Working quickly, cut the batard in 2 length ways using a dough scraper, and then cut each half into 4 small pieces. Gently tuck the dough under each piece, forming them into rough rounds and place them on a sheet of parchment paper with a little space between each one.
Just be really gentle and shape them without actually squashing them - you want to preserve as many of those precious gas bubbles as possible.
Baking the Rolls
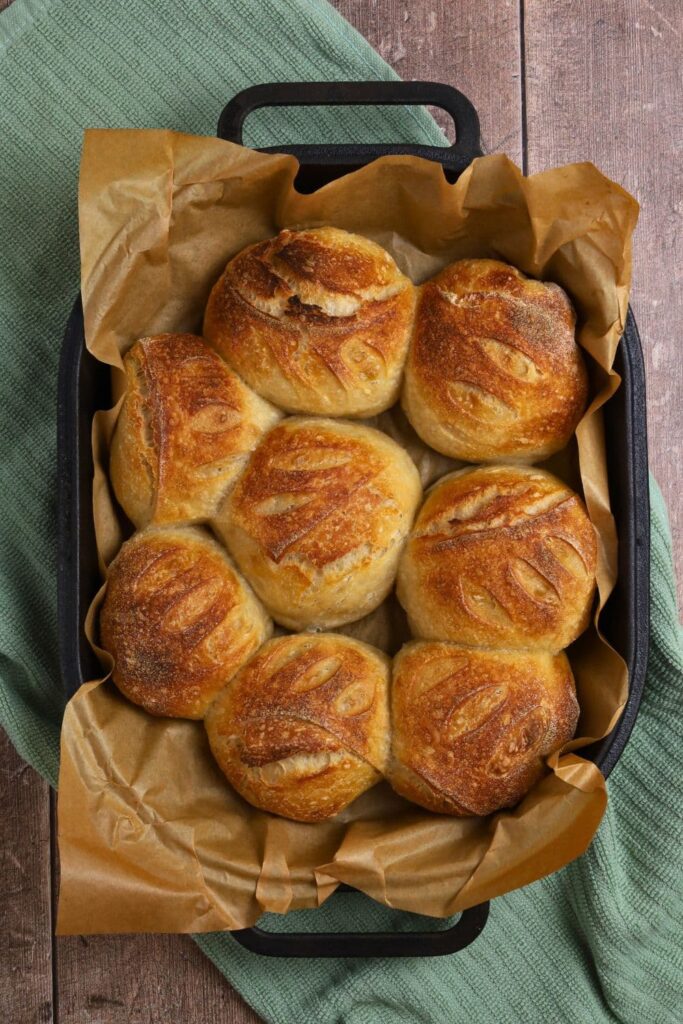
Cast Iron Bread Pan - take the hot bread pan out of the oven and gently lower the rolls in using the parchment paper. Place the lid securely on top and place into the oven. Bake for 30 minutes with the lid on at 230C/450F plus 10-15 Minutes with the lid off at 210C/410F.
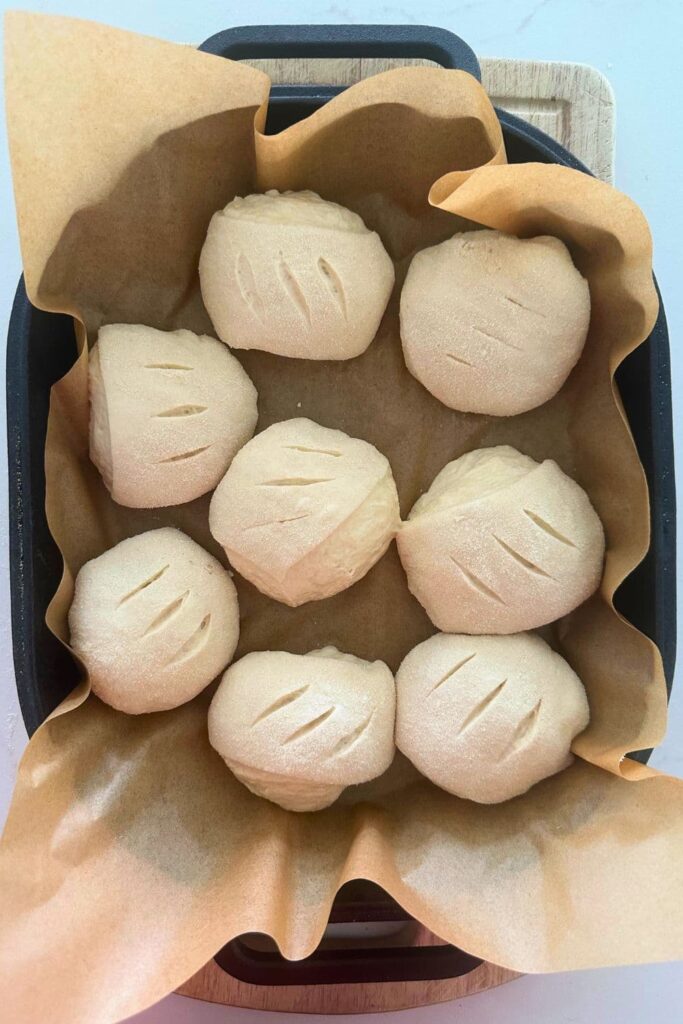
Open Baking on Cookie Sheet - place the parchment paper containing the sourdough rolls onto the cookie sheet and then spray the rolls liberally with water mist. Place immediately into the hot oven and bake at 230C/450F and then a further 10-15 Minutes at 210C/410F or until the rolls are sufficiently golden and crusty.
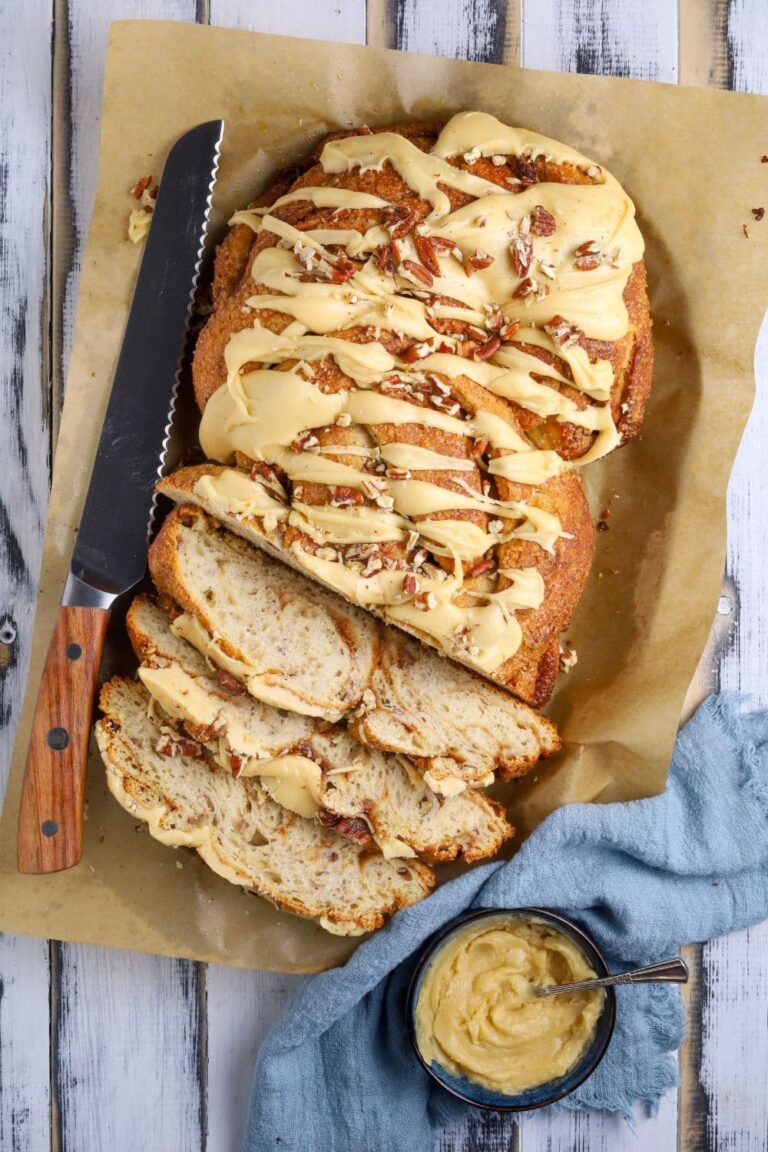
When you remove your crusty sourdough bread rolls from the oven, carefully remove them from the cast iron bread pan or cookie sheet as soon as possible and place on a wire rack to cool. You can also brush with whipped herb and garlic butter for a delicious flavor variation.
Baking Timeline
This is a sample timeline you could use to create your own crusty sourdough bread rolls. Remember that you need to make this work for your own schedule and commitments, so you can move this around as you need to. You can also find more information about creating sourdough timelines and finding your own sourdough rhythm.
| TIME | PROCESS |
|---|---|
| 10.30 pm | Feed sourdough starter 1:3:3 at bedtime so that it peaks tomorrow morning. |
| 10 am | Premix and autolyse for around an hour, forming up the dough and leaving to rest for another 30 minutes before stretch and folds. |
| 10.30 am | Stretching and folding of dough across 2 or so hours or until gluten network is developed. |
| 1 pm | Allow dough to bulk ferment at room temperature until double. |
| 9 pm | Shape dough as a batard and place shaped loaf into fridge for cold fermentation until tomorrow. |
| 10.15 am | Preheat oven. |
| 10.50 am | Take cold fermented batard out of fridge and cut into 8 equal pieces, gently tuck dough into round shapes and place onto parchment paper. |
| 11 am | Place crusty sourdough bread rolls into the oven to bake ready for lunch! |
How To Store + Freeze
I find these sourdough bread rolls are best eaten the day of baking. I prefer to bake them fresh for whatever occasion we need them for. They do freeze well, just like freezing sourdough bread.
Frequently Asked Questions
No you don't. The dough has already been through bulk fermentation and cold fermentation, so once the dough is cut into rolls you need to put it straight into a hot oven, just like you would with a regular loaf of sourdough.
Yes you can. I have tested this recipe many times and found that 8 is the optimal size for these rolls but if you like them a little larger or smaller, you can certainly divide the dough this way.
I don't recommend this because the dough will be harder to work with right after shaping. While you don't have to do a really long cold fermentation, I recommend at least a few hours in the refrigerator before cutting the dough.
Crusty Sourdough Bread Rolls
Equipment
- Mixing Bowl
- Digital Scales
- Banneton
- Dutch Oven
Ingredients
- 500 g Bread Flour
- 350 g Water
- 50 g Sourdough Starter (active and bubbly, increase to 100g if needed).
- 10 g Salt
Instructions
- Weigh out your sourdough starter and water into a large ceramic or glass bowl. Mix the water and starter together briefly. Then add your flour and salt and mix whole lot together to form a shaggy dough.
- Cover your bowl and let it sit for around 1 hour (this is called autolyse).
- After the dough has been through autolyse you need to bring it together into a ball. Work your way around the bowl, grabbing the dough from the outside, stretching it up and over itself, into the centre, until a smooth ball is formed. You shouldn't need more than about 20-30 stretches to form the ball.
- Once the dough has formed into a smooth ball, cover it again and let it rest for 30 minutes.
- Over the next few hours you need to create some structure for your dough by "stretching and folding". Aim to do around 4-6 sets of stretches and folds. For each set, stretch the dough up and over itself 4 times. Leave around 15 minutes in between each set. You do not have to be exact with time, but you need to do at least 4 sets over 2 hours.
- Bulk FermentOnce you've finished your stretch and folds, place the cling film or damp tea towel back over your dough and let it rest and ferment (a plastic cover is a better option for this stage). You want the dough to double.
- Shaping The DoughOnce your dough has finished it's first ferment, it's time to shape it into a batard. You will need a banneton to put your dough into.
- Placing Into A BannetonOnce the dough is shaped, place it into your banneton smooth side down, so your seam is on the top.
- Cold FermentNow place the dough into the fridge, covered with a plastic cover, for around 24 hours to cold ferment until you're ready to cut it into rolls and bake them.
- Preparing To BakeOnce you're ready to bake your crusty sourdough rolls, you'll need to preheat your oven to 230C/450F. If you are going to use a cast iron bread pan, place this into the oven to preheat as well.
- Cutting the RollsWhen your oven is at temperature, take your sourdough batard out of the fridge. Tip the dough out of the banneton, straight out onto a clean work surface. Working quickly, cut the batard in 2 length ways using a dough scraper, and then cut each half into 4 small pieces. Gently tuck the dough under each piece, forming them into rough rounds and place them on a sheet of baking paper with a little space between each one. Just be really gentle and shape them without actually squashing them - you want to preserve as many of those precious gas bubbles as possible.
- Baking the RollsCast Iron Bread Pan - take the hot bread pan out of the oven and gently lower the rolls in using the parchment paper. Place the lid securely on top and place into the oven. Bake for 30 minutes with the lid on at 230C/450F plus 10-15 Minutes with the lid off at 210C/410F.Open Baking on Cookie Sheet - place the parchment paper containing the sourdough rolls onto the cookie sheet and then spray the rolls liberally with water mist. Place immediately into the hot oven and bake at 230C/450F and then a further 10-15 Minutes at 210C/410F or until the rolls are sufficiently golden and crusty.When you remove your crusty sourdough bread rolls from the oven, carefully remove them from the cast iron bread pan or cookie sheet as soon as possible and place on a wire rack to cool.
- Finishing The BakeWhen you remove your crusty sourdough bread rolls from the oven, carefully remove them from the Dutch oven as soon as possible and place on a wire rack to cool.
Notes
- Notes on Flour: This recipe is written using strong Bread Flour. Bread flour has a higher protein content than All Purpose flour. If you choose to use All Purpose flour you may have a different result because of this. You can read more about the differences between All Purpose Flour and Bread Flour here.
- Notes on Sourdough Starter: This recipe is based on you having an active starter that you have fed a few hours before starting your bake. For info on how to make a sourdough starter. You can use between 50g and 100g of sourdough starter, depending on the temperature of your home.
- Notes on Stretch & Folds: If you are going to do the stretch & folds on your bench top, spray your surface with water mist rather than using flour. You can leave the dough in the bowl if you want to. Wet your hands to stop the dough sticking - although it shouldn't be too sticky. It will get less sticky as you do your stretches and folds. For more information on how to do stretch and folds, go here.
- Notes on Bulk Fermentation: If your home is warm then your dough will ferment a lot faster and could be done in as little as a few hours. If it's colder, it will take longer, possibly overnight.
I would recommend that you try to do your first few bulk ferments during daylight hours so that you can watch your dough closely.
Once you're more familiar with the process - and the temperature of your home - you will be able to do overnight ferments. You will know your dough is ready to move to the next stage when it has *just* doubled in size. It will be fairly wobbly and full of bubbles. You should be able to see large air bubbles under the surface of the dough.
You don't want to let it go any further than doubled as it will be over fermented.
If you want to do an overnight ferment, but your home is warm, consider using a little less starter (ie 25g).
Less starter means your dough will take longer to ferment and you will reduce the risk of over fermenting your dough. You'll find more information on these topics here:
When is my bulk ferment finished? What is the difference between cold ferment and bulk ferment? Why does the amount of starter matter?
- Notes on Baking: You can bake these crusty sourdough bread rolls in a cast iron bread pan (that's generally how I bake them). The rolls will touch each other if baking this way and you will need to pull them apart. If you'd prefer individual rolls then you can space them out on a cookie sheet or put them on a pizza stone. This way you'll get a crusty roll all the way around.
Nutrition


These look lovely. Do you think this recipe would work using whole wheat flour?
You can definitely do this with whole wheat flour. I recommend this recipe, and then divide and shape like I have done here 🙂
One assumes that with the open bake on a cookie sheet we bake for thirty minutes first? Same as the pan method.
Yes I bake for the same times, just obviously without the lid 🙂
How long is baking time if baking g on a tray? 30 mins, same as in the cast iron with lid?
Also you write to increase up to 100g of starter depending on temp in house. Do you increase if its colder or warmer? Thankyou!
Yes same as cast iron 🙂
So I increase starter from 50g to 100g if it's colder. During summer, it's a good idea to stick with 50g unless you have really cold AC 🙂 This post on adjusting sourdough starter amounts is a helpful read 🙂
Love a good, crusty roll. Great recipe, easy instructions.
Question if I don't have a banneton can I just let cold ferment in a bowl? Also it looks like you have flour on the rolls when you cut them is this just the photo? I make yeast dinner rolls and this is my first attempt at sour dough I was given some starter from a friend.
Yes you can just use a bowl for cold fermentation. I use semolina flour to line my bannetons, so that is the flour you can see in the photos. All the best xx
Hi there, can these rolls be frozen? If so, at what stage would you freeze them? Love your recipes. The whole wheat, rye is one of my favorites!
Thank you!
You can freeze these once they've been cut and then bake them right from frozen. I would snap freeze them on a baking tray (lined with parchment paper) first and then add them to a ziplock bag in the freezer. Alternatively, you can bake them and then allow them to cool and freeze them in a ziplock bag 🙂
Can this be done in the Thermomixer? How would you divide up the stretch & folds etc.
You can make them in the Thermomix, but there really isn't a need here because this is a regular sourdough loaf that has been cut into the rolls after shaping and cold fermentation. I feel that it's easier to mix a basic sourdough bread recipe by hand as it's too wet for the Thermomix. If you're wanting to make some delicious sourdough rolls in the Thermomix, I recommend these sourdough dinner rolls or these sourdough discard rolls 🙂
These turn out amazingly well! And are soooo delicious!
I bake them all the time now.
I always use 100g of starter and have cold fermented for 12 -48 hours and they always turn out delicious!
Thanks for this amazing recipe!
just tried your rolls for the first time, dough seemed very soft? I baked on a baking sheet, but they seemed to cook much faster, recipie doesn't mention time for baking sheet?
The dough is soft, it's basically a regular sourdough loaf dough, but we are dividing it into rolls after cold fermentation 🙂 I recommend baking them in a Dutch Oven, but if you're using an open baking sheet, you would need to reduce the temperature a little as they don't have any protection from the high heat like they do in a Dutch Oven.
Tried this method today. Rolls turned out great! I removed 900g from my batch of cold fermented dough. Shaped into a batard and placed in the fridge for 2 hours. Divided, scored and baked on a sheet pan. I was able to cover the pan for the first part of the bake. Brushed with garlic herb butter after removing from the oven. So delicious! Will definitely use this method again.
Oooh yum garlic and herb butter sounds so good! I'm so glad you loved this method. Thank you so much for leaving a review 🙂 xo