This post contains affiliate links. Please see our disclosure policy.

Cultured butter is a European style butter made by fermenting cream with lacto acid bacteria and then churning it to separate the butter fat from the butter milk.
It takes considerably more time than making regular sweet cream butter. But oh it is so worth the time. The more pronounced butter flavor is like nothing you’ve ever tasted before! Plus – most of the time for this recipe is hands off – it’s just waiting for the cream to ferment … a bit like making sourdough really!
This recipe will not only yield 200 – 250g of cultured butter, but you’ll also end up with up to 320g of cultured buttermilk that you can use in lots of different recipes – even sourdough ones!
The final yield will depend on the quality of the cream you use and how well you squeeze out all the buttermilk and water from the butter.
And if you’re interested in making cultured butter, you might enjoy making your own homemade ricotta too!
How Is Cultured Butter Different?
Cultured butter differs from regular butter because it is made from fermented cream. Live bacterial cultures are added to heavy cream and left to ferment the cream so that it develops a tangy flavor.
This tangy flavor is a result of the bacteria from the yogurt establishing itself. You’re basically making a butter from a very thick, very creamy yogurt!
Cultured butter behaves in the same way as regular butter, it just tastes way better (in my opinion). It has a much more pronounced flavor with a tang from the lactobacteria.
It is honestly the best way to eat butter! And if you already love fermenting your bread, then fermenting your butter just seems like the natural next step!

How To Culture Cream
The most important part of making cultured butter at home is preparing the cultured cream.
There are various ways to add the culture – the easiest being yogurt.
The yoghurt you use needs to be natural yoghurt with live cultures and have no thickeners, gums or additives. I use a biodynamic, organic yogurt to culture my cream. It works really well!
If you don’t have yogurt, you can use one of the following:
- cultured sour cream
- cultured creme fraiche
- cultured buttermilk
Once you’ve made cultured butter once, retain a bit of the cultured buttermilk and use that to culture your next batch of cream. Easy!
I use approximately 12% of culture to cream – this means I use 600 mls of cream to 70g of yogurt. You can see more information on this in the notes of the recipe card.

How To Make Cultured Butter
The process for making cultured butter is very easy, it just takes a bit of patience (much like making sourdough bread, right?).
You’ll need to allow a few days for the best result. I use a yogurt maker to ensure that my cream stays at a consistent 25C throughout the process.
You don’t need to be so exact, however you’ll have the best result if you let the cream sit between 24C and 28C. You could sit the cream in your microwave with the door ajar too if it’s a bit chilly in your kitchen.
- Place the natural yogurt in the base of a large jar (I use a 1000 ml jar for this recipe). Pour the heavy cream over the top of the yogurt and gently stir the two together using a clean spoon.
- Place the lid onto the jar and put it somewhere relatively warm for 24 hours. I put my jar in a yogurt maker set to 25C. See notes for ideas of how to keep your cream at the right temperature.
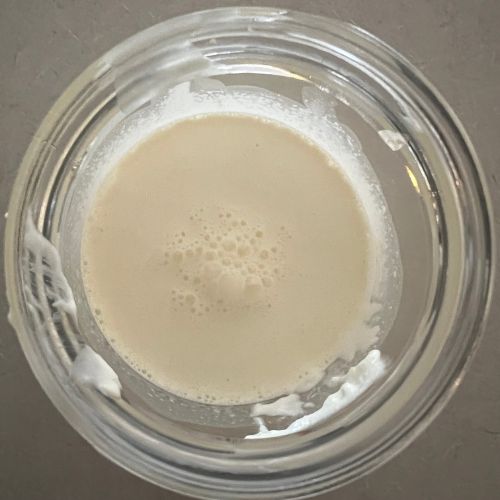
- After 24 hours, you will have a jar of thick, cultured cream. You should see a few bubbles and the cream will look like it’s been whipped.
- Place the jar (with lid on) into the fridge for 24 hours.
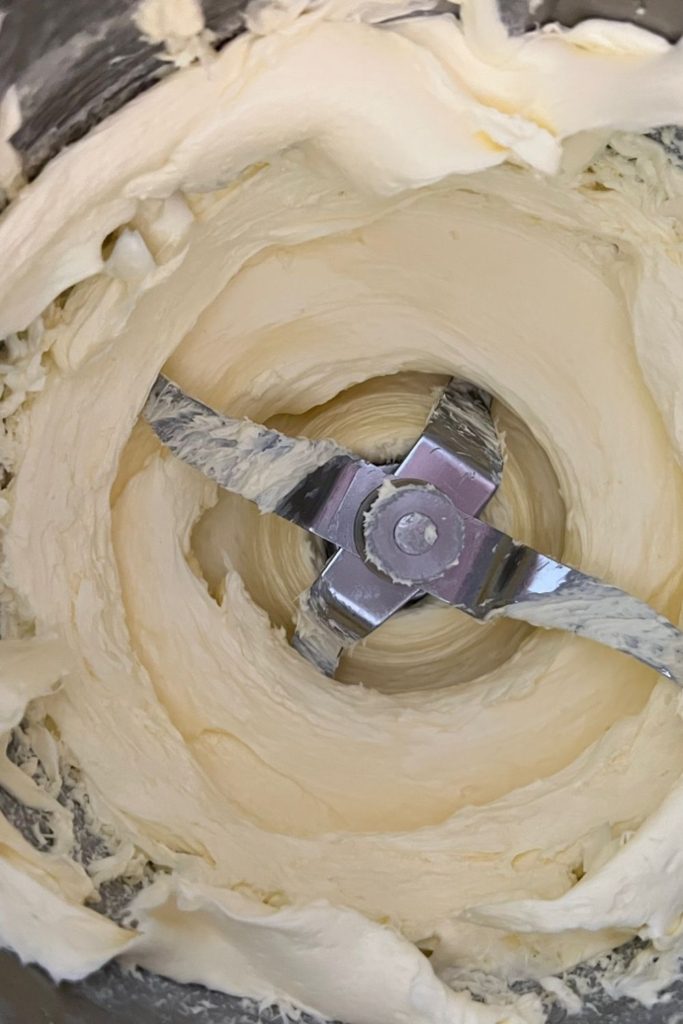
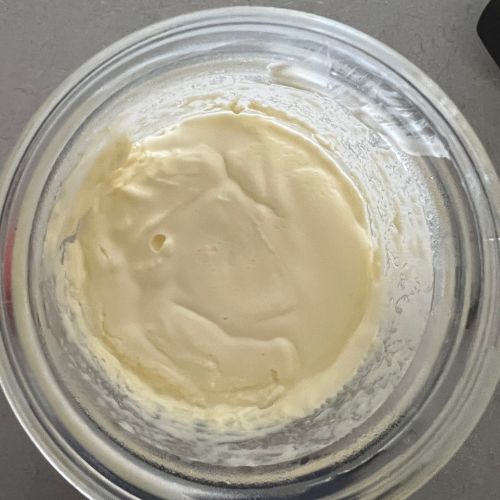
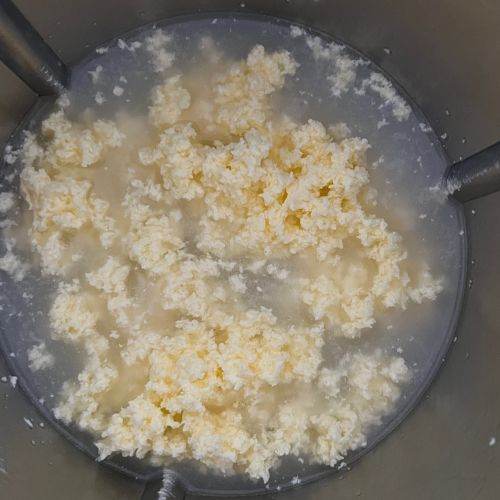
- Once the jar of cream has been in the fridge for 24 hours, remove it and empty the cultured cream into the bowl of your stand mixer or Thermomix. If you are using a stand mixer, you’ll need to use your wire whisk attachment.Please note – if using a stand mixer, you’ll need to use the stand mixer at full speed for the next few steps. If using a Thermomix, don’t go above speed 4.
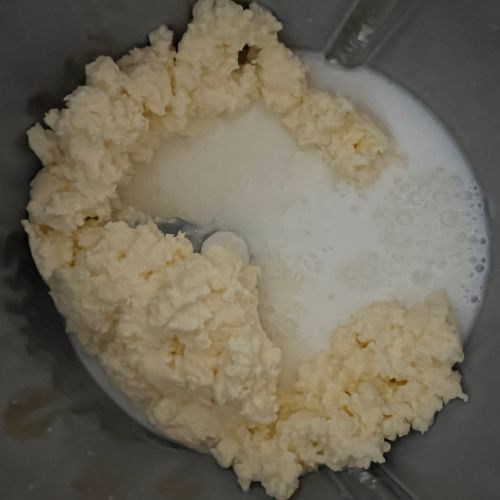
- Whip the cultured cream for a few minutes, until the cream separates into butter and buttermilk. It will take up to 5 minutes for this to happen (it takes a little longer because the cream is so cold). But just be patient, it will happen!
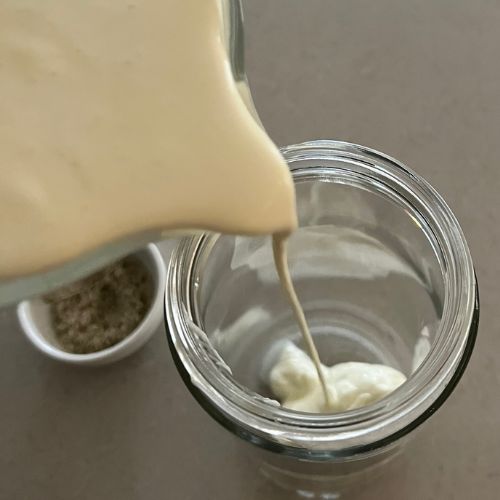
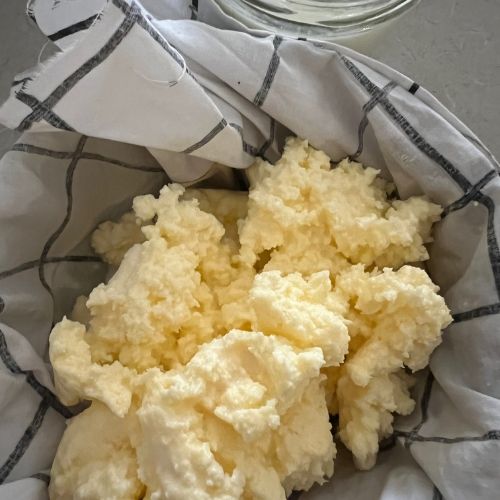
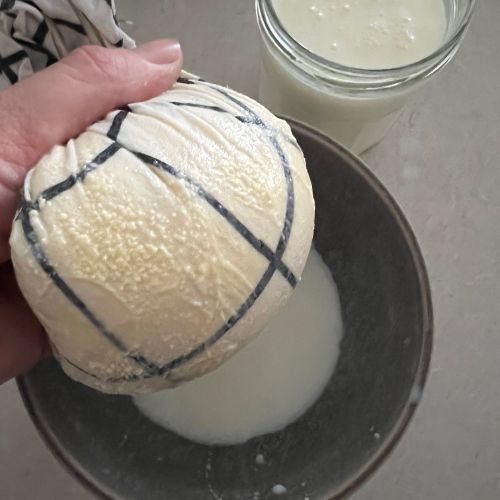
- Place a piece of fine cloth in a bowl and pour the buttermilk over it, adding the butter on top. If using the wire whisk attachment on your stand mixer, you’ll need to knock the butter out of here.
- Using your hands, squeeze as much of the buttermilk out of the butter by wrapping it in the cloth and squeezing as hard as you can. Put the strained buttermilk aside (it’s liquid gold) and add the butter back into the bowl of your mixer.
- Cover the butter with at least 1L of icy cold water and use your stand mixer or Thermomix to wash the butter. Don’t worry, you won’t ruin your beautiful butter – the icy cold water prevents it from being mixed up with the water.
- Now, place the cloth over another bowl and pour the water and butter out into it. Use the cloth to strain out the butter by wrapping it and squeezing it as hard as you can. Toss out the water.
- Repeat the washing of the butter one more time, straining it again through the cloth and squeezing out as much water as you can.
- Clean and thoroughly dry the bowl of your mixer and return the clean butter to the bowl.
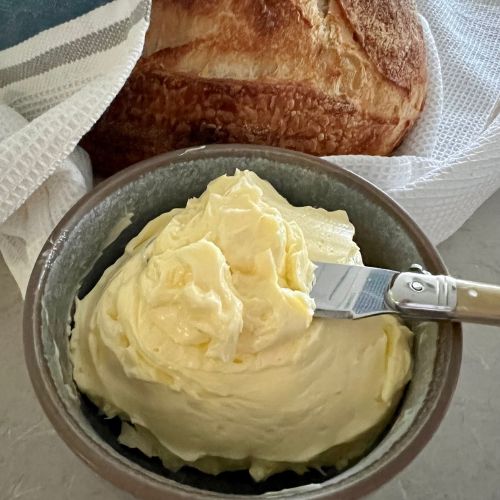
- Add the sea salt and whip the butter until it’s pale and creamy.
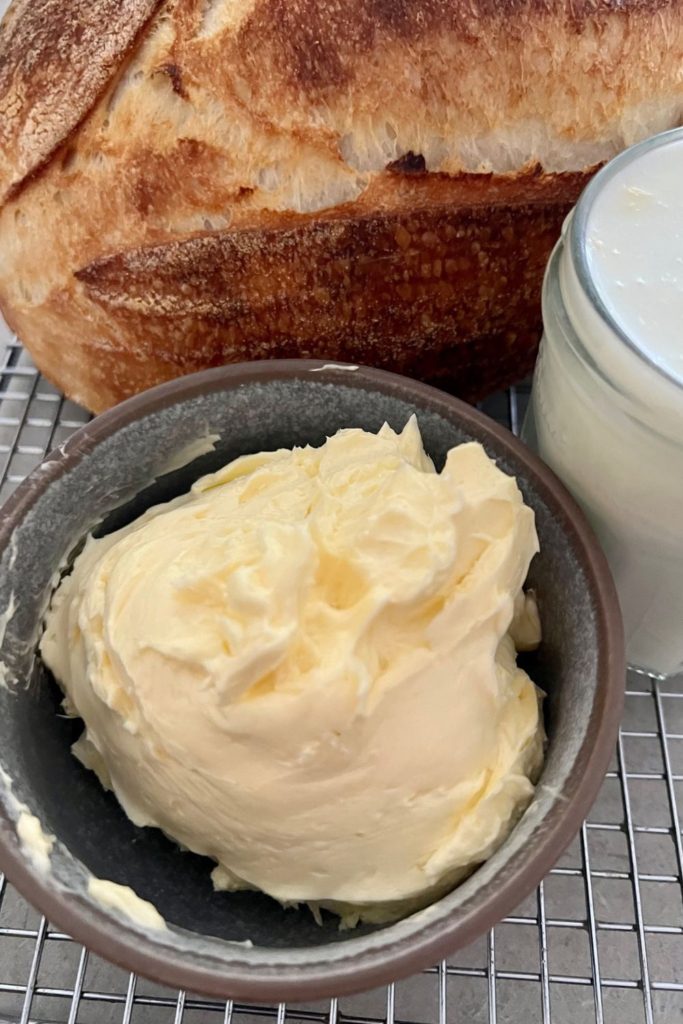
- Transfer the butter to a clean butter bell or jar for storage.

Equipment for Making Cultured Butter
While you can make regular sweet cream butter using a mason jar, I highly recommend using a stand mixer, Thermomix or hand mixer for cultured butter.
I have made cultured butter using a mason jar, but it can take a long time and I find it is much easier if you have a little help!
A stand mixer is really easy to use and makes this process really quick and easy! You will see a Thermomix being used in some of my photos, but the process is the same whether you use a stand mixer, Thermomix or even an electric hand mixer.
Why Didn’t My Cultured Cream Work?
While this is a fairly simple process, fermentation can sometimes have a mind of its own. If your cream is not thickening up after 24 hours, you might need to change a few things.
Make sure that you’ve had the cream in a warm place. If it’s been cold, try leaving it for another 16 to 24 hours in a warmer place (yogurt maker, microwave etc).
Make sure that the cream you are using is not ultra pasteurised and does not have gums or thickeners added. Most heavy whipping cream from the refrigerated section of the store is fine – stay away from UHT (ultra heat treated), double or thickened cream.
Ensure the yogurt you added to the cream contains live cultures. Flavored yoghurts, greek style yogurts or thinner, sugared yogurts will not work.

How To Use and Eat Culture Butter
You can literally use cultured butter for anything you would use regular sweet cream butter for.
If I’m honest, I only use cultured butter for spreading, buttering … and eating straight from the jar!
It is simply incredible on freshly baked sourdough bread, crunchy sourdough baguettes and sourdough pane di casa loaf – oh and it’s just amazing on this Everything Bagel Sourdough Bread!
I also use it to make whipped herb butter, whipped Brie butter and jalapeño honey butter.
I use cultured buttermilk in sourdough waffles and pancakes because it takes them to a whole new level! It also works really well in these Sourdough English Muffins and of course in this buttermilk sourdough bread.

How To Store Cultured Butter
Salted, cultured butter can be kept at room temperature in a French butter bell. If you are storing it in a jar or other container, I would recommend storing it in the fridge and removing it a few hours before you want to use it. This magic butter knife will also help to spread it directly from the fridge.
Cultured butter will last in the fridge for up to one month (but like anything, apply commonsense – if it doesn’t smell bad, it’s more than likely ok, even after a month – it’s fermented remember!!).
It can be stored in the freezer for 4 to 6 months.
I don’t normally put my butter in the fridge at all. I store it in a butter bell in the pantry. We eat it pretty quickly so I’ve never had an issue with it going bad.

How To Make Cultured Butter
Equipment
- Large Jar 1L is perfect
- Digital Scale
- Stand Mixer or Thermomix
- Ultra Fine Cloth cheesecloth, muslin or nut milk bag
Ingredients
- 600 mls Heavy Cream, must not be ultra pasteurised or contain any gums or thickeners (see notes)
- 70 g Plain Unsweetened Yogurt with Live Cultures, (see notes)
- 5 g Sea Salt, you can add less if prefer it less salty
- 2 L Water, must be icy cold
Instructions
- Place the natural yogurt in the base of a large jar (I use a 1000 ml jar for this recipe). Pour the heavy cream over the top of the yoghurt and gently stir the two together using a clean spoon.

- Place the lid onto the jar and put it somewhere relatively warm for 24 hours. I put my jar in a yoghurt maker set to 25C. See notes for ideas of how to keep your cream at the right temperature.
- After 24 hours, you will have a jar of thick, cultured cream. You should see a few bubbles and the cream will look like it's been whipped.
- Place the jar (with lid on) into the fridge for 24 hours.
- Once the jar of cream has been in the fridge for 24 hours, remove it and empty the cultured cream into the bowl of your stand mixer or Thermomix. If you are using a stand mixer, you'll need to use your wire whisk attachment.Please note – if using a stand mixer, you'll need to use the stand mixer at full speed for the next few steps. If using a Thermomix, don't go above speed 4.
- Whip the cultured cream for a few minutes, until the cream separates into butter and buttermilk. It will take up to 5 minutes for this to happen (it takes a little longer because the cream is so cold). But just be patient, it will happen!
- Place a piece of fine cloth in a bowl and pour the buttermilk over it, adding the butter on top. If using the wire whisk attachment on your stand mixer, you'll need to knock the butter out of here.
- Using your hands, squeeze as much of the buttermilk out of the butter by wrapping it in the cloth and squeezing as hard as you can. Put the strained buttermilk aside (it's liquid gold) and add the butter back into the bowl of your mixer.
- Cover the butter with at least 1L of icy cold water and use your stand mixer or Thermomix to wash the butter. Don't worry, you won't ruin your beautiful butter – the icy cold water prevents it from being mixed up with the water.
- Now, place the cloth over another bowl and pour the water and butter out into it. Use the cloth to strain out the butter by wrapping it and squeezing it as hard as you can. Toss out the water.
- Repeat the washing of the butter one more time, straining it again through the cloth and squeezing out as much water as you can.
- Clean and thoroughly dry the bowl of your mixer and return the clean butter to the bowl.
- Add the sea salt and whip the butter until it's pale and creamy.
- Transfer the butter to a clean butter bell or jar for storage.


Notes
Nutrition
Nutrition information is automatically calculated, so should only be used as an approximation.
Like this? Rate and comment below!


Does it matter if it’s regular plain unsweetened yogurt or plain unsweetened plain yogurt? I don’t really know what the difference between the two.
I meant regular vs Greek yogurt
No it shouldn’t make too much difference, as long as it’s unsweetened and contains live cultures.
What if I over mix? I passed the point where the curds separate. Now I have a beautiful icing looking product.
When you say “wash” the butter in the mixing bowl on step 9, does that mean running the mixer with a low speed and for how long? Just not sure how to use a mixer to wash butter. Thanks.
I just wanted to thank you for sharing this recipe and how to make it. I made it yesterday and like it much better than using sweet cream butter. It’s still butter but slightly different tasting in a great way and ideal for slathering on bread or any other baked good that you would slather butter on. YUM!!!
I make yogurt in my instant pot. Would it be ok to put the jar in there? Or even just the cream and yogurt directly into it like yogurt as long as I have the right temperature?
I have some buttermilk from making butter with a cheese culture, it didn’t change the taste of the butter, however the buttermilk resulting from it is quite tasty so I want to use that to culture the next lot of cream how much should i use? hope you can tell me, cheers Claudine
This looks incredible, and I’m glad you can use yogurt; I started making homemade yogurt a few weeks ago, so it’ll be perfect. Thank you!
Hi! I made cultured buttermilk. But I accidentally put the salt in at the beginning before I cultured the cream. I tried making the butter. It separated,
but is still white in color and it looks similar to cottage cheese or a rough sour cream. I ran the mixer off and on for 15 minutes, checking it at different intervals and at different speeds. With this description and without a picture, what do you think I could do with it?
Btw. I’ve been making my own butter for a year and thought I’d give the cultured butter a try.
Help!! My cultured yogurt had set and when I went to whip it for the butter to separate it just did not happen. I used my kitchen aid and went at it at speed 4-6 for almost an hour. Nadda. The. I stuck it into the fridge again and next morning g tried to do it in my vitamix. Still wouldn’t separate. Any ideas? I have 4 pints of this. What can I do and how to use it up?
Can kefir be used in place of yogurt?
I haven’t tried using Kefir to make cultured butter but it could be worth an experiment 🙂
He, Made my first batch just now … it’s really yum!
Just a question, is there a way to determine the total fat content in %?
If I would like to make the most wonderful sourdough croissants, I could used my diy butter, if the fat content is at least 80%.
I’ve made this a few times now and LOVE it! Now I’m wondering if it can be made with kefir which like yogurt (but more liquidy and I think tangier) and has a ton of live cultures.
I have used ultra pasteurized cream for my butter for 5 years and it turns out just fine and cultures just fine.
Hi, Why culture the cream at 25C when I would culture at 43C to make yogurt?
Thank you so much for this recipe. I have made the butter twice now. I have found that leaving the cream and yogurt mixture for longer than 24 hours creates a creamier butter and richer buttermilk.
Just wondering – what does washing the butter do?
It washes the buttermilk out of the butter, making it last longer!
Amazing, I love your recipe. Specially to enjoy with sourdough bread! Why do you said butter milk resulted of the process it’s a gold drink?
I’m not sure I understand this question but happy to answer if you can clarify further 🙂
This is awesome. I just recently made my own butter for the first time using the mason jar that I shook this sounds even better though I’ll have to pick up a stand mixer. question: I also made ghee from the butter I made. Could I make you from cultured butter?
You can definitely make ghee from the cultured butter. 🙂
What’s the purpose of putting the cultured cream into the fridge for 24 hours? I made this, but forgot that part. It turned out fine this time. But next time I want to follow your recipe without mistakes!
This is to make it easier to whip the cultured cream into cultured butter. When it’s cold it generally works better and separates more easily 🙂 I’m glad it worked for you even without chilling the butter 🙂 xo