Sourdough Pizza Dough Using Thermomix or Stand Mixer
This post may contain affiliate links.
Sourdough pizza dough is the most amazing pizza you will eat. There is something truly delicious about the complex flavors and crispy yet soft base. This recipe uses a stand mixer or Thermomix to mix the dough. It needs a lot of kneading and this makes the process much easier and quicker, without compromising on flavor or texture.
To make this dough, you'll need an active, bubbly sourdough starter. You could also try this quick sourdough discard pizza dough.
What If You Need Sourdough Pizza In A Hurry?
While this is a sourdough pizza base, if you need it in a bit of a hurry, add just a pinch of commerical yeast. This can be handy if you need to have them ready in a few hours. Generally, if I mix the dough at lunch time and leave it somewhere warm, it's ready by 5pm without using yeast, however if you need them faster (because kids lol) then a little pinch of yeast is not going to ruin them - you'll still get the flavor of sourdough. The option of adding extra yeast just makes this recipe super versatile!
Don't Use A Rolling Pin!
One of the best tips I can give you for making sourdough pizza is not to use a rolling pin when you are shaping your bases. Now you might think this sounds crazy, but hear me out.
When you tip the dough out of the bowl, make sure it lands with the smooth side of the dough down on the counter (just like when you make bread).
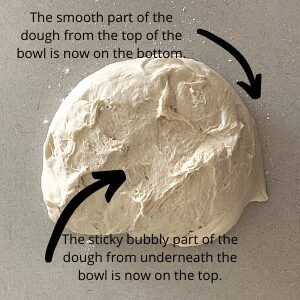
Use a dough scraper to divide the dough into pieces (around 290g each is a good size) or you can just eyeball it. Roll it into a ball and then use your fingers to push the dough out. It will be quite stretchy and elastic and shouldn't be sticky because you developed the gluten with your Thermomix or stand mixer.
You can pick the dough up and run your fingers around the edges, using the dough's own weight to stretch it out.
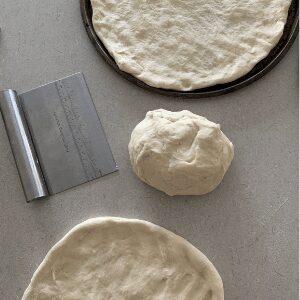
It will make a big difference to the texture of your cooked pizza dough and you'll have beautiful soft bubbles wrapped up in a crispy base that doesn't collapse under the toppings.
Cooking Your Sourdough Pizza
You can cook these bases in a regular oven - they work just fine! I find the best way to cook them is either in a cast iron skillet (you'll be able to do more deep pan pizzas this way). Or you can place the dough on pizza trays. This is what we do most of the time - the perforated trays work the best.
You could of course also bake these delicious sourdough pizzas in a wood fired pizza oven or even on a pizza stone in your own oven.
Whatever you decide to bake them in, make sure you oven is super hot to begin with to get that base nice and crispy on the outside. You can then turn the oven down a little to ensure that the toppings don't burn, but the base is cooked all the way through.
Can You Freeze Sourdough Pizza Dough?
Yes! This dough is amazing to freeze. To make life easy, I like to make a big batch of pizza dough (like double or even triple this recipe). I shape the bases and then freeze them between baking paper sheets. I put them all on a tray to start with, layering them up with paper, and then once frozen, I remove the tray from the bottom and wrap the whole lot in alfoil. When I need fast pizza I can grab a few bases out, top them and bake. You don't even have to let them defrost! Brings a whole new meaning to frozen pizza, right?
Equipment for Sourdough Pizza Dough
You don't need a lot of specialised equipment for pizza dough, however there are a few things which can make it easier for you - and give you better tasting pizza!
Glass Mixing Bowl - allows you to see what's happening as your sourdough pizza dough is proving.
Silicone Dough Scraper/Metal Dough Scraper - these make getting the dough out of the bowl much easier and dividing the dough a breeze!Perforated Pizza Trays - perforated pizza trays allow air to crisp up the base of your pizza and give you a great result in a regular oven. They are cheap enough that you can buy a few and have all your pizzas prepared and ready to bake.
Cast Iron Skillets - these can be an easy way to make deep dish pizzas and work fantastically well for sourdough pizza.
Pizza Cutter - makes slicing through molten mozzarella and crispy sourdough a breeze!
Further Reading
If you love this sourdough pizza dough recipe you might enjoy these articles:
- Best Flour for Sourdough Pizza Dough?
- Looking for the best sourdough recipes to make in your Thermomix, just like this pizza dough? You'll find 12 of the best sourdough recipes for the Thermomix here.
- This sourdough flat bread recipe is super versatile - you can even use it for mini sourdough pizzas!
- Love sourdough naan? Try this recipe!

Sourdough Pizza Dough (in a Stand Mixer)
Equipment
- Stand Mixer
- Digital Scales
- Mixing Bowl
- Pizza Trays
Ingredients
- 500 g Bread Flour
- 20 g Salt
- 30 g Olive Oil
- 20 g Honey
- 280 g Water
- 200 g Sourdough Starter active and fed
Instructions
- Measure out all your ingredients into the bowl of your Thermomix or stand mixer. You don't have to pre mix, you can just add them all in on top of one another. This dough is extremely forgiving.
- Using the knead function on your Thermomix or stand mixer, combine all the ingredients and knead for around 4-5 minutes.Thermomix - Dough function for 4 minutes.Check the texture of your dough. It should be smooth and silky and coming away from the sides of the bowl. If your dough is still sticky, sprinkle a little extra flour and knead for a further minute or two until it becomes silky smooth.
- Turn the dough out into a warm, lightly oiled bowl (I warm a bowl with water while the dough is kneading, then dry it). Cover with cling wrap or a damp tea towel and leave to rise until it has doubled. This may take several hours, depending on the temperature of your kitchen. Watch the dough and it will show you when it's ready, rather than going by a set amount of time. Using 200g of sourdough starter means the process will happen faster than if you used less.
- Once the dough has doubled, separate the dough into smaller balls so they are ready to be rolled out. 290g per ball will give you a nice size pizza when it's rolled out. Leave the balls on your counter top, covered with a tea towel, for around 30 minutes to allow the gluten to relax.
- Once you're ready to make your bases, use your fingers to press your dough into a pizza round. If you need to stretch the dough, pick it up and move your hands around the edges, allowing the dough's own weight to stretch it out into a round. Avoid using a rolling pin if you can to maintain your dough's sourdough character.
- Place your pizza dough onto pizza trays ready to top with your favorite toppings! When you are ready to bake, pre heat your oven to 230C/450F and make sure it's HOT!! Place your pizzas into the hot oven for around 15 minutes or until toppings are cooked and bases are crispy on the bottom.
