Sourdough English Muffin Recipe
This post may contain affiliate links.

Sourdough English muffins are such a lovely little invention. They are tangy rounds of fermented dough with just enough nooks and crannies to hide butter and jam in.
And they are actually quite easy to make - you just have to be organised to give the dough enough time to ferment. This recipe uses an active and bubbly sourdough starter, however there is a variation for Sourdough Discard English Muffins further down.
English Muffins made with sourdough starter are fairly easy to put together. You basically mix the dough into a relatively smooth (yet sticky) dough and then leave it overnight to ferment.
If you have a bit more time, you can pop it in the fridge to ferment for up to 3 days. This little trick will ensure you don't over ferment the dough ... and you get that beautiful rounded sourdough tang that is so sought after with sourdough English muffins.
English Muffins Aren't Really English
Here's some trivia for you ... because I just love a bit of history. English muffins aren't actually English. In fact, they were invented in the US. And in England - they're called American muffins. Crazy right?
These crazy popular leavened muffins were actually invented by an Englishman in the US, New York City to be precise. If you're interested in more of the history of English Muffins, you can read all the info here.
How To Make Sourdough English Muffins
This sourdough English muffin recipe is quite simple. The process does take a few days due to the fermentation - but this is a good thing because your sourdough starter will make English muffins that are much easier to digest than store bought ones!
Ideally, you'll need an active sourdough starter, but discard will work (see notes on this further down). You might also like to turn this into a sourdough English muffin loaf.
Here's the basic process for making English Muffins with a sourdough starter:
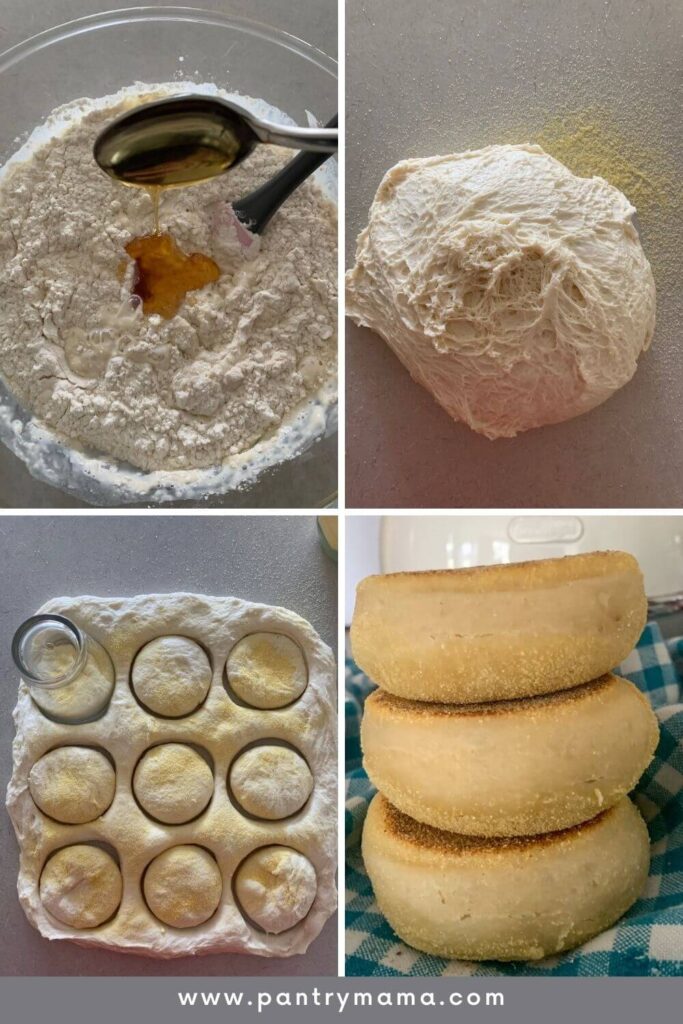
- Add flour, milk, honey, salt and sourdough starter to a large bowl and mix together to form a sticky dough.
- Use wet hands or a dough scraper to gently knead the dough in the bowl. It will be sticky because of the hydration level, but it will form a dough.
- Cover the bowl and leave it to ferment on the kitchen counter (overnight is ideal as long as it's not too warm). You'll find the mixture will double in size.
- Once the dough has fermented, work you way around the bowl and bring the dough into a ball using stretch and folds.
- Leave the dough to rest for around 30 minutes.
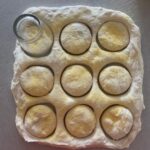
- Now sprinkle a generous amount of corn meal onto your kitchen counter and ease the dough out on top of this.
- Gently roll the dough out to form a rectangle (you can use your hands if you like).
- Use a scone or biscuit cutter to cut rounds of dough out. I used a small glass dipped in flour to stop it sticking.
- Place the rounds onto a parchment lined tray dusted with cornflour.
- Leave them to rise for around an hour (they should be puffy and light).
- Heat a skillet or frying pan and dust with corn meal.
- Place 4 English Muffins into the skillet at once and cover. Cook on medium heat for around 6 minutes before flipping them and cooking on the other side.
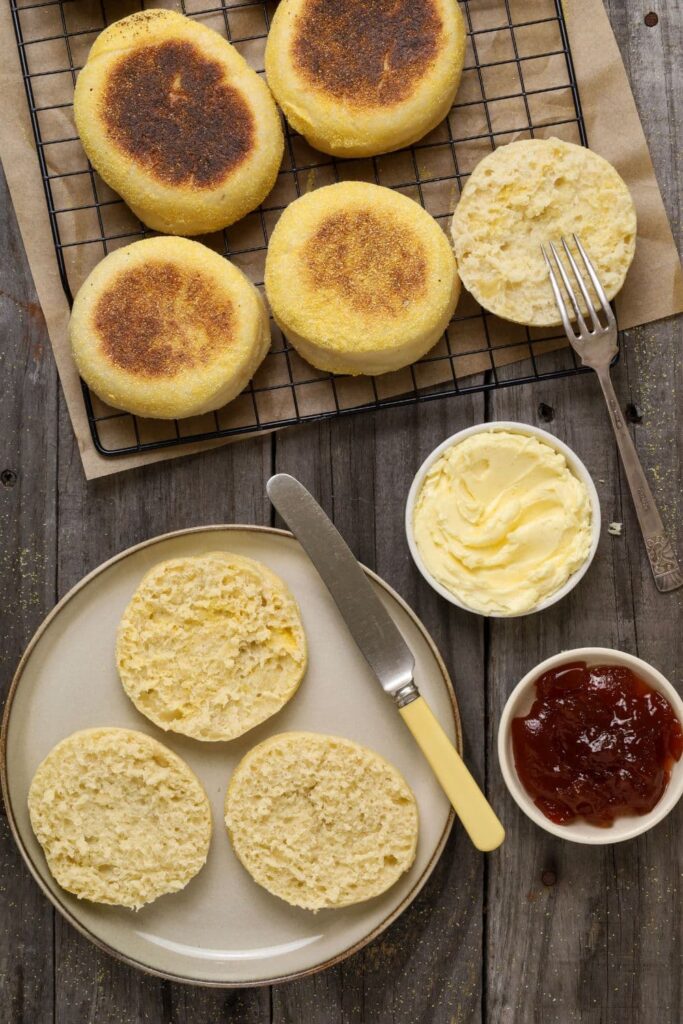
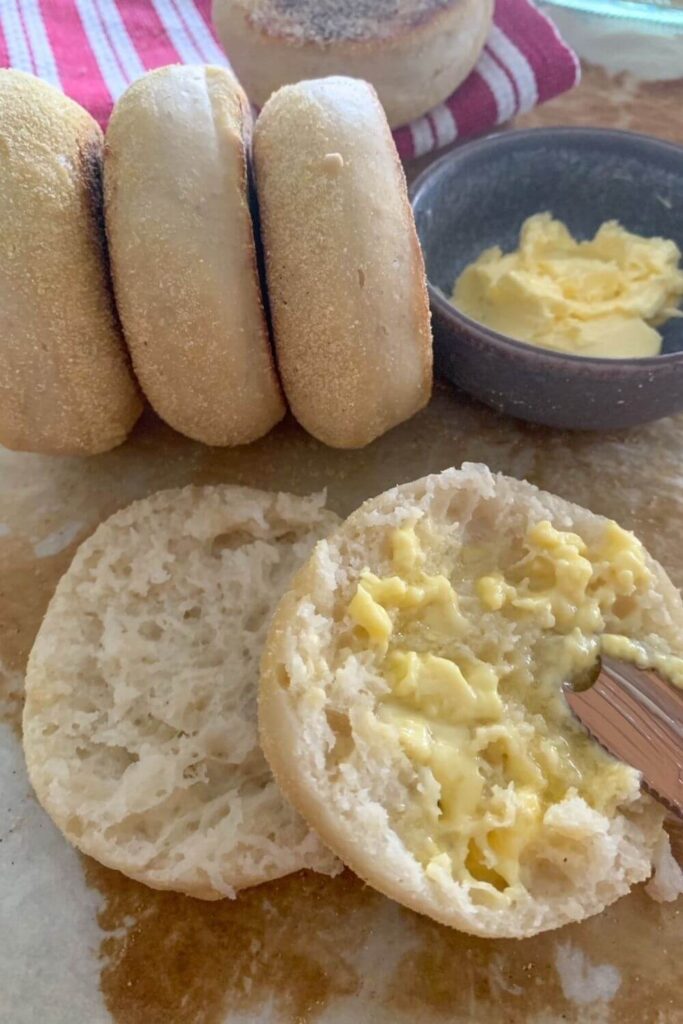
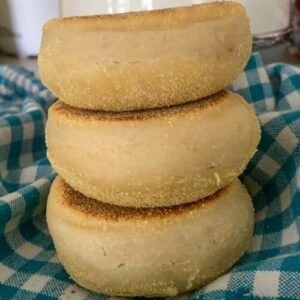
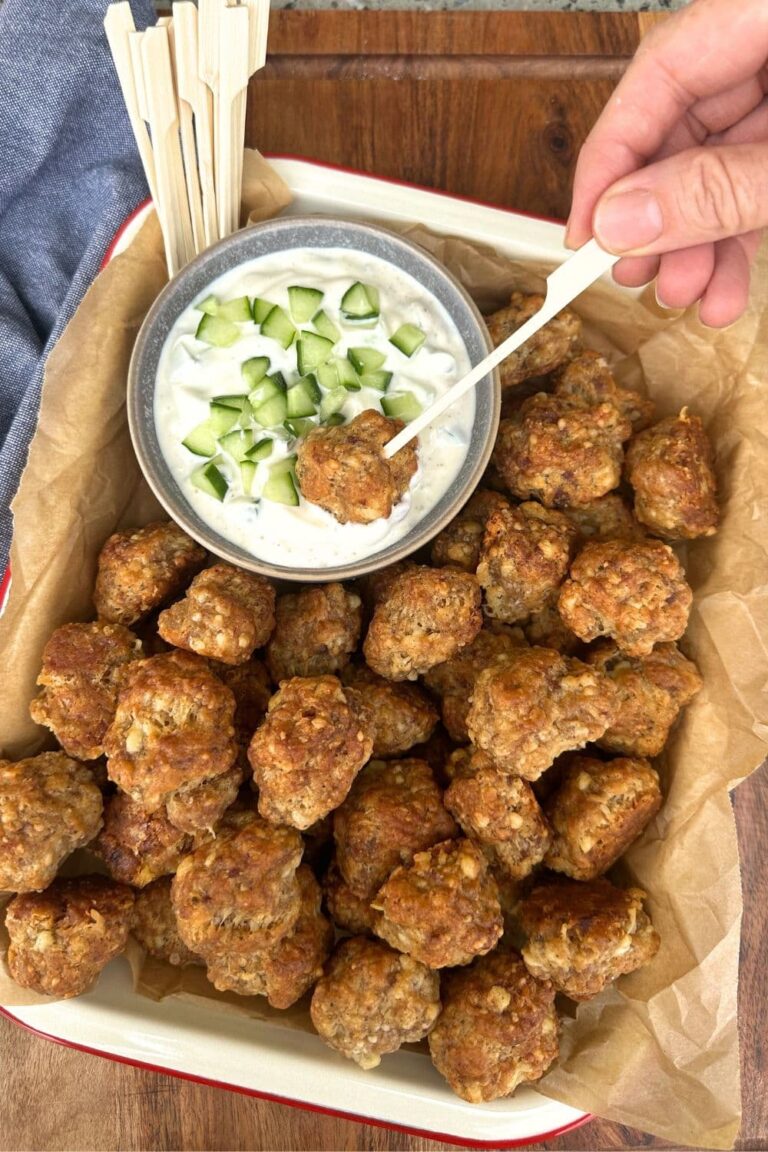
- Once they've cooled a little, split them and spread with butter and jam!
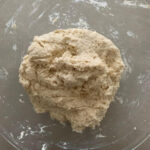
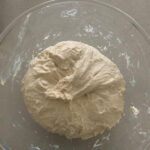
Stages of Fermentation for Sourdough English Muffins
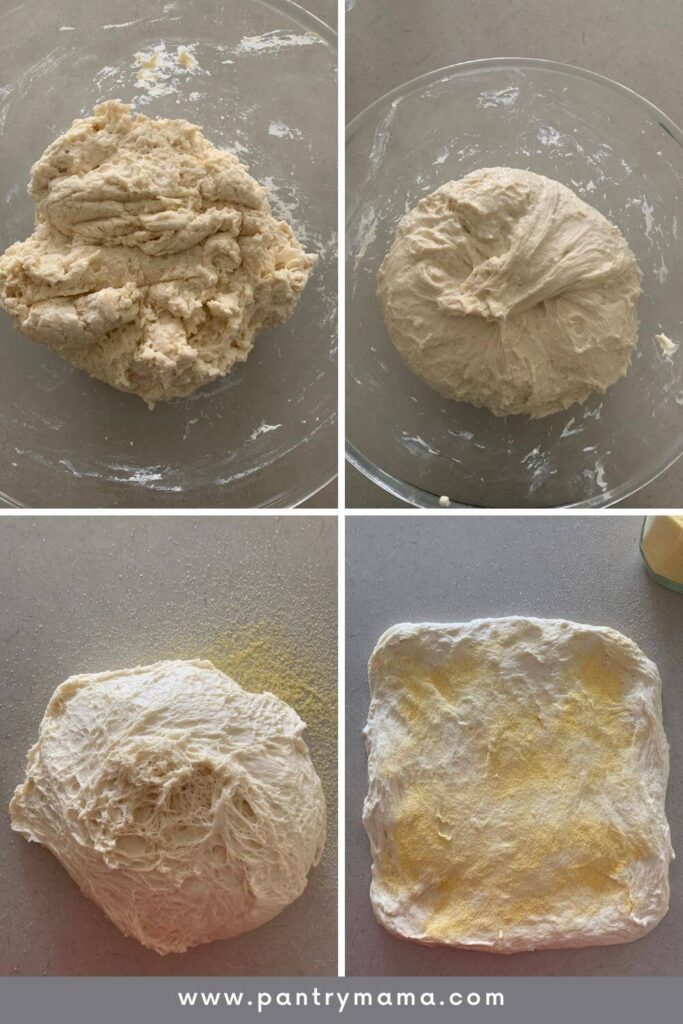
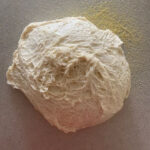
This image shows the dough when it's first mixed to how it looks when you've pulled it together into a ball after fermentation.
You can see that the dough has developed structure and smoothed out.
The bottom left shows the dough turned out onto the kitchen counter. You can see the beautiful gluten strands that have formed during fermentation.
The dough is still a little sticky at this stage, so corn meal is essential to keep it workable and if you have some cornmeal leftover, why not try these sourdough cornbread muffins.
If you are loving fermented breakfast treats, you might also like these overnight sourdough waffles.
The Secret To Good Sourdough English Muffins
Whether you're making sourdough English Muffins, or the regular variety - there's one thing that can make or bread a good muffin. You can't cut them!
Seriously, do not use a knife. To make sure you get maximum nooks and crannies, you need to split them with a fork.
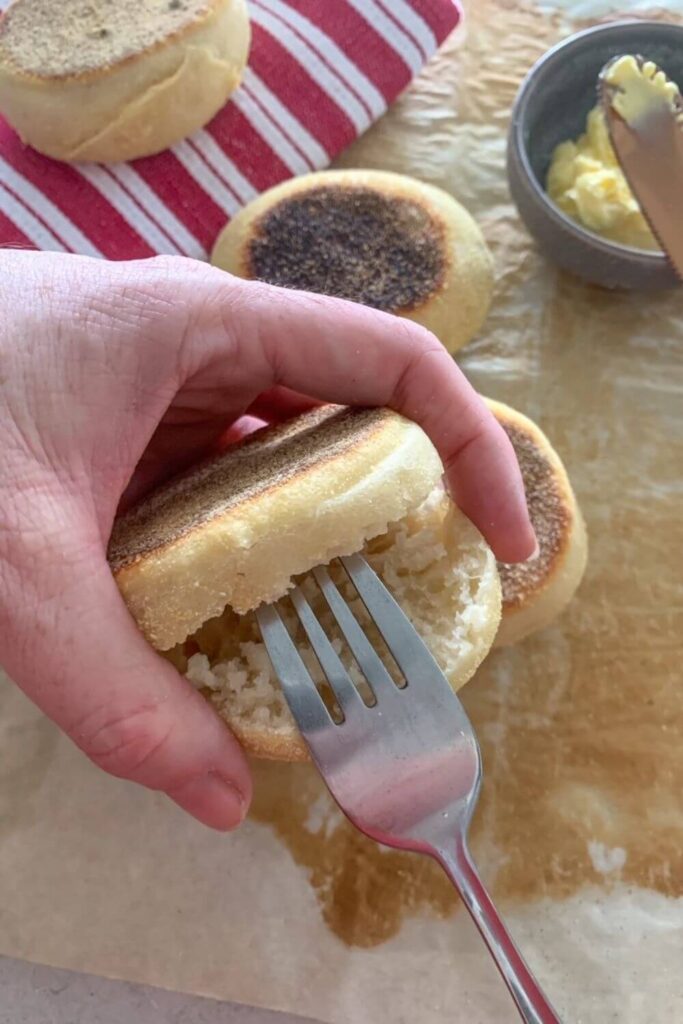
Once they're cool, push a fork into the side of the muffin and keep going around the edge until it splits open.
This is called "fork split" and will ensure that there are lots of "gnarly" bits of dough that go crispy and brown when toasted. Trust me, it's a game changer!
You must ensure that they have cooled though - if you do it when they're too hot, the steam trapped inside will cause a gummy crumb (just like when you cut sourdough bread too soon).
Patience really is a virtue with sourdough!
Additional Tips
I like to make my English Muffins with active, fed sourdough starter. But if you have lots of discard to use up, you can use the discard instead (as long as it's not too old, up to a week is ok).
If you want to use your discard in this recipe, just use it instead of active starter and add a half teaspoon of commercial yeast to your mixture.
This will ensure that the dough rises enough. This is especially important if you're still building your starter as your discard won't have enough of a yeast colony yet.
Still follow the instructions below, they will work.
You might just find that it rises a bit faster with the commercial yeast, so you won't need to leave them to rise for so long. They will also ferment in the fridge if you use commercial yeast.
If you have a mature starter, I would recommend trying this recipe without commercial yeast. Because of the long ferment time, you might be pleasantly surprised - even with your discard!
Making Sourdough English Muffins in Hot Weather
If the weather is warmer where you live, you might need to adjust things ever so slightly to ensure that you don't over ferment your dough.
It's not dissimilar to making traditional sourdough bread and making allowances for hotter temperatures.
Sourdough English Muffins are meant to be fermented for a longer period (it's what gives them the most amazing flavor), however if the ambient temperature in your home is over 28C you may need to use your refrigerator.
Once you've mixed the dough, allow it to ferment a little while on the kitchen counter - no more than an hour. Then place the dough into the fridge to ferment. It will take up to 3 days to fully ferment in the fridge.
If you do want to do an overnight ferment on the kitchen counter then you can reduce the amount of starter used. Drop it down to 100g of starter and use cold milk when you mix the dough.
These small tweaks will allow you to ferment the dough longer without over fermentation.
Serving Suggestions
There are lots of ways to enjoy these delicious sourdough English Muffins. While they are absolutely perfect toasted with lashings of butter, you might also enjoy some of these ideas:
- Toast and top with with homemade butter and sprinkle with cinnamon sugar. You might even like to serve them with this whipped honey cinnamon butter!
- Use them to make bacon and egg breakfast sandwiches. Don't forget the cheese! I love using this sourdough scrambled egg inside mine!
- Use them instead of burger buns for something different.
- Top with your favorite slices of cheese, fresh tomato and lashings of salt and pepper. This might just be one of my favorite lunches.
- Use them as mini pizza bases. My boys love making their own pizzas after school and these sourdough English muffins make it a breeze!
Notes & Substitutions
A few notes on ingredients and substitutions for sourdough English Muffins:
- You can use plain or all purpose flour instead of Bread or Baker's flour if you want to. But you may find that you need to reduce the amount of milk.
- If you have buttermilk on hand from making cultured butter or sweet cream butter, you can substitute some of the milk in this recipe with the buttermilk.
- You can use plain or all purpose flour to dust them with instead of corn meal, however you won't get the same cooked texture as you would with corn meal. Semolina is a better substitute than corn meal.
- You can keep the mixture for this sourdough English muffin recipe in the fridge for up to 3 days. Take it out of the fridge for around 30 minutes before you turn the dough out on the kitchen counter. Cut the rounds out and then let them rise before you cook them. It's better to cut them out with cooler dough and then let them warm up.
- Once you've cut them out, you can put the tray in the fridge for up to 24 hours. Let them come back to room temp before you cook them.
- Cooked English Muffins freeze really well. Store in ziploc bags and defrost and toast as you would like. For easy toasting, don't forget to fork split them before you freeze them.
If you're looking for another English inspired sourdough recipe, check out these sourdough crumpets.

Want More Recipes?
If you love this recipe, you might be interested in these ideas:
- Easy Sourdough Bagels
- Sourdough Hamburger Buns
- No Wait Sourdough Waffles
- Lemon Sourdough Muffins
- Apple & Cinnamon Sourdough Muffins

Sourdough English Muffins
Video
Equipment
- Mixing Bowl
- Cast Iron Skillet
- Biscuit Cutter
Ingredients
- 200 g Sourdough Starter fed and bubbly (reduce in warmer weather)
- 500 g Milk cold is better for overnight ferment
- 600 g Bread Flour
- 12 g Salt
- 20 g Honey you can use sugar if you want to
- 50 g Cornmeal for dusting
Instructions
- In a large glass bowl, mix together all of the ingredients, including your sourdough starter and bring it together to form a dough. The dough will be quite sticky. Gently knead the dough to bring it together.It's easy to do by hand in the bowl for less washing up, but if you prefer to do it in a stand mixer that's perfectly fine too.

- Once you have a dough formed, cover it in plastic wrap and set aside for around 12 hours to ferment at room temperature (see notes). You want the dough to rise (it doesn't need to double though). It should rise at least half in the bowl and become a smoother, structured dough (see the pics above of my dough). It's important that the dough maintains its gluten structure in order to be shaped into rounds.Just like traditional sourdough bread, you'll need to watch the dough, rather than the clock.
- Once you're happy with the dough, you can wet your hands and gently shape your dough into a rough ball by performing a set of stretch and folds. This will deflate the dough - but don't worry. Now leave the dough to rest for around 30 minutes.
- Dust your work surface with corn meal and then ease the dough out of the bowl. Sprinkle corn meal on the top of the dough too. Depending on how sticky your dough is, you might need to add some extra as you go along so keep it handy.
- Gently press the dough into a rectangle using your hands. Using a rolling pin, gently roll your dough to around ½ - ¾ inch thick. You don't want it too thick or your muffins will be doughy and take too long to cook in the middle. Using a biscuit cutter (or glass or plastic tumbler) gently cut out rounds of your dough and place them on a baking sheet lined with parchment paper and dusted with corn meal. Keep going until you can't cut any more. Then gather up the dough, roll it back out and repeat until you've used all the dough up.Cover the muffins with a tea towel and leave to rest for around 30 minutes.
- Heat a fry pan or skillet on the stove top. You want a medium heat - you don't want to burn the outside and leave the inside raw, so just keep an eye on them and adjust as you need to. Place 4 - 6 muffins in your skillet, cover with the lid and cook for around 6 minutes on each side. There is no need for oil or butter, the corn meal will protect them from sticking. Turn them over once you see the dough bubbling (they will be puffed up from the heat).Once they are golden on each side, take off the heat and allow to cool. Repeat the process until all of the muffins are cooked.
- Once they are cool, use a fork to split them and enjoy them with butter or toast them for extra golden goodness!


Notes
Nutrition


Question: Can I use almond milk instead of regular milk?
If I’d like to add oatmeal or walnuts or cinnamon, or all of the above, how would I do this?
Quick question - I am out of cornmeal, would grits work the same?
I just have a question!!
I still think mine turned out amazing, but I’m just wondering how sticky is TOO sticky when it comes to the dough.
My dough sat for the whole night and rose SO beautifully, it was overflowing by morning. I did the stretch and fold and let it sit another 30 and dusted my counter with corn meal before plopping it out of the bowl. I dusted more corn meal on top and tried shaping into a rectangle, and even tried using my rolling pin - it was SO sticky. I wanted to trust the process, but I had to add so much (at least 2-3 cups of corn meal) on my counter and on the dough each time I’d try to roll it out. My muffins were a bit funky looking because my shapes were everywhere- but the nooks and crannies are perfect and they taste great!!!
Next time, may I add just a HAIR more flour? Before bulking? Or maybe before the stretch and folds? I know that the stickiness helps with the hydration, but I think mine was significantly sticky and it made it so much harder to work with. If flour isn’t recommended, I will continue practicing (:
Excellent recipe, English muffins have been a pregnancy breakfast craving, and I’m excited to have them around!!! Using a fork to separate really makes that difference too.
This is a very forgiving dough! I don’t know what I was thinking when I mixed up a batch of these the same day I mixed up a small batch loaf of sourdough bread, did some Christmas baking and my Christmas grocery shopping as well as my normal daily routines! My timing was so off it wasn’t funny. After about 7 hours sitting on the counter, I stuck the dough in the fridge to deal with at another time. Next day while making our lasagna for Christmas and baking my small batch loaf, I took the muffin dough out of the fridge and just left it on the counter for a couple of hours before I got around to cutting out the muffins. Then amongst all the chaos, I finally got them cut out and on a pan to rise slightly. I thought that I’d get to cooking them shortly but there were so many interruptions that it was at least a couple of hours or more before I got to actually cook them. I was absolutely sure they were going to be a failure and it made me sad because this was my first attempt at this recipe. Miracle of miracles these were BEST English muffins I’ve made. One key I found was to cook them on medium low (3.5 setting out of 10) for six minutes a side with the lid on the whole time. This is definitely a keeper recipe!
To produce good muffins, does it need to be bread flour? Could I substitute the amount of bread flour for half whole wheat flour and half all purpose? Thank you for your time!
I believe that I may have over fermented. Is your dough pretty wet or fluid after doing some stretch and folds? Going in the fridge overnight and hoping for a good outcome! 😉
Wow! First time baking this. Yes! I used my bubbly , peaked starter, took a chance and cut recipe in half. Followed to a T and man, they turned out fantastic! I've used discard in another recipe and it just didn't taste right nir fluff up right, and your's is the best! Sourdough taste is better and nooks and crannies just right! Will make full recipe next time and share them with family for sure! Thank you!!!
Excellent English Muffins! I made them with discard but didn’t add the commercial yeast, just let the dough ferment 24hrs in my cupboard which is about 65 degrees. I won’t buy English Muffins again.
I just made these today, and had to add my voice to the chorus of positive reviews. I used discard from the past 2-3 days and just a bit of "insurance" commercial yeast as my starter is still getting established (It's about a month old). It worked amazingly well. I started in the morning and wrapped things up before bed. The recipe is simple, straightforward and fuss free. I was looking for a way to use up starter, especially on weeks when I don't plan on baking a lot. This will probably become a weekly ritual for me now, and if I'm honest it's the best things I've made with my starter since establishing it. Thank-you for sharing this recipe. It's a keeper.
Absolutely the best!
I started these last nite and this morning feeling successful with my 1st batch. The flavor is off the charts! My only struggle was meausring grams…I went a smidge over here and smidge under there. But this is a FUN recipe to make and eat!
I have tried twice and I just can’t get these to work. All I get is a sticky mess of dough. Even my silicone rolling pin can’t deal with this stuff. My starter is mature ( my sourdough loafs come out great), I weigh all the ingredients, follow the directions to a “T” (even printed and highlighted section) and they just aren’t work. Second batch I managed to get 6 to the cooking stage and all they did was burn after 3 minute on medium low heat. I will try again because everyone else has given these great review.
English Muffins are definitely English, and have been commonly made and sold here (in England) since at least the 1700s, and most probably earlier! The Wikipedia link you mentioned even says so.
They are called English Muffins in England, to distinguish them from American Muffins, which are the blueberry/ chocolate chip confections eaten at American breakfasts.
I love both varieties, but English Muffins are Bread, and American Muffins are cake!
Made these this morning! They are amazing! The only thing I did different instead of cornmeal was ground flaxseed meal only because I didn’t have any cornmeal. They certainly aren’t quite round and maybe not quite big enough but they were delicious!
What a great tip! I always have flaxseed on hand but I never have cornmeal. I’ve never thought to use anything else. Thank you for sharing.
4 stars only because my dough is currently in the fridge and first time making these. I used almond milk and half active starter and half discard. After mixing I could not knead the dough into anything resembling a ball. After fermenting for 10 hours it was more than double in size. I could not get a dough ball with the stretch and folds either. Am hoping the dough will dry out a bit in the fridge. Is it possible the almond milk could not replace dairy milk? Maybe I should have added more flour when kneading dough to get a ball. Just hoping now they turn out as they look delicious. Suggestions?
These are so very easy, so very delicious, and don't require me to heat up the house with the oven. English muffins aren't just for breakfast anymore! We use them at any meal. Thank you!
Can you use non dairy milk when making these?
You can. Any non-dairy milk should work. 🙂
If I’m low on bread flour, it’s it ok to sub some regular all purpose with it as well?
You can. Depending on how much AP flour you use, you may need to reduce the milk a bit.
I am allergic to dairy and am wondering if it would work to use soy or oat milk in these?
Absolutely you can do that. 🙂
I was able to make these the same day as starting. I didnt see that cold ferment was mandatory. Is that true or did I miss a step? Pretty sticky and stuck to parchment paper. I guess I didn't use enough cornmeal? I can't wait to eat them. Any feedback is appreciated. Thanks for all your recipes!
These turned out great!!!
Will these work with plant based milk?
They will 🙂
We now make English muffins regularly instead of making bread. These are so very simple, I make a half batch since there's only two of us, and they really don't take that much time. Family members are thrilled when I share!
Love Love Love!! I’ve made this with both bread and AP flour and it always works fine. I also usually forget to buy cornmeal and the results are still great. This recipe is fantastic!! The only change is instead of a cutter, I use a pizza cutter and do strips both ways to get 3x3” squares. It’s faster and I don’t have to re-roll any dough to use the circle cutter. I’m a busy mom and squares taste the same. lol.
I am in the process of trying your recipe as my last couple times I used another and that was successful. I am wondering if you have tried any inclusions in English Muffins like blueberries or cranberries?
Can I use plant based milk in this I stead of dairy?
Definitely 🙂
I've made these several times. They keep perfectly in the freezer to defrost as needed! Today I had run out of polenta/cornmeal, so used rice flour. They came out perfectly!
Made these today and they turned out great! Instructions are spot on and easy to follow. Had to refrigerate due to warm and humid conditions, just watched the dough when it doubled I covered it and put it in the fridge to cook this morning.wanted muffins to be on the larger size so used a wide mouth canning jar ring to cut them out. I have a glass top stove that burners get hot so cooked at low low med heat and watched so they wouldn’t burn. They came out
Perfect! This was the first recipe I used with my 2week old starter and am very pleased. Than you for sharing your recipe that isn’t over complicated like many others, I have been baking and cooking for 40+years from scratch but new to sourdough and find that many recipes and techniques for or sourdough seem more technical than necessary it’s bread and bread is subject to environmental conditions so amounts can vary for flour and liquid, getting familiar with how doughs act helps. Would post picture but it won’t let me.
Hey Kate
Just wondering if plant milk would work? Specifically almond milk?
Looking forward to trying this recipe!
Absolutely!