
This post contains affiliate links. Please see our disclosure policy.

Sourdough oven spring is one of the holy grails of good sourdough baking along with that elusive open crumb. No one likes flat sourdough bread, right? One of the most asked questions in my sourdough community is “Why does my bread not rise in the oven”? So let’s talk about how to improve sourdough oven spring.
DEFINITION
What Is Sourdough Oven Spring?
Think of oven spring as your dough’s last growth spurt. Once the loaf goes into the hot oven, the trapped gases expand rapidly, causing the dough to rise and puff up before the crust firms and locks everything into place.
You really only have a few minutes for the magic to happen, so you want to give your bread the best chance at fulfilling it’s puffy potential.
Table of Contents
How Do You Achieve Perfect Oven Spring?
Good sourdough oven spring comes from a combination of factors, all of which need to be met to see a beautiful round loaf greet you at the oven door. The best way to ensure your loaves expand when they hit the oven is to start at the very beginning of the process and look at your sourdough starter. From there, you need to go through the whole sourdough process and ensure you tick off all the factors that influence oven spring.

What Does Great Sourdough Oven Spring Look Like?
Chances are, you’ll know sourdough oven spring when you see. We’ve all had a flat, dense loaf, right? So you know what you’re not looking for!
Good sourdough oven spring is characterized by:
- Golden, blistered crust with lovely coloring
- Pronounced sourdough ear
- No bursting
- Fat, round belly
- Uniform, symmetrical shape
- Open, even crumb that’s light and airy
- Feels light once baked and sounds hollow when base is tapped
- Whistles and cracks (sings) when cooling (it’s really the best sound ever!)

10+ Tips For Better Sourdough Oven Spring
Strong Sourdough Starter
Sourdough oven spring will not occur unless your sourdough starter is strong and ready to bake with. Starters develop at different rates, and they certainly can get better with age. A mature, strong sourdough starter will always produce better sourdough (provided it’s fed and nurtured regularly). While the float test is one way to find out if your starter is ready to rise bread, it’s not always accurate.
You need to check for these signs of sourdough starter readiness.
- whether your starter is doubling in size within a few hours of being fed (this is super important when it comes to sourdough oven spring)
- as well as how it looks on the sides of the jar and under the skin when you tip it over.
If your starter is lacking in strength, it’s a good idea to take some time to boost it. Check out all my best tips for strengthening your sourdough starter.

Choose The Right Flour
Choosing the right flour is critical to improving your sourdough oven spring. Wholegrain and whole wheat flours simply will not give you the huge expansion you’re looking for. To achieve maximum oven spring, white bread flour is best. Choose a flour with a high protein content.
If you do want to use a whole wheat or wholegrain flour you should blend it with some bread flour to get as much oven spring as possible. You could also choose to add some Vital Wheat Gluten which will add some of the gluten that wholegrain flour is missing – yet is necessary for that coveted spring! If you are looking for a good whole wheat rye recipe that will still give you some great oven spring, this easy whole wheat rye loaf is perfect.
Understand Autolyse and When To Use It
Understanding the difference between autolyse and fermentolyse. Autolyse refers to the mixing of the flour and water together and allowing the flour to fully hydrate before adding the sourdough starter and salt. Fermentolyse refers to adding the sourdough starter along with the flour and water. I actually add my salt during the fermentolyse too.
The process of autolyse (or fermentolyse) is not always necessary for baking sourdough bread. However, if you are looking for maximum oven spring, it is a step that you should experiment with. To increase your chance of better sourdough oven spring, try performing a longer autolyse or fermentolyse. The process of autolyse can increase your dough elasticity and overall structure. It encourages a strong gluten network (which we will explore below). I don’t find a lot of difference between doing an autolyse and a fermentolyse (with salt) so I go the schedule saving option of performing a fermentolyse.

Building A Strong Gluten Structure
Developing a good gluten structure is one of the foundations underpinning superior oven spring. Gluten is activated when the proteins in flour (gliadin and glutenin) are hydrated. Agitation (stretches and folds) assists the development of the stretchy substance that is gluten. Gluten is super important because it is literally the structure of your bread – it forms little chain like threads which hold all the CO2 bubbles in all the right places.
If your gluten is weak, you’ll have an uneven, dense crumb and the gas and air in your bread will not have anywhere to go, meaning your bread will not rise and be doughy and stodgy. Effective stretch & folds help your dough stay together and help your loaf stand taller in the oven because they fully allow the gluten to develop.
This is a good article about the development of gluten and why it’s important (it’s pretty heavy going though). It is possible to overdo the handling of your sourdough, so don’t go overboard on the stretch and folds. You want to perform just enough to develop the gluten effectively – but you don’t want the chains to start to break down and collapse. Using a stand mixer is also a good option for developing a strong gluten network in sourdough bread.
Window Pane Test To Check For Strong Gluten Development
To understand whether you’ve developed the gluten enough in your dough, you can try performing the window pane test. To perform the window pane test, you need to grab a piece of dough and stretch it between your fingers. Proceed slowly and keep stretching until the dough is super thin and you can see light through it. If the dough holds together and you successfully see light through the paper thin “window” – then you’ve developed the gluten successfully.
However, if the dough breaks, you need to do some more agitation and stretch and folds and further develop the gluten to ensure you get your sourdough oven spring to work. If you are using a lower protein flour, or a whole grain flour, you may want to add some Vital Wheat Gluten to encourage a stronger gluten network.
Understanding Fermentation
One of the biggest reasons home sourdough bakers don’t get the sourdough oven spring they’re after is because they don’t understand fermentation. Under-fermentation can be just as bad as over-fermentation when it comes to achieving good oven spring.
If your dough has over-fermented then it won’t have any energy left to bloom and rise in the oven. You’ll end up with a flat, sour loaf that looks more like a pancake. On the flip side though, under-fermented sourdough can actually give you a big oven spring, but when you pick it up, the loaf will be heavy and when you cut it, it will be dense and gummy.
Lack of sourdough oven spring is generally because of poor fermentation in the bulk ferment stage – you only want your dough to double, any more and you will risk losing your oven spring. But if it’s not fully fermented, it will give you false oven spring.
Some of the early signs that your dough has over-fermented are:
- your dough has become very runny or soupy;
- it’s over double the size you started with.
The poke test is not a good indicator at the bulk fermentation stage, it’s better to perform this after the loaf has been shaped and proofed.
Tighten That Surface Tension – Practice Shaping!
Something that is often overlooked in the quest to getting exceptional oven spring for your sourdough is good shaping technique. When you shape your dough, you must ensure you create lots of surface tension. This organizes the gluten network and ensures that it holds the gas inside your dough, allowing it to expand further once it hits the oven.
Good surface tension ensures a more even growth and therefore improves sourdough oven spring, giving you that even, symmetrical shape when baked. You want your dough to be tightly shaped when it hits the fridge for the cold ferment stage of your sourdough bake so that the outer skin of the dough is holding all of the ever so important gases inside. These gases form the beautiful bubbles sourdough is renowned for.
Choose Your Shaping Container Wisely
It may seem inconsequential, but the proofing basket or shaping container you choose will affect the oven spring of your bread. A banneton is best for proofing your sourdough, but if you don’t have one, you can use a something else around your kitchen. I’ve put together a list of banneton alternatives. You need to make sure that your banneton or other shaping container is the right size for your dough. If it’s too big, your dough will spread out during proofing and this will result in reduced oven spring. I’ve put together a banneton size guide here to help you choose the perfect size to support your dough during proofing.
Perfectly Proofed
Now we’ve already spoken fermentation, which occurs during the bulk ferment. But what about over proofing? Yes – they are two different things. Proofing is the rest period that occurs after shaping. This allows the dough to rest. While the yeast are asleep (or at least slowed down) the bacteria continue to ferment the dough.
If you cold proof your dough, there is a chance it can over proof if your fridge is too warm. It’s always a good idea to check that your fridge is 4ºC (39.2º) or cooler.
If your dough is over proofed, there will not be enough energy left when it hits the oven. This is result in a flat, dense bread and lack the oven spring you desire.
Score Your Sourdough Strategically
Scoring is an important part of ensuring that you get the oven spring you want when baking sourdough. While your dough is in its cold ferment (proofing) stage in the refrigerator, it will develop a dry skin. This helps to ensure you can cleanly score your sourdough before you place it in the oven. You’ll need to score your dough just deep enough so that it opens up, but not so deep that it causes it to collapse. Around 1/4 to 1/2 inch is perfect.
Less is more when it comes to scoring. One or two slashes is enough and will focus the energy of your bread in one place, improving your oven spring. One simple slash will also improve your chance of getting a better sourdough ear.
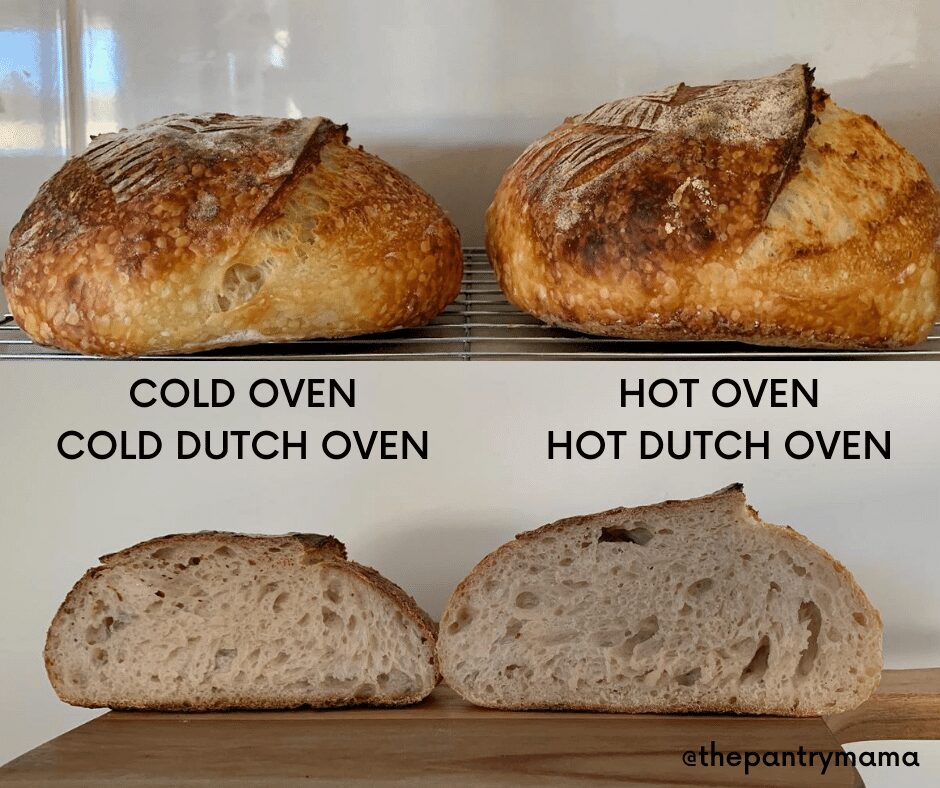
Bake Your Sourdough in a Hot Dutch Oven
There are many different ways of putting your sourdough in the oven, all with their pros and cons. After much trial and error, I believe the best oven spring comes from a preheated oven and hot Dutch Oven. There is something magical that happens when you place cold dough into a hot oven.
The dough in the photo below is from my basic sourdough recipe and split into two at shaping. You can see the sourdough on the right has superior oven spring and a fantastic ear! If you want to really get things going, give your dough a spray with some water mist before you place the lid on your Dutch Oven. This can also help with creating more sourdough blisters.
Frequently Asked Questions
The best way to bake sourdough bread, and to ensure optimal oven spring, is to bake it in a hot Dutch Oven. If you don’t have a Dutch Oven, you can add water to the oven when baking sourdough bread. However, you need to be very careful not to burn yourself. You’ll find my best tips for baking sourdough bread without a Dutch Oven.
Proofing occurs after shaping, so it’s not ideal to reshape it once it’s rested and basically ready to bake because when reshaping you can disturb all of the gases that are trapped inside the gluten network. However, there are ways to cut the dough into new shapes after proofing, like baguettes or crusty bread rolls. I have written about how to reshape your dough after proofing to show you how to divide your dough without losing all that precious oven spring.
While there are many factors that contribute to your sourdough not rising in the oven, the short answer is that the yeast have no energy left for that final push when they hit the oven. You need to go back through your process and pinpoint the issue. You’ll find all the contributing factors to oven spring in the article above – but you will need to look at starter strength, fermentation, shaping and scoring. More often than not, when the dough doesn’t rise at all in the oven it’s due to over fermentation and over proofing, so the yeast have used all of their energy with none left to raise your bread.
Sourdough bread has the potential to feel heavy, however in reality it should be light and airy and sound hollow when you tap the base. If your baked sourdough bread is heavy, chances are you have under-fermented the dough. This means that fermentation was not sufficient to allow the yeast to convert the carbohydrates in the bread into carbon dioxide gas, which gives sourdough its rise. If your bread is dense, gummy and heavy, look at the health of your sourdough starter and the length of your bulk fermentation.
It really depends. If your sourdough is under baked due to under fermentation, no amount of cooking time will fix it. No matter how long you cook it, it will still be gummy and dense inside. If your bread is cooked, but a little blonde, you can return it to the oven to deepen the crust. Just be careful to cook it at a lower temperature to prevent it from burning.












This is brilliant, thank you. A very interest and helpful read with some new tips to try and improve the texture of my sourdough.
I overproofed my dough. It was sticky. I shaped it & put it in banneton & put in the refrigerator. Could I have done something different? I hope I get a spring when I put it in the oven.
I am getting too much oven spring and tearing occurs. Any ideas?
This would indicate under fermentation – you can read more about this (and how to fix it) here.
Thank you for your clear and concise information. I regularly check in when I need more information just like on this article. My spring is lacking so I need help, and you’re providing it, what a wonderful thing!
Hi Kate! Thank you for this article. I was hoping you’d address the over-handling at the dough formation stage/dividing in particular, just before the placement into the brotforms.
I feel like the other stages of development have improved for me, but I’m pretty sure the dividing the dough into the individual loaves is where I’m handling it way too much. Any recommendations?
All the best!
PS: Your chocolate sourdough loaf and your orange-cranberry loaves are insanely delicious!
Hi Yvette 🙂 Happy to help, I just want to clarify, when you say dividing the dough into individual loaves, are you doing this at the end of bulk fermentation, or are you referring to dividing say a batard into 2 baguettes after it’s been sitting in a banneton in cold fermentation? Just wanted to clarify so that I can give you the best possible advice. K x
Do you have any advice for those of us who keep starter in the fridge and bake once a week, using a bread pan instead of a Dutch oven? I’m struggling to find good info on that combo.
Absolutely! I do recommend not keeping your starter in the fridge if you can help it, however I understand that sometimes you need to. Even keeping a really small starter on the counter top can be a good way to avoid the fridge. I have a full write up on storing sourdough starter in the fridge, as well as using a loaf pan to bake sourdough. One thing I do stress is that if you’re keeping your starter in the fridge, make sure that it’s fed, rather than just keeping the scrapings, which can make your starter become acidic as it’s starving. I hope this helps 🙂