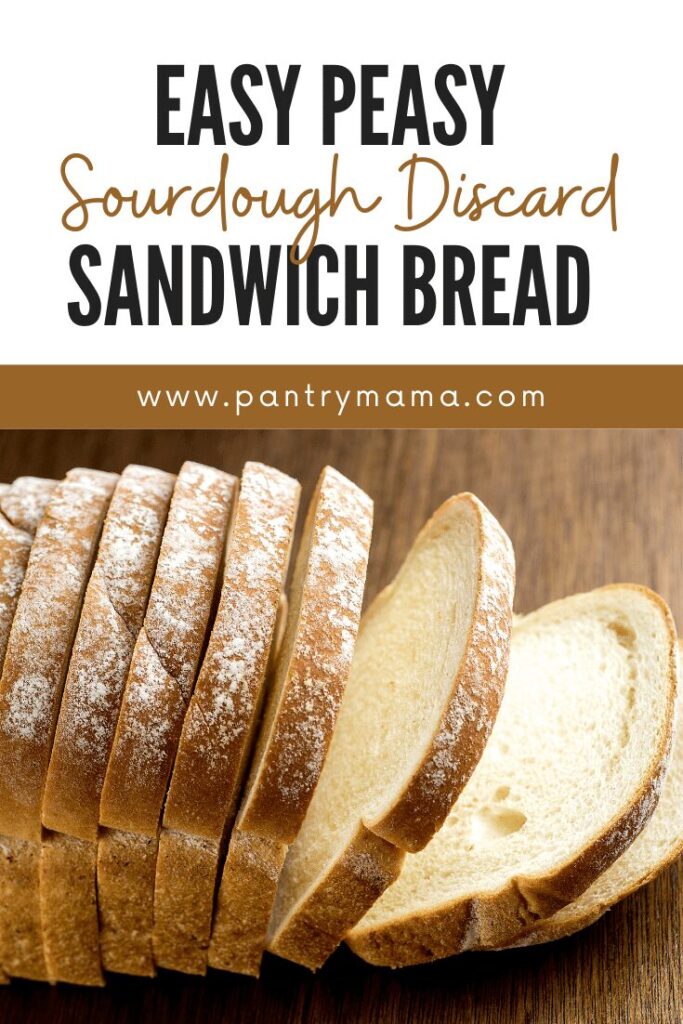
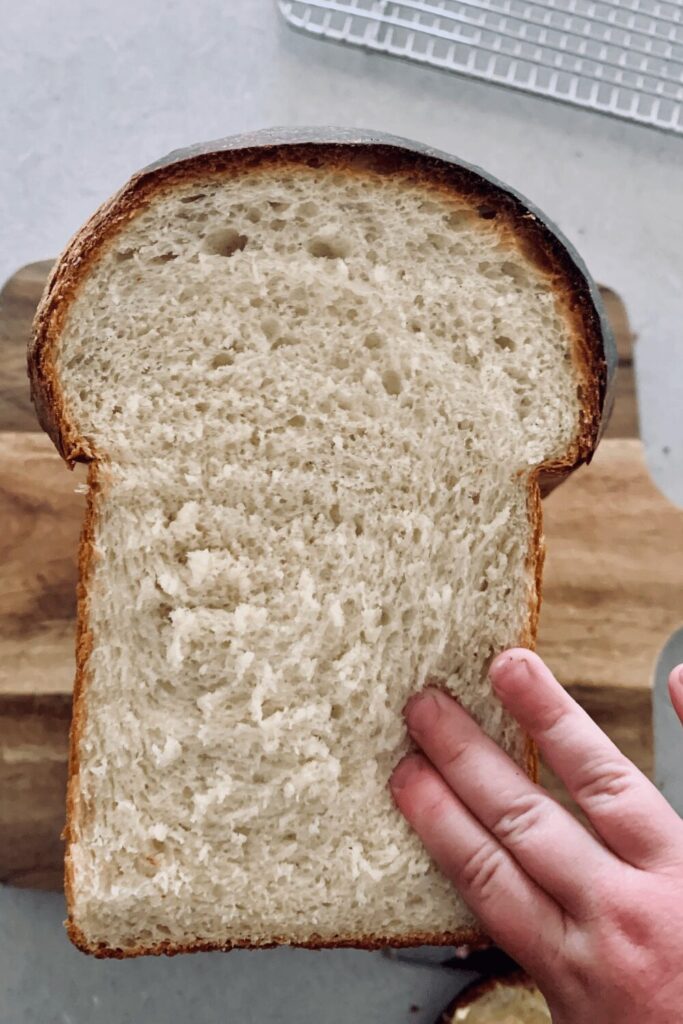
This quick and easy sourdough discard sandwich bread is a great sourdough recipe to have in your repertoire for when you need to use up some discard or you need a loaf of bread in a hurry. You'll get a super soft, light and airy crumb with a soft crust that's easy to eat.
This bread takes around 2 to 3 hours from start to finish, depending on how warm your house is. It utilises 100g of sourdough discard and is perfect with homemade butter!
If you'd like a more artisan style sourdough discard bread, you could try this recipe.
Which Loaf Tin Should You Choose?
Sandwich bread needs to be baked in a tin. You can use an open tin or a tin with a lid or “Pullman Bread Tin“. If you use an open tin, you’ll achieve a rounded top to your sandwich loaf. This is what I prefer to bake in.
You can however also use a Pullman Tin. This has a lid that slides on top and will yield you a square sandwich loaf, more like the bread you would buy in the supermarket.
No matter what type of tin you use, this loaf is best in a tin around 4 x 8 x 4 inches. This is the one I use (I just leave the lid off as I think it is nicer with the rounded top).
Sometimes my sourdough sandwich discard bread comes out looking like a mushroom ... it makes my kids love it even more because they think it's hilarious! Spot the squishy toddler fingers!
Shaping Sandwich Bread
Shaping sandwich bread is so so easy. Of course, like anything, there are a million ways to complicate it, however I like to stick to this simple method – it’s so easy my kids can do it!
Remember that this dough will feel different to traditional sourdough sandwich bread because it has been leavened with instant yeast. It may feel stickier than traditional sourdough, but if it is, you just need to flour your hands a little.
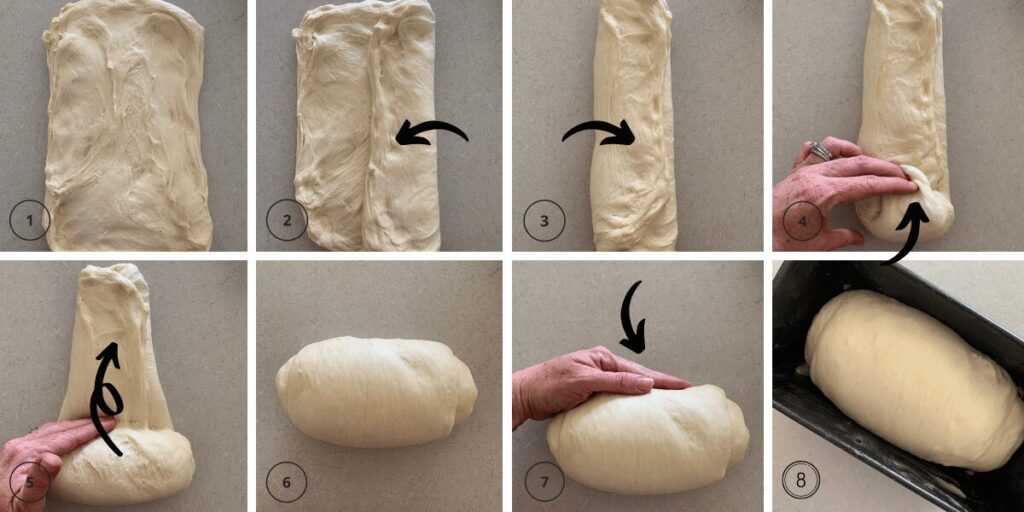
You need to pop your fermented dough out onto the kitchen counter so that the smooth side is underneath and the sticky side is on the top. Gently ease the dough out into a rough rectangle, with the short edge closest to you.
Then roll the dough up into a log and tuck the ends under. Try and create as much tension as you can on the top of the loaf. This will help it to develop a lovely shape and crust when it's baked.
Then simply plop the log into your buttered tin.
Freezing A Sourdough Discard Sandwich Loaf
You can easily double or even triple this recipe (when you look at the recipe below, you can easily click the button and it will automatically calculate the measurements for you). Doubling the recipe means you can use one loaf and freeze the other.
These plastic bread bags are perfect for freezing your sandwich bread in.
This yeasted version of sandwich bread is super handy to have in your recipe collection when you realise you have to pack school lunches ... and there's no bread!!
It also freezes really well - as a whole loaf or even sliced and made into sandwiches.
To store frozen sandwiches, you can place each sandwich in a plastic ziploc bag. This makes them easy to place in lunchboxes in the morning. You could also wrap them in parchment paper and store in an airtight plastic container in the freezer if you don’t want to use ziploc bags.
Slicing Sourdough Discard Sandwich Loaf
Slicing a sandwich loaf can be tricky, especially if you want perfect slices. However, you can purchase a bread slicing guide which makes things much easier. You could even use an electric knife or electric food slicer.
Making Sourdough Discard Sandwich Bread in the Thermomix
I use a Thermomix to make this discard bread, however you could use any stand mixer. I find that using a mixer creates a super soft crumb - and makes this a quick easy recipe to use.
I use the dough function on the Thermomix (any version will work TM31, TM5 or TM6).
As with the traditional sourdough method in your Thermomix, clean up is easy - just add some water to the jug afterwards and run at speed 10 to clean the blades.
For the all the best sourdough recipes to make in your Thermomix, check out this guide.
Sourdough Discard Sandwich Bread Variations & Substitutions
There are lots of ways to jazz up this easy sourdough discard sandwich bread. Here are a few suggestions:
- Honey & Oat Sandwich Loaf - Add 20g of honey and 50g of oats to the mixture when you add the butter, sugar and salt. If you'd like to add oats to the top you should do so when you put the dough into the tin - spray the loaf lightly with water so the oats stick to the top.
- Multigrain Sandwich Loaf - Add 50 to 100g of your favorite seeds to the mixture when you add the butter, sugar and salt. Seeds like sesame, sunflower, pumpkin and flax work really well.
- Wholemeal Sandwich Loaf - Replace half the Bread Flour with Whole Wheat or Wholemeal Flour for a more hearty country style sandwich loaf. You could top with sesame seeds when you place it into the tin.
- Make this loaf into sourdough discard rolls by following these instructions.
Equipment for Making Sourdough Discard Sandwich Bread
Sandwich Loaf Tins – you’ll need a selection of sandwich loaf tins to bake your bread. Having 2 or even 4 is a great idea if you want to bake several loaves at once (and this bread freezes really well).
Plastic Bread Bags – these are a great way to store and freeze your bread and fantastic if you’re making multiple loaves at once.
Bread Slicing Guide – these are super handy if you’re wanting perfectly sliced sandwich bread.
Further Reading
If you love this recipe, you might enjoy these:
- Want to make this sourdough discard loaf in a bread machine? You'll find a how-to-guide here.
- Prefer baking with whole wheat flour? You'll find a whole wheat version of this recipe here.
- These super fast sourdough discard hamburger buns are delicious - soft, buttery and everything a burger bun should be!
- Want to make a sourdough version of pane di casa? This sourdough pane di casa is perfect (it uses discard too!).
Sourdough Discard Sandwich Loaf Recipe
Equipment
- Stand Mixer
- Digital Scales
- Bread Tin
Ingredients
- 100 g Sourdough Discard unfed sourdough starter
- 250 g Water
- 500 g Bread Flour or All Purpose Flour
- 10 g Salt
- 20 g Sugar
- 60 g Butter room temperature
- 7 g Instant Yeast
Instructions
- Combine the sourdough discard, water and flour into the bowl of your stand mixer or Thermomix and mix until it forms a shaggy dough (around 30 seconds will do it). Leave the dough to rest for 30 minutes.
- Now add the salt, sugar, butter and yeast to the bowl and knead the dough for around 3 to 6 minutes. You want the dough to be elastic, silky and slapping the sides of the bowl. Just keep the mixer going until you achieve this. If you are using a stand mixer you'll need to use your dough hook attachment for this step.
- Now you need to let your dough rise. You are using instant yeast as the leavening agent in this recipe, rather than sourdough/wild yeast, so it will rise very quickly, particularly if your home is warm. Leave it for around an hour (it will take longer if your house is cooler). You want it to double.
- While you're waiting for the dough to double, lightly butter a sandwich loaf or pullman pan so it's ready to go when the dough is shaped.
- Once the dough has doubled, tip it out onto the counter top with the smooth side underneath and the sticky side on the top. Gently ease the dough out into a rectangle. It should be quite easy to do this as the dough is very elastic.
- Now you want to shape your dough into a sandwich loaf. This is fairly easy. Make sure that the short side of the rectangle is in front of you. Fold each side of the dough into the middle, then roll the dough into a tight log with the seam underneath. Tighten the top of the dough by putting your hands at the base and pulling the dough towards you, without lifting if off the countertop.
- Once the dough is shaped, gently place it into the buttered loaf tin. Leave the dough to rise until it's just above the rim of the tin. This will take around an hour, depending on the temperature of your home.
- Once the dough has risen, you'll need to bake your loaf. Turn your oven on and set the temperature to around 180C/350F. Let it warm for around 10 minutes. Spray the top of your dough with some water mist and place into the oven. Make sure that there's plenty of room for it to grow in the oven as it will generally keep rising.
- Bake your bread at 180C/350F for around 40 to 45 minutes or until the loaf is golden brown.
- Remove from the loaf tin and allow to cool on a wire rack.
I am deciding if I want to learn to do sourdough, so I am reading up on lots of recipes an ideas. This bread looks really good, but I am old and don't understand grams and don't want to invest in a scale.
Is there any way you could print your recipes using standard measuring spoons and cups? I don't want to be a bother, but maybe there are a few others like me who cook a little more old fashioned!! Thank you for your help.
Unfortunately measuring spoons and cups are not accurate nor universal. You can read about why I don't use cups or spoons for measurements here:
https://www.pantrymama.com/benefits-of-weighing-sourdough-ingredients/
I'm 60.i bought a $20.00 scale at Walmart. I've learned to use grams. If I can do it, anyone can! This is delicious! Thank you!
I agree, I had never used the metric system in cooking. I bought a scale 20$. Best thing I could have bought. Love it! Now I use it for everything. 😊 Also my starter and bread do better.
Have made this bread several times, I love the honey oat version but today I made the original. It must have been my day in the kitchen, it was the best EVER!
I am old too. Believe me, weighing is easier. You can use one bowl. Put the bowl on the scale and zero it (tare). Add 100 grams starter. Tare again and add water. Tare again and add flour etc. It is way more accurate. Digital scales are inexpensive. You can switch from grams to ounces. I am encouraging you to try something new.
I’m 64 this month 😊 and know just a little bit about the metric system. You don’t need to know anything really. I did buy a scale, you can get one for 10$. I absolutely love my scale and use it on all kinds of meal prep. It has lbs, ounces, grams etc. I was like you at first. Grams were a bit intimidating. Now I don’t like it when the recipe is in cups and I have to convert to grams. Weighing your ingredients makes the recipe more accurate. Even my sourdough starter did better when I weighed the flour. Best Wishes and Happy Baking!
I was hesitant just to switch over to different measurements, but I did, and it's so much easier! I use a glass bowl and a scale now instead of having to dig through my drawer for multiple measuring cups and spoons.
How would I make 3 loaves and freeze 2 of them? Would I bake the 3 loaves and freeze 2 loaves of bread or would I make 3 batches and freeze enough to bake 2 loaves later and bake 1 loaf now?
Definitely bake first and then freeze xx
I tried this bread at high-altitude (10,000 feet) and it came out absolutely perfect with ZERO adjustments. Great recipe, saving to my “discard” favorites and will be making your recipe for-ev-errrr. We used it to make grilled cheese to go with a hot bowl of soup and it held up perfectly, toasted perfectly, and made one of the best grilled cheese sandwiches we had ever had. Impressive! Thank you for the solid recipe.
Can I put the dough in the fridge overnight?
I made this today. The loaf was so light with a good tight crumb. My husband was very impressed. Thank you so much for this great recipe. A great way to use discard.
I'm new to sourdough so I'm in the early stages of learning. I've made 4 loaves of this bread this week. My family loves it. I'm super impressed with everything about it. From the light soft texture to the way it still tastes fresh days later. No need to microwave it to soften it up like most homemade breads. Thank you for sharing!
Great use of discarded starter!! Fabulous bread
AHHHHH! I’m eating my first slice from this recipe and it is so good I could cry!!! I’m a beginner baker and all I’ve had are semi-successes/failures despite trying my hardest to learn the necessary techniques. FINALLY I have made a beautiful loaf of bread... TWO even! I doubled the recipe to use up my abondance of discard. My discard is 100% whole wheat einkorn. The dough was STICKY and so hard to work with, but I persevered with hand kneading for at least 20mins and it got nice and smooth and tacky. After shaping I let the loaves rise in the fridge overnight. Results are beautifully sweet and sour sandwich bread. THANK YOU!
That's so awesome! Enjoy your delicious bread xo
We absolutely LOVE this recipe. I’ve added it to my cookbook. Is there anyway to make this bread without the sourdough discard?
I am sooo happy I tried your recipe. My bread turned out delicious! It was so easy to follow your directions. I'm just learning to bake bread. I am so proud of this sandwich loaf. Thank you!
Georgia
Loved this recipe. Every loaf has come out perfectly. It’s definitely my go to recipe. However, my bread is cooked around 35 minutes. If I leave it in any longer then the top starts to really burn.
I’m baking the loaf at 180C in a normal oven. Just curious, why my bread is cooking faster than the suggested time in the recipe?
So glad you're enjoying the recipe. Every oven is different so just do what works for you 🙂
Did you use just the discard. Or both discard and regular yeast
so you need discard plus the yeast because the discard has no leavening power 🙂
I used only discard and it works perfectly when you leave growing overnight. Love this recipe!
Hi! Wondering how I modify this recipe if I only have dry active yeast?
You don't need to modify - active dry and instant are pretty similar. In fact I have made this with dry active yeast and it works just the same 🙂
I am a little confused on using discard and regular yeast. Do I use both
So discard is just unfed starter. This particular recipe is using unfed starter (discard) which you can accumulate a lot of while you're establishing a new starter. So use the bit you discard from your starter before you feed it for this recipe 🙂 This glossary might help explain a big further 🙂
Oh my goodness just cut a slice. It is my new sour dough bread. I let it rise to much still turned out perfect. Everyone wants the recipe now. Thank you so much. Have a blessed day.
if you use dry yeast do you need to activate in water first ?
If you use instant yeast, you don't need to activate it.
Thank you for the recipe. It is wonderfully delicious! I would much rather eat this bread rather than store bought bread.
Question: Can I freeze the unbaked dough after it has risen once and I’ve shaped it? Then when I’m ready to bake my loaf in the future, can I place the shaped frozen loaf in a buttered pan, let it rise for the second time, then bake? An unbaked loaf is much smaller and easier to store in the freezer than a baked loaf. Thanks 😊
So glad you love the recipe! I'm honestly not sure - I haven't frozen in this way before. I prefer to bake and slice and then freeze so I can grab out slices as needed. Would be worth a try to see how it turns out 🙂
Hi! Can you use a glass bread dish instead of a tin?
Yes glass is fine.
What was the size of the loaf tin you used for this recipe?
The dimensions are listed towards the top of the page 🙂
Thank you! This was my first time ever baking bread with sourdough starter (that I made myself). Turned out great. Hand kneaded 💪
I absolutely love this recipe. I made it with the Oat Variation. Did not add the extra sugar only the honey. Turned out fine. Running low on butter so did half butter and half olive oil. Since the weather got cold my start didn't have much ump so I thought I would give this a try. Prefect loaf.
Fantastic! It's such a versatile recipe isn't it xo
This is amazing bread and makes good use of my Pandemic 2020 sourdough!
Just made this bread and worried that I didn’t proof long enough. Tossed them in anyways. 35 mins later they came out looking gorgeous, but I was terrified they would be dense. NOPE. Incredible! Soft, moist, great flavor (I also doubled it). Tomorrow going to make it with oats!
Hi! I've been looking for a sourdough sandwich recipe. My question is: What would your suggestion be for those of us that do not have a stand mixer or Theromix? I realize I'd be using "hands on" but wonder if you would please offer details for "hands on"? Thank you! Also, wondering if an answer will come to me email? Can't really keep this page open on my computer. Thanks again!
If you're looking for a traditional sourdough recipe, you might like this one -https://www.pantrymama.com/sourdough-sandwich-bread-super-simple-sandwich-bread-with-a-soft-crust/ as it has no yeast.
This sourdough discard sandwich loaf can certainly be kneaded by hand. I choose to do it in the mixer as it saves me time. You just need to knead it all together until the dough is silky. It's a beautiful elastic dough, it will be smooth and not sticky at all. You won't even need flour to shape it.
Good luck and I look forward to hearing how it turns out 🙂
Do you have the nutritional information for this recipe?? I’ve used it several times and it’s AMAZING but I can’t track accurately track it in my food diary. Thank you!
I'm sorry I don't at this time. It's something I'm working on for all recipes. I would suggest looking up the information for each of the ingredients and then working it out from there 🙂 xo
Made the honey & oat loaf today. Very soft & nice 👍
I just love this recipe but am having a blow-out problem. Not sure if I am shaping too tightly or under proofing? Last week I made loaves small enough to fit in a roasting pan to trap steam and they were perfect. Maybe I just need to try and get more steam in the oven for the larger 4x8 loaves?
Generally blow outs are from under proofing. Let it rise a bit higher before you bake it 🙂
This with the honey oat variation is wonderful!!
Love this bread! But, you did a switch up and made it whole wheat...Can you at least post both recipes? I have it memorized so I am able to remember the original recipe.
Hey Michelle - thank you for pointing this out - it was totally not meant to have been changed! For some reason when creating the whole wheat version it has ammended the original. I've changed it back now so hopefully it won't happen again 🙂 Sorry for any inconvenience - and again, thank you for letting me know 🙂 xo
Hi Kate, I would like to use my thermomix for this recipe. Could you please tell me in Point 1 of your instructions, you say to mix for about 30 seconds - what speed do you use on the thermo? 🙏🙂
Hey Luciana - you certainly can use Thermo. I only use dough mode for all the mixing so I'd use dough mode for 30 seconds. Let me know how it turns out xo
Hi! I just did this and I turned out BEAUTIFUL.
I just wondered how long it will keep fresh? Should I slice and freeze the bits I don’t need or does it keep fresh at room temperature for a few days/ fridge?😬😊
Love this recipe! My kids love it too!!!
I've been looking for a good sandwich loaf recipe when I stumbled on your post. I tried it and it definitely is a keeper. Now, I don't have to throw away my sourdough discards. Thank you for sharing your recipe.
Love this recipe! Make multiple loaves, slice and freeze them so I’m not baking every day. (Also easier to share)
I have a question…after all the proofing, as I make it into the rectangle…could I add cinnamon and maybe raisins or chocolate chips to make a sweet loaf? If yes…same baking instructions?
I made this bread today. I wanted to make four loaves. It was amazing but did it raise!! All four of my loaves look like mushrooms!! So much fun! I added several cups of seeds for extra texture. Best bread ever!
Best sandwich bread recipe ever!!!!!
Question: how do you store it? Wrap? Leave out? I don’t want to lose the moisture! It’s so good!!!
It was a busy day the first time I made this bread, but despite all the distractions (that I blame for misreading the recipe ingredients and starting the initial mixture with double the water!!) The clue was the soupy mixture that, according to the recipe, should have been a shaggy dough. It turned out marvellously when I doubled the other ingredients as well! Two beautiful loaves! Today I intentionally doubled up - thank goodness for my KitchenAid that can handle that much - and there are two more loaves in the oven right now filling the house with the most glorious aroma. Thank you, thank you. I have been baking with sourdough for more than 50 years and this is the best bread of its type I have ever tried and a very welcome way to use up discard.
This is such a simple and tasty recipe. I've made it twice in a week now and the whole family loves it. The bread is fluffy but sturdy, and so delicious.
Can you use olive oil rather than butter to keep non dairy?
yes 🙂
New fave go-to easy bread recipe for my discard... lots of kids to feed and we also feed two jars of sourdough daily... my small humans say this is the best bread ever! Our best recipes get posted on the inside of our kitchen cabinets for easy reference - this got voted in!
I have never seen bread add the yeast in without any liquids - and at the end. I was skeptical but oh boy did i eat crow when that bread came out of the oven. I made two loaves and they were gone lickety split. Wonderful recipe!!
I have tried this recipe several times, my end result s being a brick. I can’t seem to get my dough to be silky and stretchy. I am using gluten free flour. Please help!
This recipe is made for regular bread flour - gluten free flour is very different 🙂
Love this recipe. I want to cut back on it a little and wondered if you have percentages for the ingredients? I’m using a 9x5 tin and I’m at 5600 ft and the bread is about 2-1/2 to 3 inches above the tin.
I made this yesterday. I made the dough in the bread machine and baked it in a pain de mie. I cooled it on a rack. It turned out beautifully.
This has become a regular in our house. My husband says it tastes as good as the bread his Grandma made and for him that is saying a lot! She never used sourdough but this bread has a texture that is soft and squishy and delicious.
I love this recipe and my loaves are beautiful and delicious. I do find they are a bit dense. Any advice would be appreciated
The trick is to make sure the bread is very risen and puffy before you bake it 🙂 If it's dense then it hasn't risen enough before you bake it 🙂
Love this recipe! Thank you! I was wondering if it’s possible to shape it and then refrigerate overnight and bake in the AM? I’ve never tried that with a yeasted bread before.
You definitely can, but I would take it out of the fridge and give it some time to come to room temp before you bake it or you might risk a dense loaf 🙂
Could this recipe be made in a bread machine? I do not have a stand mixer.
you certainly can do it in a bread machine - the instructions for this are here.
Very good sandwich loaf. I mixed all by hand. It gets a bit messy for the first few minutes after adding the butter,s,sug,and yeast but eventually comes together well with flour dusting. Kneaded approximately 7-10 minutes. I was curious. What is the largest amount of discard you would hazard to use? Thanks again.
Beautiful bread with a great crumb!
It’s just a little sweet.
Any way I can decrease the sugar amount?
Just made my first loaf and as always with your recipes, it turned out amazing! The only thing is I always have to add more flour with most of your recipes than called for, or it stays way too sticky. Same goes with the discard sourdough pizza dough. Perhaps my starter is more wet or something, but everytime I end up adding about 1/3-3/4 additional flour to your recipe. Just a heads up to anyone looking. Otherwise the flavor and directions are simply fabulous.
Turned out delicious and beautiful. Taste, crumb. I've bookmarked it. Thank you for posting!
Made this recipe today for my very first sandwhich loaf and it turned out so beautiful! I made a couple of adjustments but mostly because I don’t think the loaf pans I have are for normal size bread loafs. I split them in half, made 2 loaves and only baked for 20 minutes. They turned out absolutely perfect. And you can really taste the sourdough which I LOVE. This will probably be the only recipe I ever use for sandwhich bread. My kids love it too and they are all 7 and under. 🥰
Wonderful recipe! One issue - Why is my loaf bursting after baking?
I love this loaf. Today I’m thinking of dusting with herbs before I roll it up to put in the pan. Can’t see where it’s been mentioned. Have you done this? If I try it will let you know.
That sounds lovely! Let me know how it goes xo
This turned out amazing. Double the recipe and ended up with two small loaves and a small round. The kids and husband said it was the best.
Will definitely be making this weekly.
Just wanted to say thanks for this recipe. We're now making and freezing four loaves a week. Kids and parents love it. PB&J, egg and toast, avocado toast, deli sandwiches. Mmmmm
In general, when using saved discard from the refrigerator, should you let it come to room temp before beginning? Brand new to SD here. 🙂
You don't have to let it come to room temp, just use it straight from the fridge, especially if you're adding yeast x
Made this the other day and it was amazing. I am curious to know if you can use honey instead of the Sugar. And if so how much honey in grams would you use?
So glad you loved it! Yes you can use honey instead of sugar in the sourdough discard sandwich bread recipe. I would use 20g to 40g of honey, depending on how strong flavored your honey is. Let me know how it goes 🙂 TPM xo
I tried this recipe yesterday and it turned out beautifully! I put everything in my bread machine where it mixed and did the 1st proof. Then I shaped it and put it in the pan for the 2nd proof. I will be making this one again! It made delicious toast for my neighbor and I had a stellar grilled cheese for lunch today!
This bread is worth making over and over and over…so tender! Best sandwich bread I’ve ever had! We always have a lot of discard, so we usually make a loaf a week. Go-to, every time!