How To Bake Simple Sourdough Bread: A Beginner's Guide
This post may contain affiliate links.

This beginner's sourdough bread recipe is really easy to follow. I'm going to show you, step by step, how to use your sourdough starter to make a crusty loaf of sourdough bread with a beautiful open crumb. And the best thing is that this sourdough bread recipe is very hands-off! Perfect for making sourdough on a busy schedule.
The full, printable recipe is at the end of this guide, complete with videos and photos to help you along the way. You can also use this table of contents to jump to any point in the post you would like.
What is Sourdough Bread?
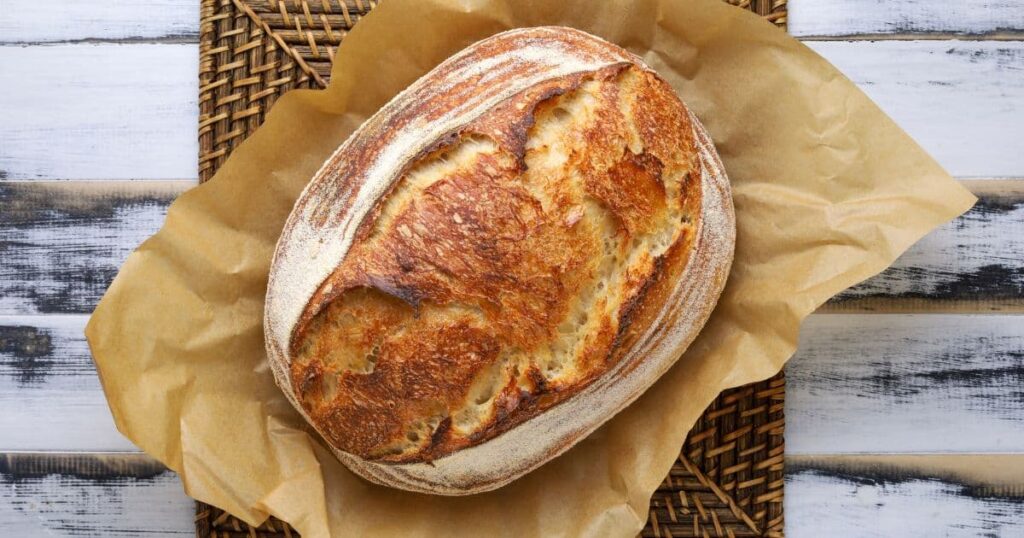
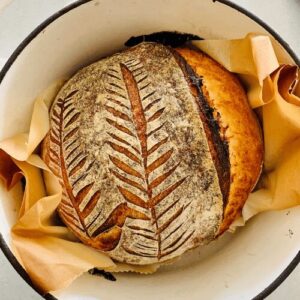
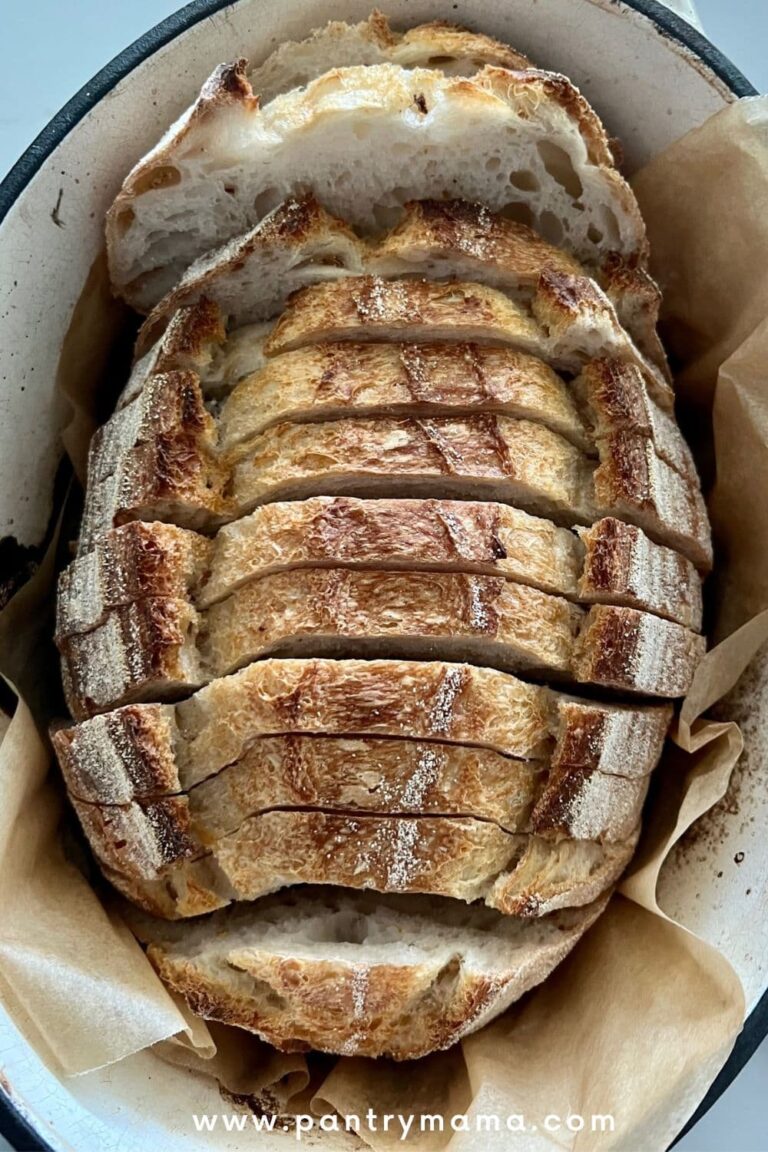
Sourdough bread is made with a wild yeast starter, giving it that signature tangy flavor and long, slow fermentation. The result is a loaf with a soft, airy crumb and a crispy, deep golden brown crust that’s hard to resist. Take a peek at what a true sourdough loaf should look like.
Why You'll Love This Recipe?
Forgiving for beginners – even if you’re new to sourdough, this recipe is approachable and easy to follow, with plenty of instructional photos and videos.
Perfect for Busy Schedules – With three kids and a hectic life, I bake sourdough in the middle of chaos. This recipe is my go-to for creating delicious bread with plenty of hands-off time, making it easy to fit into any schedule.
Consistently delicious results – soft, chewy crumb with that perfect golden crust every time. This recipe has been used by thousands of home bakers in my sourdough community to create consistently great sourdough bread.
⭐️⭐️⭐️⭐️⭐️ "better than the Sourdough bread in San Francisco"
“I made my first loaf of bread using your recipe and it was amazing! My family thought it was better than the Sourdough bread in San Francisco! Thank you for a wonderful recipe!”
- Rose Prince
⭐️⭐️⭐️⭐️⭐️ "One of the prettiest loaves I have made this year"
I am a self-taught sourdough baker and have been enjoying a modicum amount of success with my bakes for the past ten years. One thing I have always struggled with however, is the bulk ferment. I stumbled across this blog when troubleshooting, and proceeded to click just about every link off this page. I have learned SO much, and am very grateful for people like this generous woman who so thoroughly shares their hard won knowledge. So thank you very much for that, and if you’ve made it this far- try this recipe! One of the prettiest loaves I have made this year, and I’m excited to try the longer cold ferment recipe as well. Cheers from Alaska!!
- Mimi from Alaska
What Do You Need?
These are the basics that you'll need on hand to have success with this recipe.
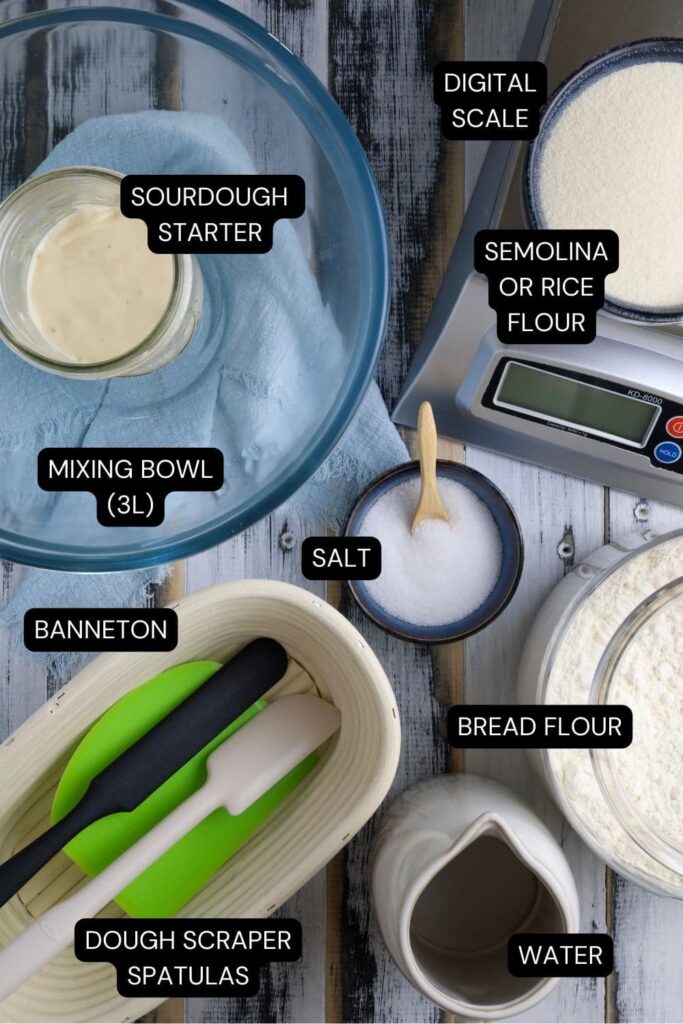
Ingredients
Sourdough Starter - The absolute most important thing when making this sourdough bread recipe is to have a super bubbly, active sourdough starter. New to sourdough? You can follow my step-by-step guide on how to make a sourdough starter. You can check if your sourdough starter is ready to bake with. If your sourdough starter isn't ready to bake this sourdough bread just yet, why not try this crusty sourdough discard loaf or this easy sourdough discard sandwich bread.
Bread Flour - High protein bread flour is essential for making sourdough bread. If you want to use whole wheat flour, I recommend this whole wheat sourdough bread recipe.
Salt - use a good quality, non iodised salt to add flavor to your dough and help to strengthen the gluten of the dough. You might like this post on the role of salt in sourdough bread.
Water - just like when you make sourdough starter, good quality, filtered water is best.
Rice Flour or Semolina Flour - You'll need rice flour or semolina flour to prevent your sourdough from sticking to the banneton.
Digital Scale - This is so important! Weighing your sourdough ingredients will ensure you're measuring accurately and give you a much better chance at sourdough success.
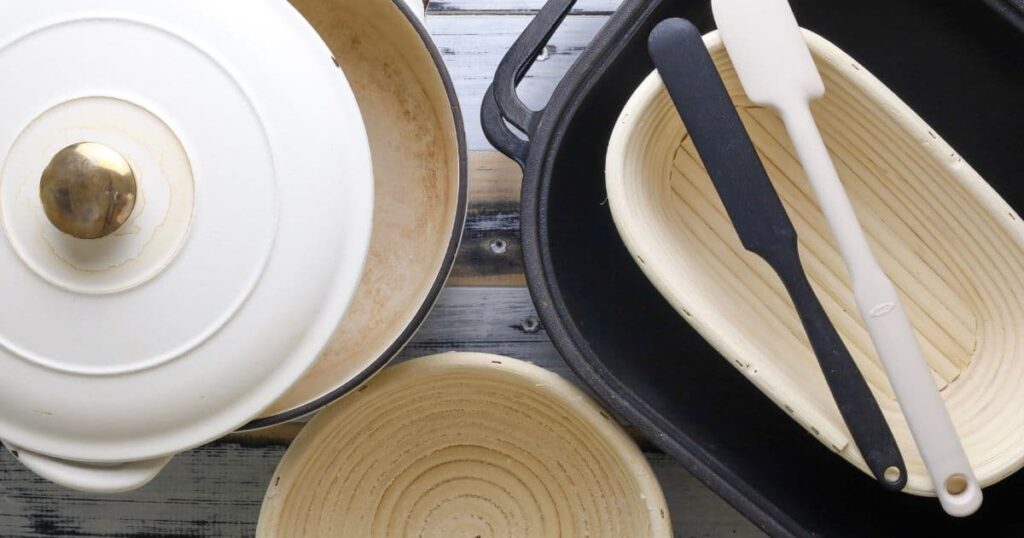
Equipment
Spatulas & Dough Scrapers - A long spatula or jar spatula is handy, not just for your sourdough starter, but also for mixing sourdough bread in the initial pre mix and autolyse stages. A dough scraper is handy to flip your dough out of the mixing bowl.
Banneton - I highly recommend using a banneton (proofing basket) to place your shaped dough into. If you don't have a banneton, a bowl or other banneton alternative is fine. I generally use a 9" or 10" banneton, but you can find the right one for you in this banneton sizing guide.
Parchment Paper - A piece of parchment paper is essential for lifting the shaped dough into your Dutch Oven.
Dutch Oven - A Dutch Oven or Cast Iron Baking Pan will give you the best results when you bake your sourdough loaf. If you don't have a Dutch Oven, you can check out these ideas for baking sourdough without a Dutch Oven.
If you want a more in depth look at the equipment I use in The Pantry Mama kitchen, check out this guide to sourdough baking equipment. You might also like this guide to the best Dutch Oven for sourdough bread.
What I do differently ... and why you should too
There are literally thousands of sourdough recipes out there. Why should you use this one? What do I differently that will make this recipe work for you in your kitchen?
- Amount of sourdough starter - I recommend 50g of sourdough starter when you first start out, but you can easily increase this to 100g if it's cooler. I've written a guide to changing the amount of sourdough starter in a recipe to help you do this when you need to.
- Overnight Bulk Ferment - I love using an overnight ferment, which many people try to avoid, particularly with a beginner's sourdough bread recipe. You can do the bulk ferment during the day, but once you're confident in how your dough looks when it's ready to shape, an overnight bulk ferment is a game changer in helping you fit sourdough into your busy schedule.
- Let the dough double - If you don't allow your dough to fully bulk ferment, you'll be short changing your yourself (and your bread). The dough needs to be puffy, like a giant marshmallow, while still maintaining some of it's energy so that it gives you the best oven spring when it hits the oven. Trust me on this, give your dough time to develop and bloom.
- Semolina Flour - I recommend using semolina flour to flour your banneton or proofing basket rather than rice flour. This is just personal preference, but if you haven't tried semolina, I urge you to give it a go. You might just love it as much as me. Plus, it's the best for stopping your sourdough discard pizza dough from sticking to pizza peels, so it's super handy to have around.
Kate's Recipe Tip
- When you're beginning to bake sourdough, the best way to learn is to watch your dough. There's nothing worse than over proofed dough that fails to provide good oven spring.
How to Make Simple Sourdough Bread
Making this easy sourdough bread recipe is really easy! There's no kneading and a lot of the time will actually be hands off. You're going to read a lot of terminology in this sourdough bread recipe. If you aren't sure of some of the words, you can use this sourdough glossary.
Here's an overview of what you need to do to make delicious sourdough bread in your own kitchen (you can find step-by-step instructions in the recipe card).
1. Mix the ingredients - this is where you'll do a quick autolyse or fermentolyse in this case).
2. Form Up the Dough - turn the clumpy dough with dry bits in it into a more cohesive dough ball by moving the dough around the bowl to start the gluten development.
3. Stretch & Fold - this is a technique used to move the dough around the bowl and develop the gluten network in your dough. It basically means to stretch the dough up and then fold it over itself. You move clockwise around the dough and perform a stretch and fold at 12, 3, 6 and 9 o'clock. You can see me doing this in the video inside the recipe card at the end of this post.
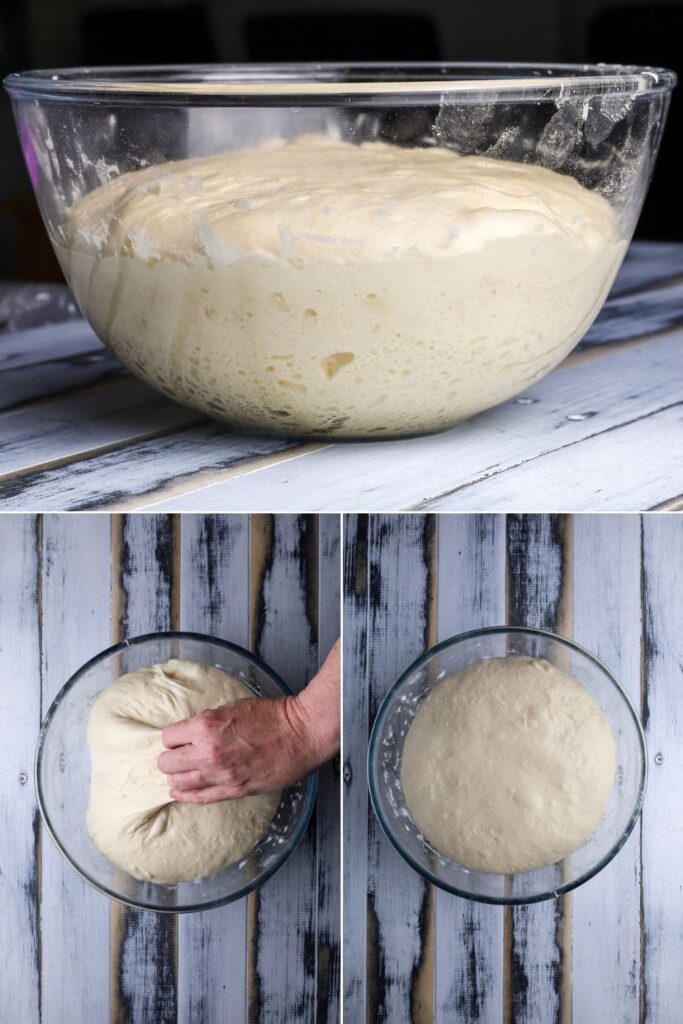
4. Bulk Fermentation - The bulk fermentation in any sourdough recipe refers to the "first rise" or the longest fermentation period. It's always done at room temperature. It's when the magic happens. You're looking for your dough to double. You'll know your dough is perfectly fermented and ready to shape when it has a smooth, domed top. It will be soft and pillowy - but not sticky (just slightly tacky). Use this guide to check whether bulk fermentation has finished.
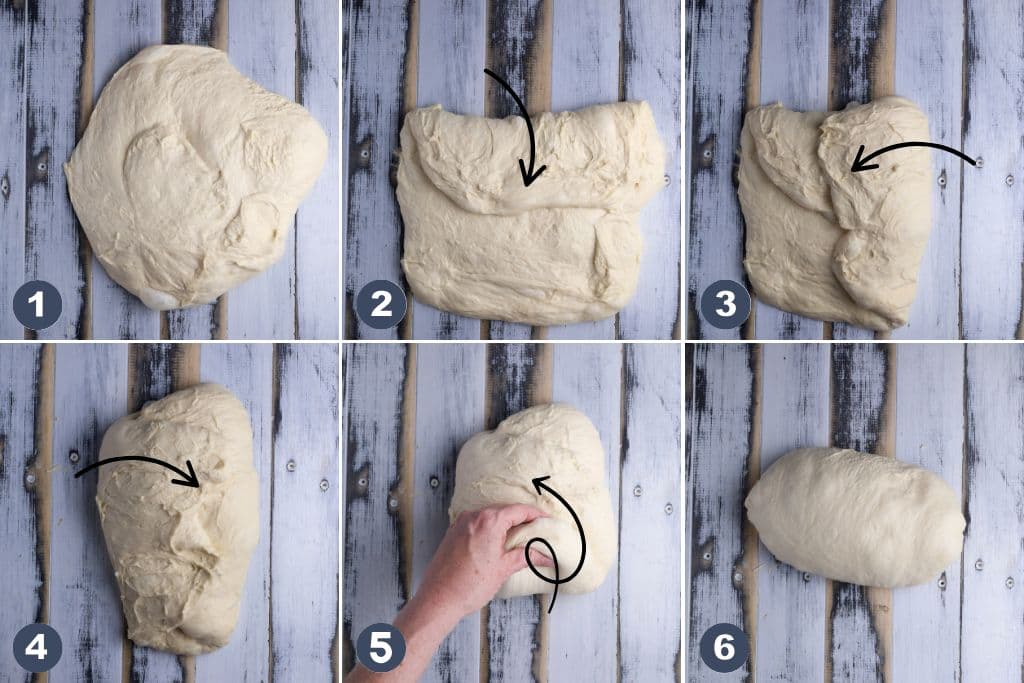
5. Shaping - shape your dough into either a batard or a boule and place it seam-side up into your banneton basket Surface tension is really important here!
6. Cold Fermentation - Often referred to as the cold proof, this is the time when your dough will develop it's signature flavor. You can leave your dough in the refrigerator for up to 36 hours. You might like to read this information on proofing sourdough in the refrigerator.
7. Let's Bake - You'll need to preheat your oven, with your Dutch Oven inside. You need to place your cold fermented dough into the hot Dutch Oven using parchment paper.
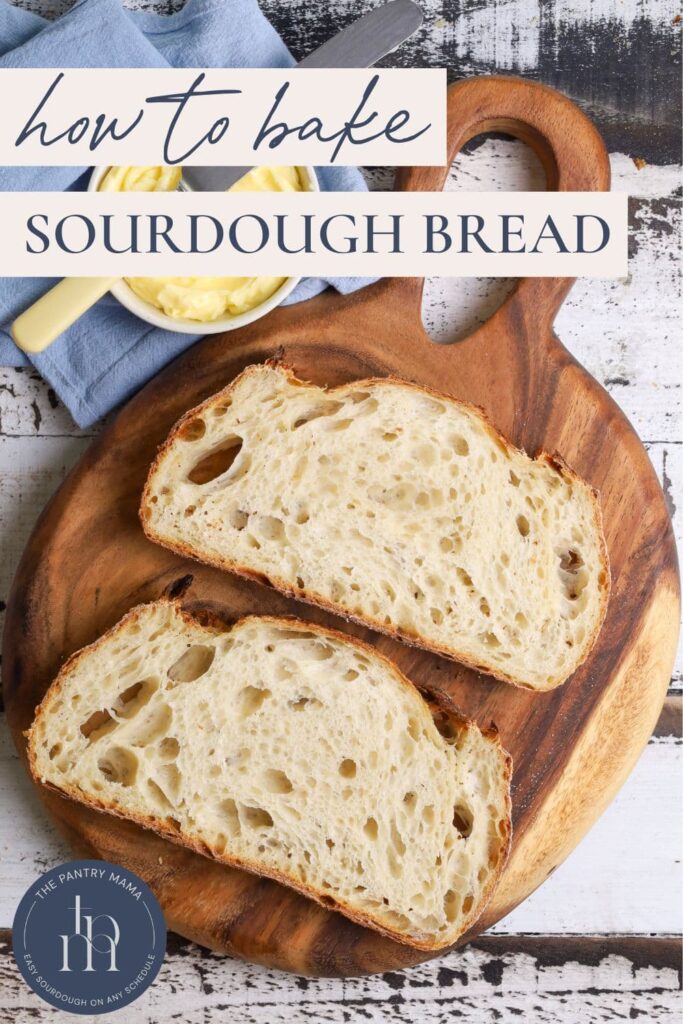
Don't cut your sourdough loaf right out of the oven. Allow it to cool completely before slicing (usually around 4 - 6 hours). Of course you can cut into your loaf sooner, but there are so many benefits to waiting until the loaf has fully cooled. Check out the best bread knife for sourdough bread and my best tips for slicing sourdough bread.
Baking Timeline
One of the other keys to successful sourdough is create a sourdough baking timeline that works for you. Many of my sourdough failures (and indeed any cooking failure) occur because I start and then I get distracted by kids and I'm not able to come back and finish.
Or you have to go out right when you are supposed to be doing stretch and folds (you can see how I deal with this in my Sunday Sourdough baking timeline).
So while my sourdough baking process has a few different stages and some suggested timings, it's not absolutely critical that you follow them to the letter. If your starter is super active and you weigh your ingredients correctly then you will be off to a fantastic start.
Let the rest unfold. Listen to your instincts. Watch the dough, not the clock.
My timeline for this baking simple sourdough bread looks something like this - but it's all negotiable.
| TIME | PROCESS |
|---|---|
| 1pm | Day 1 - Feed my sourdough starter so it's ready to mix the dough later on in the day. |
| 5pm | Premix and Autolyse (while I cook dinner) |
| 6:30pm | Form into a smooth ball, allow the dough to rest for 30 minutes while I clean up dinner and do the dishes. |
| 7pm | Perform 4-6 sets of stretch and folds over the next 2 hours while the kids do their homework and chill out before bedtime. |
| 9pm | Cover the dough and leave on the counter overnight for bulk fermentation (ensuring it's not too warm in the kitchen). |
| 6am | Day 2 - Shape and lift the dough into a banneton. Pop it in the fridge for cold fermentation. (I could bake my sourdough bread from around 2pm today if I wanted to, I just prefer a longer cold ferment). |
| 2pm | Day 3 - Bake my sourdough loaf in a hot oven after a 32 hour cold ferment. |
| 7pm | Finally cut into m delicious loaf of sourdough bread, slathered with cultured butter! |
Troubleshooting Tips
I've baked thousands of loaves of sourdough bread using this very recipe. Everyday, I get asked for advice on what went wrong in other people's bakes. There are generally 5 areas that go wrong when baking sourdough bread:
- A weak starter - this is generally the root cause of "failed" sourdough. Remember, a young starter can still quite weak. If you're not sure whether your starter is mature, read about when sourdough starter is ready to bake with. You can also read my post on how to strengthen a sourdough starter.
- Under Fermentation - under fermentation will give you gummy bread that doesn't seem to bake through. Not sure how to fix under fermented sourdough? My guide to under fermented sourdough will walk you through the process.
- Using too much water - all flour absorbs water differently, but higher protein bread flour is always best. Too much water will cause sticky, unmanageable dough. Read more about how to fix sticky sourdough.
- Over Fermentation - while less common than under fermentation, over fermentation can occur during bulk fermentation, but also during cold fermentation. Read more about bulk fermentation vs cold fermentation.
For even more troubleshooting solutions, you can read these common sourdough bread troubleshooting tips.

One Last Thing ...
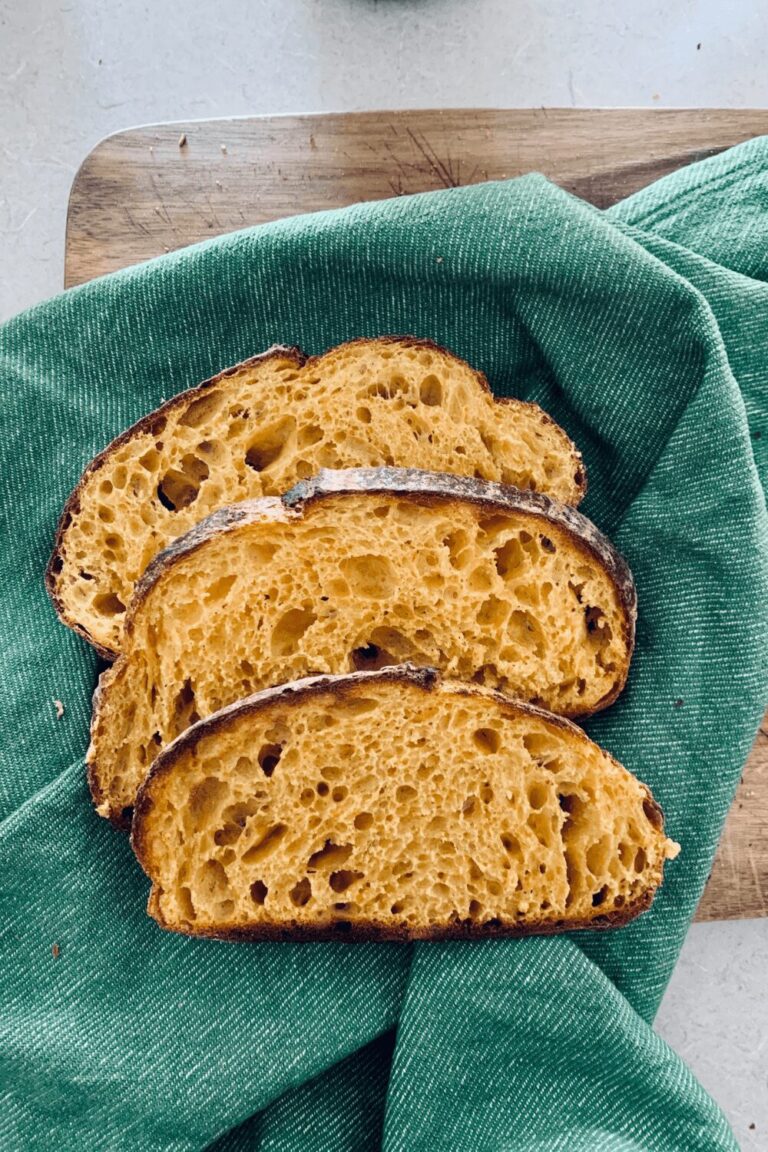
We all see photos of the lacy, holey sourdough bread - they really do look amazing and it is certainly an achievement. But don’t let these photos make you feel unhappy about your loaves. Some questions to ask yourself - is my bread edible? Does it have good flavour?
While there is always room for improvement, the perfect bread is bread you enjoy baking and eating. I don’t like my sourdough with too many holes - I can’t slather butter on it when there’s too many holes 😉
Embrace the imperfection and know that your sourdough is a completely unique result of the different flours, water, wild yeasts and bacteria in your town, home & country.
That's pretty special if you ask me!
What's Next On Your Sourdough Journey?
- Learn how to add inclusions into sourdough bread.
- Try a higher hydration sourdough bread recipe.
- Learn how to bake sourdough in a loaf pan.
- Want a smaller sourdough loaf? Try this small batch sourdough bread recipe.
- Make these sourdough baguettes.
- Learn how to make sourdough at higher altitude.

Simple Sourdough Bread Recipe
Video
Equipment
- Mixing Bowl (use a 3L glass Pyrex bowl)
- Digital Scales (this is essential)
- Banneton (proofing basket)
- Dutch Oven (you can see the Dutch Ovens I use here)
Ingredients
- 500 g Bread Flour
- 350 g Water
- 50 g Sourdough Starter
- 10 g Salt
Instructions
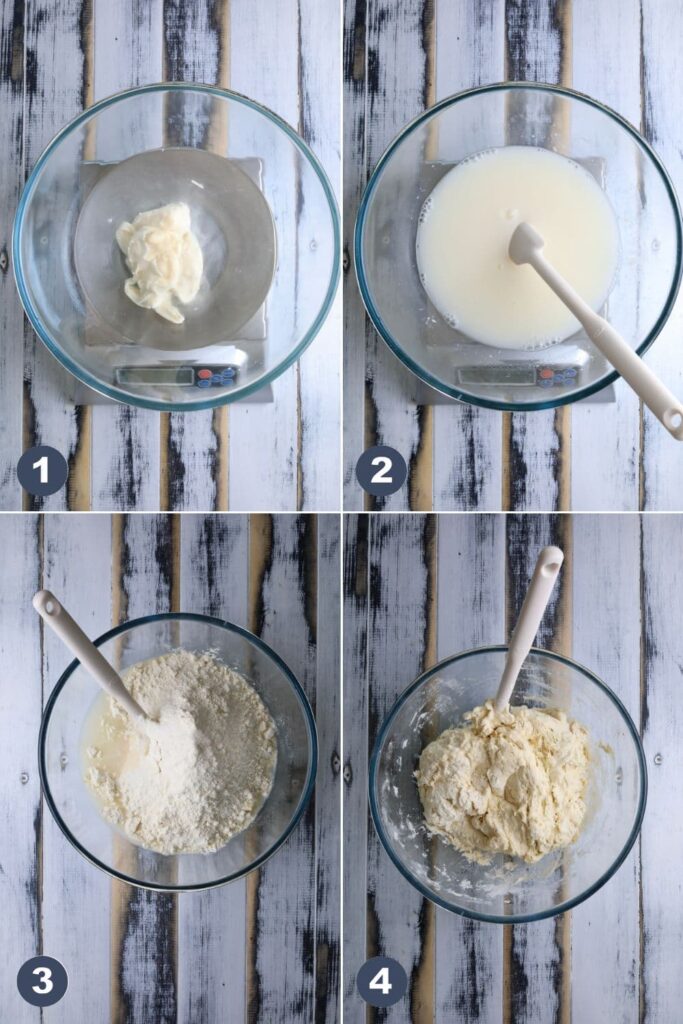
- Autolyse - Premixing The DoughWeigh out your sourdough starter and water into a large ceramic or glass bowl. Mix the water and starter together briefly. Then add your flour and salt and mix whole lot together to form a shaggy dough. You can use a dough scraper or long jar spatula to do this. I don't like using hands at this stage as it's way too messy!The dough will be fairly shaggy and only just brought together. You might wonder how this will turn into bread, but just wait, time is your friend and the dough will change in around an hour.
- Cover your bowl with a plastic bowl cover or damp dish towel and let it sit for around 1 hour. This process is called the "autolyse" and allows your flour to soak in all the water and become hydrated. You can see how the dough has changed in this photo.
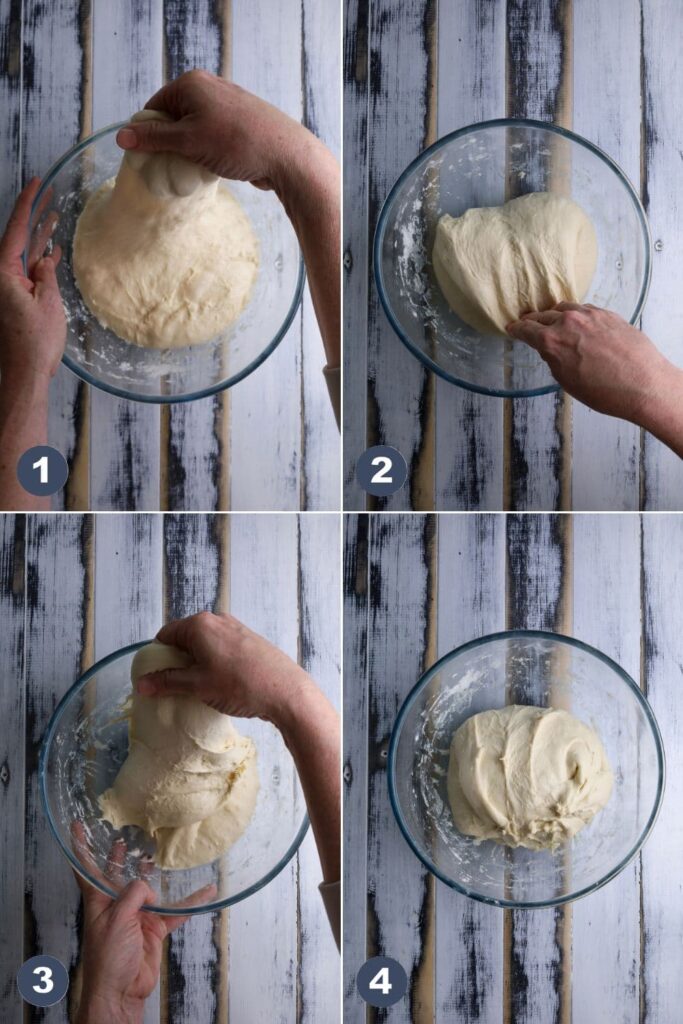
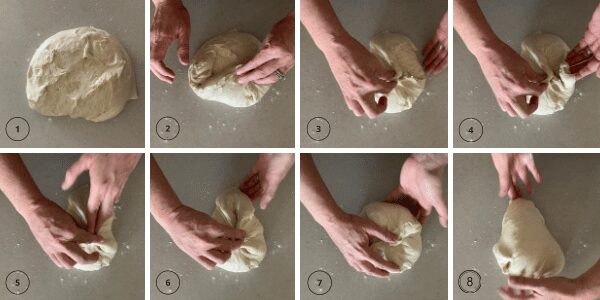
- Forming Up The DoughAfter the dough has been through autolyse you need to bring it together into a ball. Work your way around the bowl, grabbing the dough from the outside, stretching it up and over itself, into the centre, until a smooth ball is formed. You shouldn't need more than about 20-30 stretches to form the ball. You'll notice that the dough is fully hydrated after soaking all the water up. It will be fairly sticky but as you bring it into a ball, it will become smoother and shinier.
- Once the dough has formed into a smoothish ball, pop the plastic bowl cover back on and allow it to rest for around 30 minutes.
- Stretch & Fold - Creating StructureOver the next few hours you need to create some structure for your dough by "stretching and folding". Aim to do around 4-6 sets of stretches and folds. For each set, stretch the dough up and over itself 4 times. Leave around 15 minutes in between each set. Again you do not have to be exact with time, but you need to do at least 4 sets over 2 hours.
- Bulk FermentOnce you've finished your stretch and folds, place the plastic bowl cover or damp tea towel back over your dough and let it rest and ferment (a plastic cover is a better option for this stage).See notes below for more info on this step.
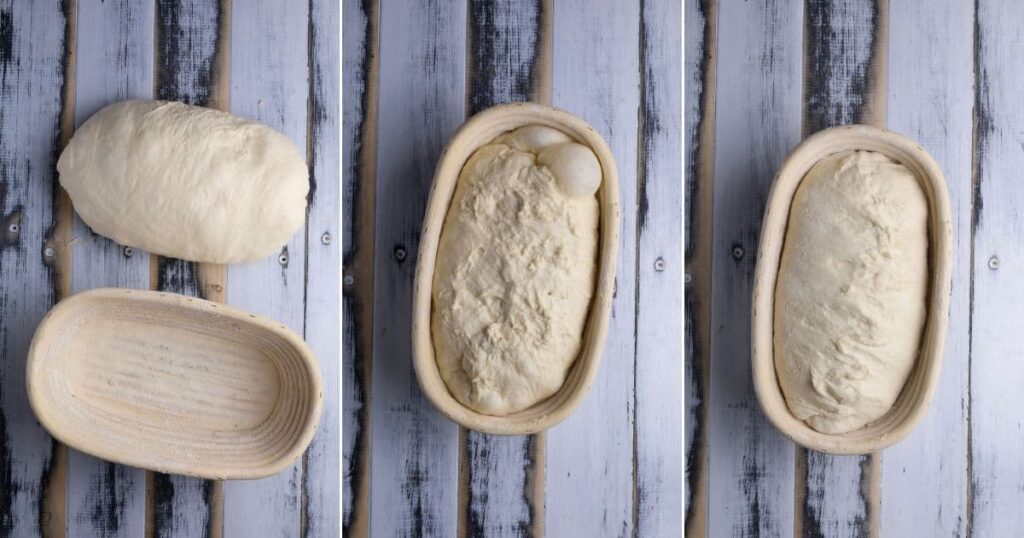
- Shaping The DoughOnce your dough has finished it's first ferment, it's time to shape it into either a boule or a batard. I don't like using flour for shaping, however if you feel you need it, give your counter a really light dusting of rice flour or semolina flour.Use a silicone dough scraper to gently ease the dough out of the bowl. You want it to land upside down on your counter so that the smooth top of the dough is on the countertop and the sticky underside is facing up. This will make it easier to shape and allow you to use the dough to create it's own surface tension.I like to make batards, but you can also create a boule. You can see a video of me shaping the dough at the top of this recipe card.
- Placing Into A BannetonOnce the dough is shaped into a boule or batard with plenty of surface tension, place it into your banneton smooth side down, so your seam is on the top. Stitch the top of the dough together if you need to.Lift your dough around the edges to pop a little more flour if you feel it needs it. Just try to handle the dough as little as possible and be really gentle as you really want to preserve all the gases and air bubbles that have formed during your bulk ferment.
- Cold FermentNow the dough is in its proofing basket, cover it loosely with a plastic bowl cover or damp dish towel and place into the refrigerator.Try to leave it in the fridge for a minimum 5 hours up to a maximum of around 36 hours. The longer you leave it the better your bread will be! A longer cold ferment creates beautiful blisters on your crust and a deeper sourdough flavour.
- Preparing To BakeOnce you're ready to bake your sourdough, you'll need to preheat your oven to 230C/450F. Place your Dutch Oven into the oven when you turn it on so it gets HOT. Try to preheat for around 1 hour to ensure your oven is super hot - but you know your oven so just adjust this time if you need to.Leave your dough in the fridge until the very last minute - placing a cold dough into a hot oven will give you a great oven spring.
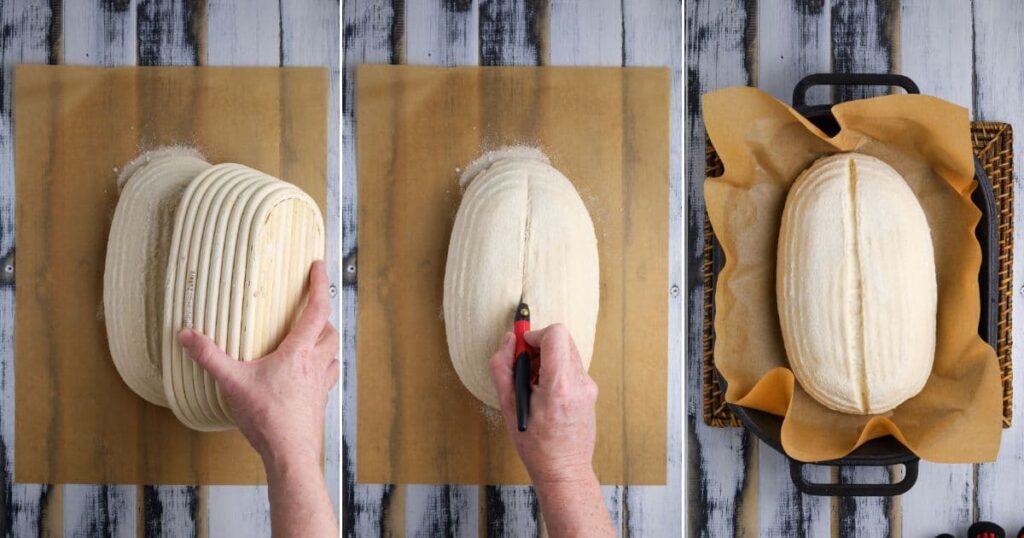
- Let's Bake Your Sourdough BreadWhen your oven is at temperature, take your sourdough out of the fridge. Gently place it onto a piece of parchment paper.Make sure that you make the baking paper big enough to use the edges as a handle to lower to dough into your Dutch Oven.Gently score your bread with a bread lame or clean razor blade. At minimum a large cross is sufficient, but you can get as artistic as you like. Check out this guide to scoring sourdough bread.Carefully take your Dutch oven out of the oven. Place the sourdough into the pot using the parchment paper as a handle. Put the lid on and place into the hot oven. BAKE TIME:30 Minutes with the lid on at 230C/450F plus10-15 Minutes with the lid off at 210C/410F
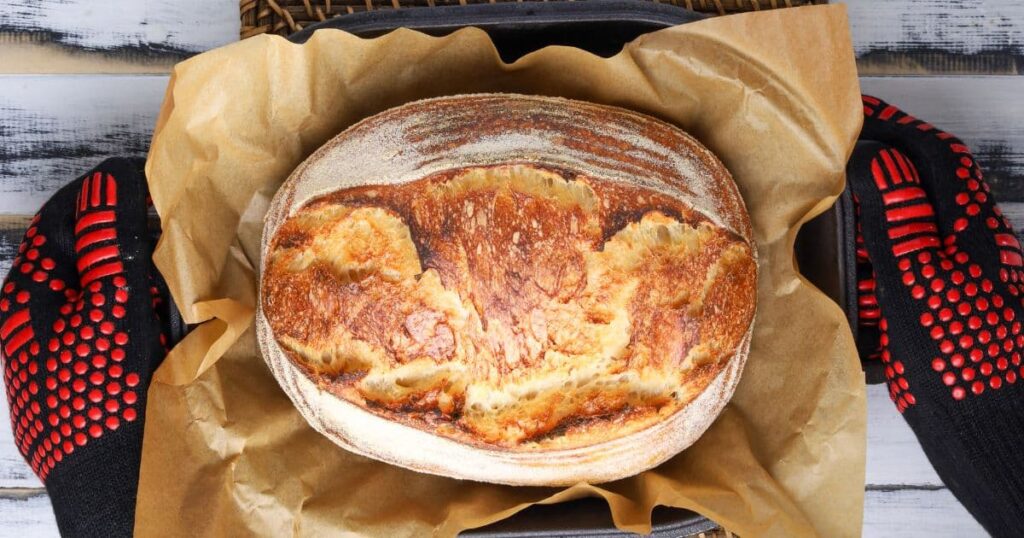
- Finishing The BakeWhen you remove your dough from the oven, carefully remove it from the dutch oven as soon as possible and place on a wire rack to cool.
Notes
- Notes on Flour: This recipe is written using strong Bread Flour. Bread flour has a higher protein content than All Purpose flour. If you choose to use All Purpose flour you may have a different result because of this. You might choose to use this sourdough bread recipe with all purpose flour. You can read more about the differences between All Purpose Flour and Bread Flour.
- Notes on Sourdough Starter: This recipe is based on you having an active starter that you have fed a few hours before starting your bake (check out the best time to use sourdough starter). You might also find these instructions for how to make a sourdough starter helpful.
- Notes on Stretch & Folds: If you are going to do the stretch & folds on your bench top, spray your surface with water mist rather than using flour. You can leave the dough in the bowl if you want to. Wet your hands to stop the dough sticking - although it shouldn't be too sticky. It will get less sticky as you do your stretches and folds. For more information on how to do stretch and folds, go here.
- Notes on Bulk Fermentation: If your home is warm then your dough will ferment a lot faster and could be done in as little as a few hours. If it's colder, it will take longer, possibly overnight.
I would recommend that you try to do your first few bulk ferments during daylight hours so that you can watch your dough closely.
Once you're more familiar with the process - and the temperature of your home - you will be able to do overnight ferments. You will know your dough is ready to move to the next stage when it has *just* doubled in size. It will be fairly wobbly and full of bubbles. You should be able to see large air bubbles under the surface of the dough.
You don't want to let it go any further than doubled as it will be over fermented.
If you want to do an overnight ferment, but your home is warm, consider using a little less starter (ie 25g).
Less starter means your dough will take longer to ferment and you will reduce the risk of over fermenting your dough. You'll find more information on these topics here:
When is my bulk ferment finished? What is the difference between cold ferment and bulk ferment? Why does the amount of starter matter?
- Notes on Baking: If you're worried about the base of your bread burning, place a baking sheet on shelf underneath your Dutch Oven - it works! If you're worried about your bread not being cooked all the way through, turn the oven off and place your dough straight onto the oven rack. Leave the door ajar and let your bread rest there for a few hours. Make sure you don't close the door or your sourdough will sweat and you'll get a wrinkly, soggy crust. Remember not to cut into your loaf too soon - you'll need to let it cool for at least a few hours (4-6 is best).
Nutrition


Hello I have been trying your recipes but not able to get soft crust .It is hard to chew. I read somewhere to brush oil after baking and putting the bread in wet cloth so that steam remains inside.Please share your thoughts. I am in India.we have hot weather bulk fermentation takes less than 5 hours.I do overnight in the fridge and bake next day
Thank you!! I almost gave up hope making sourdough. This recipe/method worked out amazing.
How do you calculate what the nutrients would be for 1 slice of this vs the whole loaf?
Hello. I don’t have any rice flour. Is there an alternative I can use? Would an all purpose gluten free flour work instead?
I purchased your guide and can't say enough about it - having everything in one place is nice! Here's my question: Would it be okay to do all the kneading up front during bulk ferment to get to a good windowpane instead of spacing out the stretch and folds?
Love this recipe. My first loaf turned out amazing. If I wanted to add jalapeños and cheddar cheese, what step would I do this at? After bulk fermentation? Before I put it in the fridge? So lost! Thank you!
So glad you're loving the recipe. You could use this Jalapeno Cheddar sourdough recipe to add your inclusions 🙂
Whenever I make a loaf after autolyse and the 20 or so stretch and folds my dough never really smoothes out and is never terribly elastic. It always feels kind of dense and not very stretchy when doing my first 20 folds. Am I doing something wrong? I follow the recipe and use my food scale.
I misread the baking instructions and thought mistakenly that it was either/or to cook covered or uncovered, and then realized after taking the bread out of the over for a few hours (and the bread was pale) after only cooking covered that I was supposed to NEXT uncover it and cook 10-15 minutes. Can I put it back in the over to finish after it’s been resting a few hours on a cooling rack? Or have I ruined it?
When I put in bowl for the bulk fermentation, do I oil the bowl? Looking forward to implementing this recipe!
I think you should amend your method as there is an inaccuracy. When you autolyze, it's just flour and water. No yeast. The technique to properly autolyze: mix flour and water together, let it sit for sometime (30+min), then add in the yeast (starter) and salt. There is a noticable difference in the texture of the bread. Sometimes I do a proper autolyze, other times I just mix it all together because my starter is ready and I've forgotten to mix the flour and water together in advance. I've mixed my flour and water together the same time I start my starter and that's my preferred way. Best texture ever! Give it a try 🙂
Why is my dough always so sticky after the bulk rise (I notice your video says it should not be sticky). What am I doing wrong?
Are there any alterations that need to be made if I use all purpose flour?
This recipe gave me my best loaf yet. The steps were well explained and easy to follow. I loved the time line - a really good visual for how the process goes and how to fit it into your day. Thanks Kate.
I have two 10” bannetons- can I use the recipe and split it into two? And if so, does it change the baking time?
You can split it in two. The baking time will be the same. 🙂
Hello! Thank you so much for everything you do and share with us!
I have a question about the transition between stretch & folds to bulk fermentation. I did my last stretch and fold, covered, and let it rest. Then ready for bulk time so all I did was take the aliquot portion from it and let it go. Was I supposed to shape/stretch & fold or anything before that longer bulk fermentation time? It was the relaxed version post last stretch & fold. Thanks!!!
This was my first time ever making sourdough and this recipe did not disappoint! I was prepared to fail miserably my first couple times but my first loaf with this recipe turned out absolutely perfect! Followed the directions to a tee and we have the most gorgeous + delicious loaf of sourdough!
I followed this rxipre but reduced the water to 300g as it currently is about 100% humidity. Once I got to th stretch and fold the dough was super dense feeling, but not super tacky, and requires both hands just to stretch it. Is this a hydration issue or maybe a starter that's no super active? My started was fed about 5 hours before mixing. It was between 2-3 times it size. The starter is about 1 month old and the dough is like this every time it comes to stretch and fold.
Can I use a reusable (cloth) bag for the cold ferment over my bowl/banneton instead of a plastic bag?
Is it okay for dough to be sticky while stretching and folding?
I have tried to make sourdough two times; the first one failed and the second one turned alright but this!! My sourdough came out GREAT!!!! The directions were very clear and simple! Thank you so much!
Hi, I tried doing this after I had so much success in pan di casa. I use your stretch & fold esp where you wrap the dough on your hand! Amazing and able to do it but clumsy towards the end. Now my dough is on cold ferment (2) and will bake tomorrow! Exciting 🩷
Just put my first loaf into the fridge and am concerned because my dough was super sticky. It doubled beautiflly during the overnight ferment but I had to use more flour than you to get it shaped for the battard. I've got my fingers crossed!!
Just ate my first slice of bread using this recipe (slathered in butter of course). It was fantastic- I got a great rise, the crumb was open and even, and the crust perfectly crisp, bubbly and a little chewy. I’ve tried sourdough before but found recipes too complicated… so I put my starter in the fridge and forgot about it. After using the guide for reviving it, it was so nice to have a success first go! Perfect as a starting point for getting familiar with the process, and looking forward to getting more confident, intuitive and experimental! Thanks so much for this guidance.
Thank you SO very much for this recipe, all your very well written tips and information and all the other recipes on your site!!! I've made several of your discard recipes and loved every one. This week, despite it being the hottest week of the year so far, I decided to go for the gold and followed this recipe for my first ever 'artisinal' sourdough bread. Followed your instructions to the letter and my very first attempt came out beautifully! I think it is just about everything it is supposed to be, and delicious to boot! I shared with a friend and she gobbled up 3 slices while we were chatting about it. So, from a former 'never baked true sourdough loaf' person to one who has now made a successful loaf, thank you!!!
Anxious to try… Any changes if I use KA whole wheat flour? It’s what I have most of currently.
Thank you.
Any ideas why every time I use bread flour my dough becomes super wet during autolyse? Yet if I use AF it doesnt do that? Im using Bobs Red Mill Artisanal Bread flour. Totally racking my brain why this is happening.
If I want to make 4 loafs at the time do I have to adjust som ingredients?Or do I use the recipe 4 times?
Just made my first loaf today and I couldn't be happier, used this recipe and your how to make a sour dough starter and I couldn't be happier with how they turned out ! thank you!
I’ve tried this recipe two times.
The taste is good but the dough is so wet. It’s impossible to work with.
What can I do to improve?
I feed my starter 1:1:1 ratio.
Hi Anastasiia, There are many different reasons for wet dough. This post on Why is my Sourdough Wet & Sticky goes through a bunch of troubleshooting that should help.
As a beginner sourdough baker I have tried a 60% hydration recipe and a 74% hydration recipe with varying levels of success but this recipe has worked for me every time. Thank you - it’s great to feel confident I will put the effort in and get a great loaf.